Deprecated: Creation of dynamic property WP_Term::$cat_ID is deprecated in /var/www/twodee/blog/wp-includes/category.php on line 378
Deprecated: Creation of dynamic property WP_Term::$category_count is deprecated in /var/www/twodee/blog/wp-includes/category.php on line 379
Deprecated: Creation of dynamic property WP_Term::$category_description is deprecated in /var/www/twodee/blog/wp-includes/category.php on line 380
Deprecated: Creation of dynamic property WP_Term::$cat_name is deprecated in /var/www/twodee/blog/wp-includes/category.php on line 381
Deprecated: Creation of dynamic property WP_Term::$category_nicename is deprecated in /var/www/twodee/blog/wp-includes/category.php on line 382
Deprecated: Creation of dynamic property WP_Term::$category_parent is deprecated in /var/www/twodee/blog/wp-includes/category.php on line 383
Deprecated: Creation of dynamic property WP_Term::$cat_ID is deprecated in /var/www/twodee/blog/wp-includes/category.php on line 378
Deprecated: Creation of dynamic property WP_Term::$category_count is deprecated in /var/www/twodee/blog/wp-includes/category.php on line 379
Deprecated: Creation of dynamic property WP_Term::$category_description is deprecated in /var/www/twodee/blog/wp-includes/category.php on line 380
Deprecated: Creation of dynamic property WP_Term::$cat_name is deprecated in /var/www/twodee/blog/wp-includes/category.php on line 381
Deprecated: Creation of dynamic property WP_Term::$category_nicename is deprecated in /var/www/twodee/blog/wp-includes/category.php on line 382
Deprecated: Creation of dynamic property WP_Term::$category_parent is deprecated in /var/www/twodee/blog/wp-includes/category.php on line 383
Deprecated: Creation of dynamic property WP_Term::$cat_ID is deprecated in /var/www/twodee/blog/wp-includes/category.php on line 378
Deprecated: Creation of dynamic property WP_Term::$category_count is deprecated in /var/www/twodee/blog/wp-includes/category.php on line 379
Deprecated: Creation of dynamic property WP_Term::$category_description is deprecated in /var/www/twodee/blog/wp-includes/category.php on line 380
Deprecated: Creation of dynamic property WP_Term::$cat_name is deprecated in /var/www/twodee/blog/wp-includes/category.php on line 381
Deprecated: Creation of dynamic property WP_Term::$category_nicename is deprecated in /var/www/twodee/blog/wp-includes/category.php on line 382
Deprecated: Creation of dynamic property WP_Term::$category_parent is deprecated in /var/www/twodee/blog/wp-includes/category.php on line 383
With these great services around acting as central servers, I’ve not had to host my own Git project. Then I started tracking student grades in my course reposities. This is not the kind of information I can give to a third-party service like GitHub, so it was time to learn how to host my own project. I’ve jotted my notes down here.
On the central server, we create an empty project directory and initialize it as a bare repository:
mkdir myrepo.git
cd myrepo.git
git init --bare
A bare repository differs from a non-bare repository in that it doesn’t give you a working directory in which to make edits. Its sole purpose is to serve out files, not edit them. It’s my understanding that making the central repository bare eliminates confusion. If changes are pushed from a client up to a non-bare central repository (one with a working directory), the working directory and repository passively get out of sync. You haven’t actively pulled any changes, but they were silently pushed to you.
On the client, if we don’t already have a project directory, we can clone the bare repository:
git clone host:path/to/myrepo
Suppose we already have a project that we initialized as a Git repository:
cd project
git init
In this case, we don’t need to clone anything, but we do need to set the repository’s remote to be our bare repository:
git remote add origin host:path/to/myrepo]]>
Deprecated: Creation of dynamic property WP_Term::$cat_ID is deprecated in /var/www/twodee/blog/wp-includes/category.php on line 378
Deprecated: Creation of dynamic property WP_Term::$category_count is deprecated in /var/www/twodee/blog/wp-includes/category.php on line 379
Deprecated: Creation of dynamic property WP_Term::$category_description is deprecated in /var/www/twodee/blog/wp-includes/category.php on line 380
Deprecated: Creation of dynamic property WP_Term::$cat_name is deprecated in /var/www/twodee/blog/wp-includes/category.php on line 381
Deprecated: Creation of dynamic property WP_Term::$category_nicename is deprecated in /var/www/twodee/blog/wp-includes/category.php on line 382
Deprecated: Creation of dynamic property WP_Term::$category_parent is deprecated in /var/www/twodee/blog/wp-includes/category.php on line 383
Deprecated: Creation of dynamic property WP_Term::$cat_ID is deprecated in /var/www/twodee/blog/wp-includes/category.php on line 378
Deprecated: Creation of dynamic property WP_Term::$category_count is deprecated in /var/www/twodee/blog/wp-includes/category.php on line 379
Deprecated: Creation of dynamic property WP_Term::$category_description is deprecated in /var/www/twodee/blog/wp-includes/category.php on line 380
Deprecated: Creation of dynamic property WP_Term::$cat_name is deprecated in /var/www/twodee/blog/wp-includes/category.php on line 381
Deprecated: Creation of dynamic property WP_Term::$category_nicename is deprecated in /var/www/twodee/blog/wp-includes/category.php on line 382
Deprecated: Creation of dynamic property WP_Term::$category_parent is deprecated in /var/www/twodee/blog/wp-includes/category.php on line 383
Deprecated: Creation of dynamic property WP_Term::$cat_ID is deprecated in /var/www/twodee/blog/wp-includes/category.php on line 378
Deprecated: Creation of dynamic property WP_Term::$category_count is deprecated in /var/www/twodee/blog/wp-includes/category.php on line 379
Deprecated: Creation of dynamic property WP_Term::$category_description is deprecated in /var/www/twodee/blog/wp-includes/category.php on line 380
Deprecated: Creation of dynamic property WP_Term::$cat_name is deprecated in /var/www/twodee/blog/wp-includes/category.php on line 381
Deprecated: Creation of dynamic property WP_Term::$category_nicename is deprecated in /var/www/twodee/blog/wp-includes/category.php on line 382
Deprecated: Creation of dynamic property WP_Term::$category_parent is deprecated in /var/www/twodee/blog/wp-includes/category.php on line 383
Remote Repository on GitHub
We first need a place on GitHub’s servers to store our project. This is the central location to which you will push your changes and pull your teammates’ changes. Follow these steps to create your so-called remote repository:
- Create an account on GitHub. Every individual should do this. The free plan is fine.
- Create a repository by clicking Start a project. Give it a meaningful name. This only needs to be done by one team member.
- Click Settings / Collaborators and add your teammates to the project. This only needs to be done by one team member.
Prepare Unity Project
Now let’s jump to the local machine. You should have already created a Unity project that you want to get under version control. Please follow these steps to prepare that Unity project for hosting on GitHub:
- Binary files and version control don’t go all that well together. Some version control tools compare versions of a file line by line. Binary files are essentially one really long line. Adding one to your repository is like a throwing a Slinky under a lawn mower. As much as possible, we’d like to operate on text. We can make Unity use text for many assets through our project settings. In your project, go to Edit / Project Settings / Editor. Choose Force Text for Asset Serialization.
- Without a special license, Unity by itself doesn’t deal with version control. We’ll have to add, commit, push, and pull with another tool. However, we want to make sure that all the files that Unity creates are visible to this tool. Also under the Editor settings, choose Visible Meta Files for the Version Control Mode.
- Derived files (like our game builds) don’t belong in our repository. They change too frequently, can always be regenerated from the source, and tend to be larger than the source that generated them. However, many of these derived files will appear in our project’s directory. We must tell our version control tool to ignore these files. In the top-level project directory, add a
.gitignorefile with these contents:/[Ll]ibrary/ /[Tt]emp/ /[Oo]bj/ /[Bb]uild/ /[Bb]uilds/ # Autogenerated VS/MD solution and project files *.csproj *.unityproj *.sln *.suo *.tmp *.user *.userprefs *.pidb *.booproj # Unity3D generated meta files *.pidb.meta # Unity3D Generated File On Crash Reports sysinfo.txt
Link Unity Project and Remote Repository
Next you’ll need a Git client. I recommend GitHub Desktop for macOS and Windows. Let’s have it preside over the wedding between our remote repository and our local project. Only one team member completes the following steps:
- Download, install, and open it.
- The tutorial is more than we want right now. Right-click on Tutorial in the left panel and click Remove.
- Click the + button in the top-left corner of the window.
- Select the Add tab and browse to the top-level folder of your Unity project. Click Create and Add Repository.
- You’ll see a bunch of changed files, but hopefully none of the files that were listed in
.gitignore. Type a message like"Prime repository"in the Summary box and click Commit to master. - Committing puts the project on a local repository that is intended to mirror the remote repository, but now the two are out of sync. Visit your repository’s page in the browser and copy the link that has this form:
git@github.com:username/repo.git.usernameandrepo, of course, will be your actual username and repository name. - In GitHub Desktop, visit Repository / Repository Settings and paste in the link and click Save.
- Now sync the two repositories by clicking Publish. Reload your repository’s page in the browser, and you should see your committed files listed.
Afterward, the rest of the team follows these steps:
- Download, install, and open it.
- The tutorial is more than we want right now. Right-click on Tutorial in the left panel and click Remove.
- Click the + button in the top-left corner of the window.
- Selec the Clone tab and choose the team’s repository.
Now, everyone should have a clone or checkout of the remote repository.
Workflow
Henceforth, one should follow this workflow to keep files in sync:
- At the beginning of a work session, click Sync in GitHub Desktop to pull down any changes from your team members.
- Make your edits to the project, but make sure you always leave your code in a state of compiling.
- At the end of your work session, commit your changes.
- Hit Sync.
Steady adherence to this workflow will minimize headache.
]]>Deprecated: Creation of dynamic property WP_Term::$cat_ID is deprecated in /var/www/twodee/blog/wp-includes/category.php on line 378
Deprecated: Creation of dynamic property WP_Term::$category_count is deprecated in /var/www/twodee/blog/wp-includes/category.php on line 379
Deprecated: Creation of dynamic property WP_Term::$category_description is deprecated in /var/www/twodee/blog/wp-includes/category.php on line 380
Deprecated: Creation of dynamic property WP_Term::$cat_name is deprecated in /var/www/twodee/blog/wp-includes/category.php on line 381
Deprecated: Creation of dynamic property WP_Term::$category_nicename is deprecated in /var/www/twodee/blog/wp-includes/category.php on line 382
Deprecated: Creation of dynamic property WP_Term::$category_parent is deprecated in /var/www/twodee/blog/wp-includes/category.php on line 383
Deprecated: Creation of dynamic property WP_Term::$cat_ID is deprecated in /var/www/twodee/blog/wp-includes/category.php on line 378
Deprecated: Creation of dynamic property WP_Term::$category_count is deprecated in /var/www/twodee/blog/wp-includes/category.php on line 379
Deprecated: Creation of dynamic property WP_Term::$category_description is deprecated in /var/www/twodee/blog/wp-includes/category.php on line 380
Deprecated: Creation of dynamic property WP_Term::$cat_name is deprecated in /var/www/twodee/blog/wp-includes/category.php on line 381
Deprecated: Creation of dynamic property WP_Term::$category_nicename is deprecated in /var/www/twodee/blog/wp-includes/category.php on line 382
Deprecated: Creation of dynamic property WP_Term::$category_parent is deprecated in /var/www/twodee/blog/wp-includes/category.php on line 383
One-time Setup
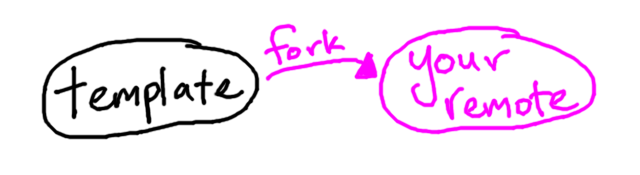
Before the semester even starts, I set up a template repository that contains things like homework specifications and graders. This repository is publicly available on Bitbucket or GitHub, but only I can write to it. Let’s draw it:

At the beginning of the semester, you make your own copy of the template by forking my repository. This fork also lives remotely on Bitbucket or GitHub:
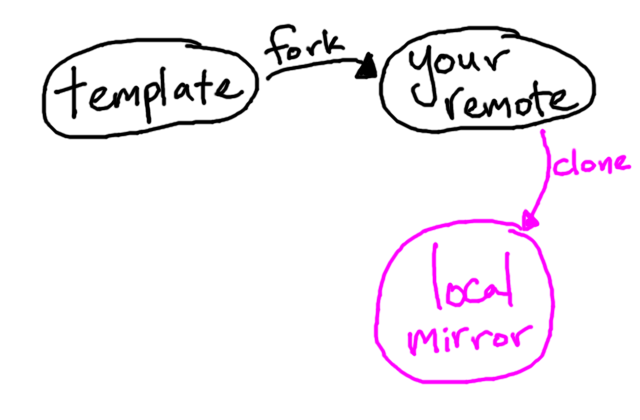
To get your remote repository on your local machine, you clone it:
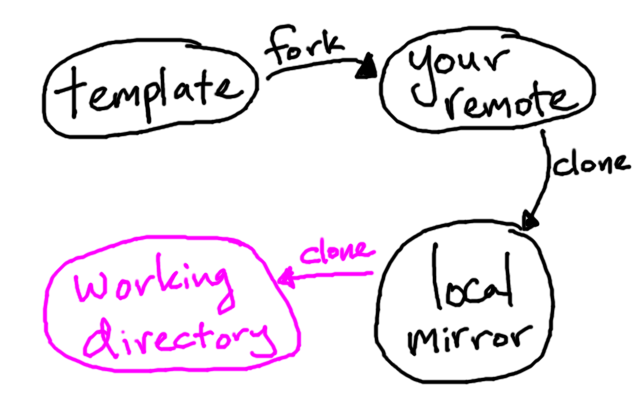
The local mirror is not what you edit—it’s a database containing snapshots of our files throughout history. When you cloned your remote repository, the most recent snapshots were also automatically extracted into a working directory, whose files you can edit:
These steps usually only need to be completed once during the semester. If your repository breaks, the fastest path to recovery may be to fork and clone again, migrating over any files from the working directory with the broken repository.
Pushing Changes
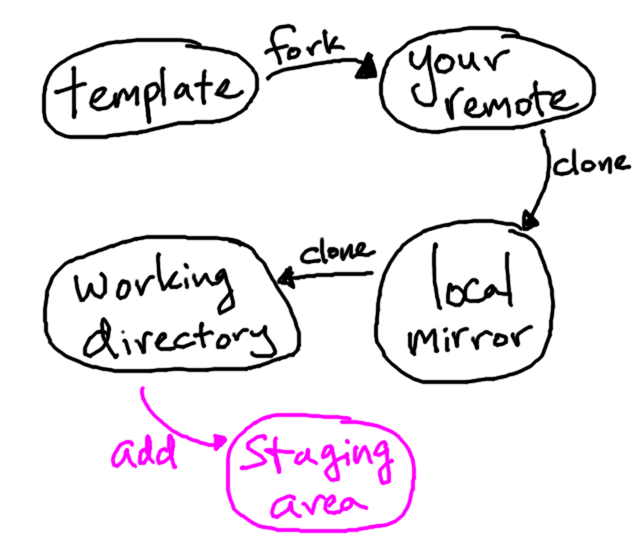
You get the itch to work on a homework assignment. You don’t finish it all, but you make some progress. You still have two weeks left to finish the rest, but you want to make sure your progress is vouchsafed with your remote repository. Sadly, any changes you made (including edits to existing files, new files, and file deletions) only exist in the working directory. To inform Git of these changes, you first wrangle them into the staging area or index:
After you’ve staged a related set of changes, you ship them off to the local mirror through a commit. Each commit should be explained with a short message explaining what changes you made:
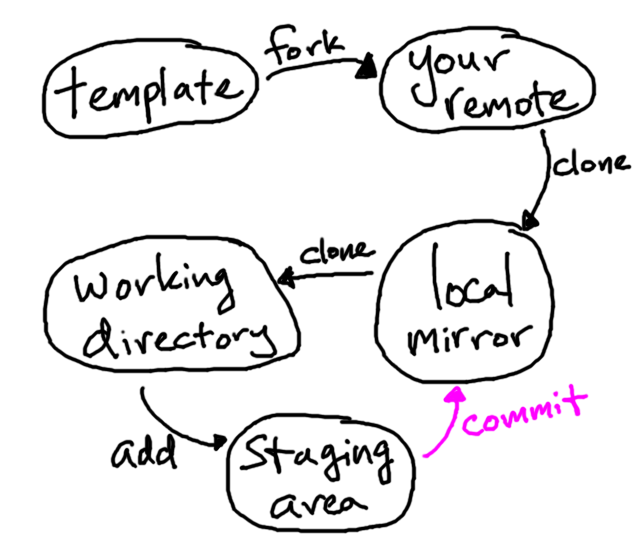
Your commit has made it to the local mirror. If your machine falls into the river, so does your local mirror. To get your commits up to your remote repository, you must push them:
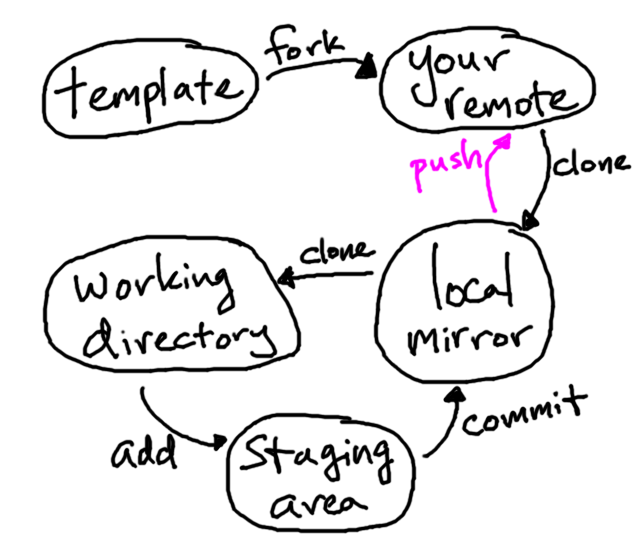
At this point, your files are safe on the remote repository. Your instructor can see them, assuming the permissions were set appropriately when you forked the template. You should verify the push succeeded by viewing your repository in the web browser.
Pulling Origin
Cloning your repository on multiple machines is perfectly legal. Suppose on machine A you commited and pushed some changes to your remote repository. To get these on machine B, you could fetch them:
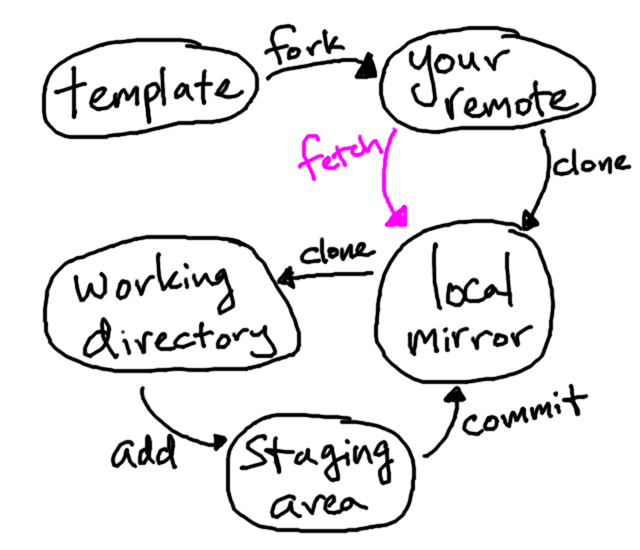
But this only brings the changes down to the local mirror. To integrate them into the working directory, you must also merge them:
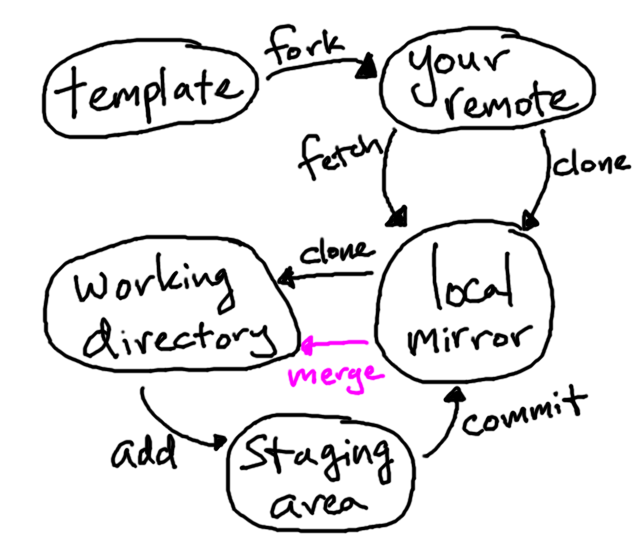
However, the pull command makes this easier. It executes both a fetch and a merge in one fell swoop:
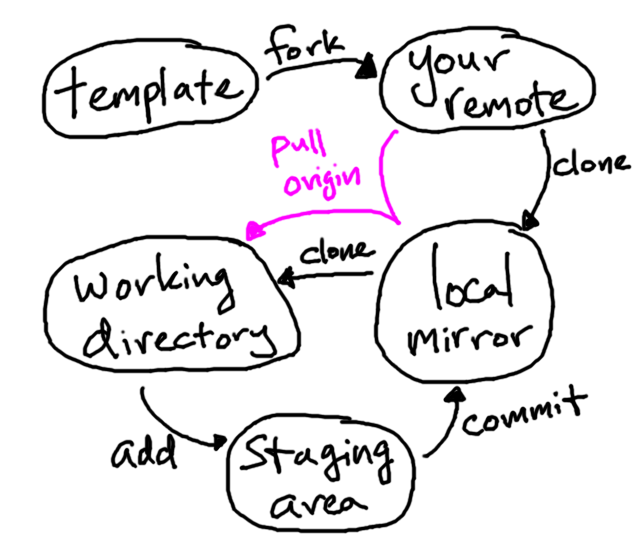
If there are edits in both your working directory and edits in your remote repository, Git will figure out if it can combine them. If the edits conflict with each other, the merge step will fail. It’s best to avoid these conflicts by always pushing up your changes at the end of a work session and pulling any new ones down at the beginning of a session.
Pulling Template
By default, a pull draws from origin, which is your remote repository. Sometimes your instructor issues changes to the template repository, the one you had originally forked. To synchronize your repository with the template, you pull down changes from the template remote, which you added explicitly:
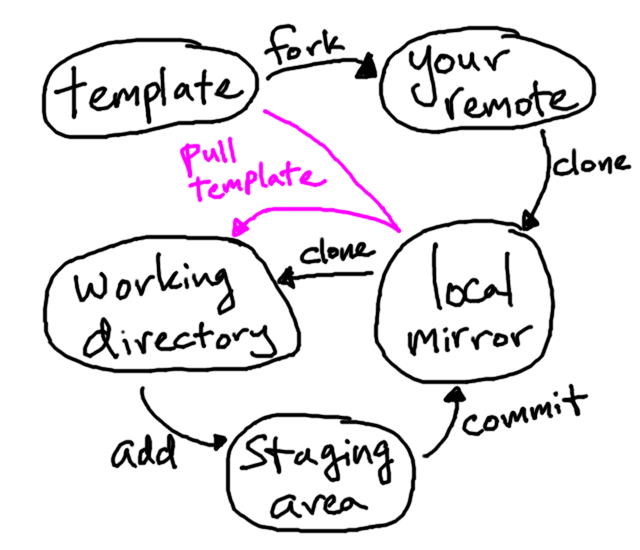
Your remote repository is side-stepped here. You’ll need to explicitly push to your remote repository the commits you pulled down.
]]>