Deprecated: Creation of dynamic property WP_Term::$cat_ID is deprecated in /var/www/twodee/blog/wp-includes/category.php on line 378
Deprecated: Creation of dynamic property WP_Term::$category_count is deprecated in /var/www/twodee/blog/wp-includes/category.php on line 379
Deprecated: Creation of dynamic property WP_Term::$category_description is deprecated in /var/www/twodee/blog/wp-includes/category.php on line 380
Deprecated: Creation of dynamic property WP_Term::$cat_name is deprecated in /var/www/twodee/blog/wp-includes/category.php on line 381
Deprecated: Creation of dynamic property WP_Term::$category_nicename is deprecated in /var/www/twodee/blog/wp-includes/category.php on line 382
Deprecated: Creation of dynamic property WP_Term::$category_parent is deprecated in /var/www/twodee/blog/wp-includes/category.php on line 383
Deprecated: Creation of dynamic property WP_Term::$cat_ID is deprecated in /var/www/twodee/blog/wp-includes/category.php on line 378
Deprecated: Creation of dynamic property WP_Term::$category_count is deprecated in /var/www/twodee/blog/wp-includes/category.php on line 379
Deprecated: Creation of dynamic property WP_Term::$category_description is deprecated in /var/www/twodee/blog/wp-includes/category.php on line 380
Deprecated: Creation of dynamic property WP_Term::$cat_name is deprecated in /var/www/twodee/blog/wp-includes/category.php on line 381
Deprecated: Creation of dynamic property WP_Term::$category_nicename is deprecated in /var/www/twodee/blog/wp-includes/category.php on line 382
Deprecated: Creation of dynamic property WP_Term::$category_parent is deprecated in /var/www/twodee/blog/wp-includes/category.php on line 383
Deprecated: Creation of dynamic property WP_Term::$cat_ID is deprecated in /var/www/twodee/blog/wp-includes/category.php on line 378
Deprecated: Creation of dynamic property WP_Term::$category_count is deprecated in /var/www/twodee/blog/wp-includes/category.php on line 379
Deprecated: Creation of dynamic property WP_Term::$category_description is deprecated in /var/www/twodee/blog/wp-includes/category.php on line 380
Deprecated: Creation of dynamic property WP_Term::$cat_name is deprecated in /var/www/twodee/blog/wp-includes/category.php on line 381
Deprecated: Creation of dynamic property WP_Term::$category_nicename is deprecated in /var/www/twodee/blog/wp-includes/category.php on line 382
Deprecated: Creation of dynamic property WP_Term::$category_parent is deprecated in /var/www/twodee/blog/wp-includes/category.php on line 383
Day 1
On this day we introduce the notion of a sound wave, and we see how the frequency of these waves accounts for the different pitches we hear. Using Pure Data and Arduino, we build our first instrument, which uses a potentiometer to control the emitted frequency and sounds like a slide whistle. We eventually abandon the physical description of sound in favor of MIDI, and we adapt our instrument to send messages to a MIDI controller.
If you finish early, consider completing these extra exercises:
Complete this homework for tomorrow:
- Read sections 3.1.1 through 3.1.4 of Digital Sound & Music.
- If you have time, work through Learning Synths.
Day 2
On this day we build up a piano-like instrument using push buttons. We introduce two major computational ideas: conditional logic and abstractions. Conditional logic allows us to program choices into our instruments. Abstractions have two significant advantages: they hide complexity, and they are reusable.
- Monodrone, Part I
- Monodrone, Part II
- Monodrone, Part III
- Abstractions
- Pentatouch, Part I
- Pentatouch, Part II
If you finish early, consider completing these extra exercises:
Complete this homework for tomorrow:
- Read Chord Building 101.
- If you have time, work through Learning Music.
Day 3
On this day we build an instrument that can play multiple notes simultaneously—as chords. We introduce two major computational ideas: iteration and arrays. To produce pleasing sounds, we’ll investigate scales and common chord structures.
If you finish early, consider completing these extra exercises:
Complete this homework for tomorrow:
- Read Arpeggios.
- Experiment with this arpeggiator. Press the play button in the center and then tinker.
Day 4
On this day we build an instrument that can play multiple notes in quick succession—as arpeggios. We continue our discussion of conditional logic, iteration, abstraction, and arrays. We extend arrays from one-dimensional sequences to two-dimensional tables. We also introduce some low-level bit manipulation.
If you finish early, consider completing these extra exercises:
Complete this homework for tomorrow:
- Work through How Generative Music Works.
Day 5
On this day we build an instrument that allows the player to walk through a 2D space. One axis alters a melody, and the other harmony. We’ll use a joystick for input. We continue our discussion of conditional logic, iteration, abstraction, and arrays. We also introduce the modulus operator.
- Music Mouse, Part I
- Music Mouse, Part II
- Music Mouse, Part III
- Music Mouse, Part IV
- Music Mouse, Part V
- Music Mouse, Part VI
If you finish early, consider completing these extra exercises:
Extra
]]>Deprecated: Creation of dynamic property WP_Term::$cat_ID is deprecated in /var/www/twodee/blog/wp-includes/category.php on line 378
Deprecated: Creation of dynamic property WP_Term::$category_count is deprecated in /var/www/twodee/blog/wp-includes/category.php on line 379
Deprecated: Creation of dynamic property WP_Term::$category_description is deprecated in /var/www/twodee/blog/wp-includes/category.php on line 380
Deprecated: Creation of dynamic property WP_Term::$cat_name is deprecated in /var/www/twodee/blog/wp-includes/category.php on line 381
Deprecated: Creation of dynamic property WP_Term::$category_nicename is deprecated in /var/www/twodee/blog/wp-includes/category.php on line 382
Deprecated: Creation of dynamic property WP_Term::$category_parent is deprecated in /var/www/twodee/blog/wp-includes/category.php on line 383
Deprecated: Creation of dynamic property WP_Term::$cat_ID is deprecated in /var/www/twodee/blog/wp-includes/category.php on line 378
Deprecated: Creation of dynamic property WP_Term::$category_count is deprecated in /var/www/twodee/blog/wp-includes/category.php on line 379
Deprecated: Creation of dynamic property WP_Term::$category_description is deprecated in /var/www/twodee/blog/wp-includes/category.php on line 380
Deprecated: Creation of dynamic property WP_Term::$cat_name is deprecated in /var/www/twodee/blog/wp-includes/category.php on line 381
Deprecated: Creation of dynamic property WP_Term::$category_nicename is deprecated in /var/www/twodee/blog/wp-includes/category.php on line 382
Deprecated: Creation of dynamic property WP_Term::$category_parent is deprecated in /var/www/twodee/blog/wp-includes/category.php on line 383
Deprecated: Creation of dynamic property WP_Term::$cat_ID is deprecated in /var/www/twodee/blog/wp-includes/category.php on line 378
Deprecated: Creation of dynamic property WP_Term::$category_count is deprecated in /var/www/twodee/blog/wp-includes/category.php on line 379
Deprecated: Creation of dynamic property WP_Term::$category_description is deprecated in /var/www/twodee/blog/wp-includes/category.php on line 380
Deprecated: Creation of dynamic property WP_Term::$cat_name is deprecated in /var/www/twodee/blog/wp-includes/category.php on line 381
Deprecated: Creation of dynamic property WP_Term::$category_nicename is deprecated in /var/www/twodee/blog/wp-includes/category.php on line 382
Deprecated: Creation of dynamic property WP_Term::$category_parent is deprecated in /var/www/twodee/blog/wp-includes/category.php on line 383
Our input so far has come from an Arduino plugged into our computer. It’s time to free things up. Bring on the internet! In this exercise, we will see how to make Pure Data listen for commands through a network connection. We will send it commands from a couple of other, non-Arduino interfaces.
There are two parties in a networked application: the server and the client. The server provides a service, and it responds to requests for that service from clients. Servers tend to run in an infinite loop since a client may connect to them at any time.
Protocol
As with serial port communication, networked communication assumes that both server and client speak a common protocol. For this exercise, let’s send commands to a server to play MIDI notes of a certain duration. Each command will have this form:
MIDI-NUMBER DURATION-IN-MILLISECONDS;
For example, to play middle C for 250 milliseconds, a client will send this command:
60 250;
If I had my druthers, we’d not use semi-colons. But Pure Data assumes commands are separated by semi-colons.
Server
The server must listen for commands and fire off MIDI messages. Servers are capable of listening on many possible channels. Each channel is identified by a integer port number. Some ports are well-known. When you access a webpage in a browser, for instance, you communicate on ports 80 or 443. Many online games communicate over established ports.
We will use port 9001 for this exercise, but any port over 1023 should be fair game—unless you have another service running on your computer that is already listening on that port.
In our patch, we use a netreceive PORT-NUMBER object to receive commands. We unpack the commands into the MIDI number and duration and then use makenote and noteout to issue the MIDI messages. Our patch might look something like this:
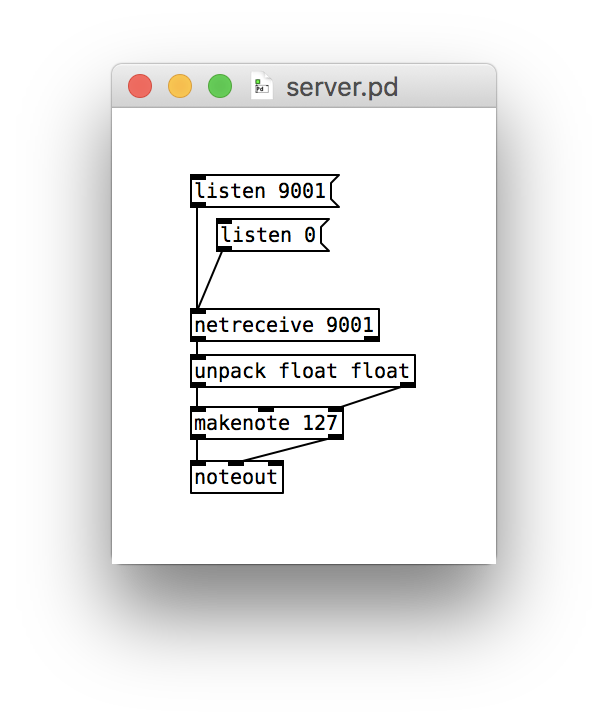
To stop listening, we send a listen 0 message. To resume listening, we can send a listen 9001 message.
Telnet Client
We can masquerade as a client to our server using the telnet utility. Open the Terminal application and enter the following command:
telnet localhost 9001
You can now type commands in the prescribed grammar directly to the server. Hit Enter/Return after each command. In this telnet session, we play note 60 for 500 milliseconds and note 64 for 1000 milliseconds:
> telnet localhost 9001
Trying ::1...
telnet: connect to address ::1: Connection refused
Trying 127.0.0.1...
Connected to localhost.
Escape character is '^]'.
60 500;
64 1000;
To quit the session, press Control-] and type exit at the prompt.
Ruby Client
Telnet is useful for testing servers, but typing is laborious and error-prone. Let’s make another client using a different programming language. It doesn’t matter which one we use, because the network is a universal communication channel. Whatever language you use, whether it’s Python, Java, C# or something else, you’ll need to investigate how to create a socket, which is a name we give the object that holds a connection to a port. In this example, we’ll use Ruby.
Our Ruby script starts by including the socket library and creating a couple of variables to identify the server:
#!/usr/bin/env ruby

require 'socket'

hostname = 'localhost'
port = 9001
When we’re ready to communicate, we open the socket, and we close it when we’re done:
#!/usr/bin/env ruby

require 'socket'

hostname = 'localhost'
port = 9001

socket = TCPSocket.open(hostname, port)

# send commands along to the server

socket.close
The magic happens while the socket is open. We keep the magic contained in this short example:
#!/usr/bin/env ruby

require 'socket'

hostname = 'localhost'
port = 9001

socket = TCPSocket.open(hostname, port)
print '> '

measure_duration = 500.0
while line = gets
  midi, type = line.split.map(&:to_i)
  delay_millis = measure_duration / type
  socket.write "#{midi} #{delay_millis};"
  sleep delay_millis / 1000.0
  print '> '
end

socket.close
Let’s walk through this. Using gets, we grab from the user a line of input of the form MIDI-NUMBER TYPE, where TYPE refers to the length of the note. The user enters 1 for a whole note, 2 for a half, 4 for a quarter, 8 for an eighth, and so on. We split the line on the separating space character, convert the two chunks of text to integers, and compute the duration in milliseconds using the note type. Using socket.write, we send a message in the prescribed format. And then we do it all again.
Challenges
Networking is probably the most empowering technical concept we’ve discussed. You can make different entities talk to each other! Consider exploring some of this potential further in the following challenges:
- Sockets opens the door to conventional programming languages that can defer to Pure Data to generate music. That means you can use loops, functions, arrays, and GUIs in your musical explorations. How else can you make music besides entering raw MIDI messages?
- Our examples above assume the server and client are running on the same computer. That’s what
localhostmeans. Try running the server on a computer that’s not hidden behind a firewall, and try running the client on a different machine. You could create a client on your phone! - It’s often the case that a single server handles requests from many different clients. Try creating multiple simultaneous clients that play music together.
Deprecated: Creation of dynamic property WP_Term::$cat_ID is deprecated in /var/www/twodee/blog/wp-includes/category.php on line 378
Deprecated: Creation of dynamic property WP_Term::$category_count is deprecated in /var/www/twodee/blog/wp-includes/category.php on line 379
Deprecated: Creation of dynamic property WP_Term::$category_description is deprecated in /var/www/twodee/blog/wp-includes/category.php on line 380
Deprecated: Creation of dynamic property WP_Term::$cat_name is deprecated in /var/www/twodee/blog/wp-includes/category.php on line 381
Deprecated: Creation of dynamic property WP_Term::$category_nicename is deprecated in /var/www/twodee/blog/wp-includes/category.php on line 382
Deprecated: Creation of dynamic property WP_Term::$category_parent is deprecated in /var/www/twodee/blog/wp-includes/category.php on line 383
Deprecated: Creation of dynamic property WP_Term::$cat_ID is deprecated in /var/www/twodee/blog/wp-includes/category.php on line 378
Deprecated: Creation of dynamic property WP_Term::$category_count is deprecated in /var/www/twodee/blog/wp-includes/category.php on line 379
Deprecated: Creation of dynamic property WP_Term::$category_description is deprecated in /var/www/twodee/blog/wp-includes/category.php on line 380
Deprecated: Creation of dynamic property WP_Term::$cat_name is deprecated in /var/www/twodee/blog/wp-includes/category.php on line 381
Deprecated: Creation of dynamic property WP_Term::$category_nicename is deprecated in /var/www/twodee/blog/wp-includes/category.php on line 382
Deprecated: Creation of dynamic property WP_Term::$category_parent is deprecated in /var/www/twodee/blog/wp-includes/category.php on line 383
Deprecated: Creation of dynamic property WP_Term::$cat_ID is deprecated in /var/www/twodee/blog/wp-includes/category.php on line 378
Deprecated: Creation of dynamic property WP_Term::$category_count is deprecated in /var/www/twodee/blog/wp-includes/category.php on line 379
Deprecated: Creation of dynamic property WP_Term::$category_description is deprecated in /var/www/twodee/blog/wp-includes/category.php on line 380
Deprecated: Creation of dynamic property WP_Term::$cat_name is deprecated in /var/www/twodee/blog/wp-includes/category.php on line 381
Deprecated: Creation of dynamic property WP_Term::$category_nicename is deprecated in /var/www/twodee/blog/wp-includes/category.php on line 382
Deprecated: Creation of dynamic property WP_Term::$category_parent is deprecated in /var/www/twodee/blog/wp-includes/category.php on line 383
Earlier we said that sounds are generated by oscillating sine or cosine waves. That was a lie. None of our musical instruments produce pure waves of a single frequency. Rather, they produce a family of waves. For instance, if I play an A in the 4th octave on my trombone, I will broadcast a wave at 440 Hz, another at 880 Hz, another at 1320 Hz, and so on.
Where did that 880 come from? And the 1320?
Sound waves that are integer multiples of the fundamental frequency are called harmonics. They sound pleasant when combined with the fundamental.
What gives each instrument its unique sound—or timbre (rhymes with amber)—are the relative strengths of the fundamental and harmonic waves. For example, 50% of the sound’s energy might go to the fundamental frequency, 30% to the the third harmonic, and 20% to the fifth.
In this exercise, we’ll create a Pure Data patch that lets the musician control the relative strengths of the fundamental and harmonic waves.
Five-key Keyboard
We start our patch with a little keyboard. Since we will be shaping the sound waves ourselves, we can’t use MIDI. We’ll be configuring our own oscillators all within Pure Data. However, let’s use MIDI numbers to choose what notes we want to play. We can turn a MIDI number into a frequency using the mtof (MIDI to frequency) object.
Here’s a little keyboard that provides a major pentascale starting at middle C:
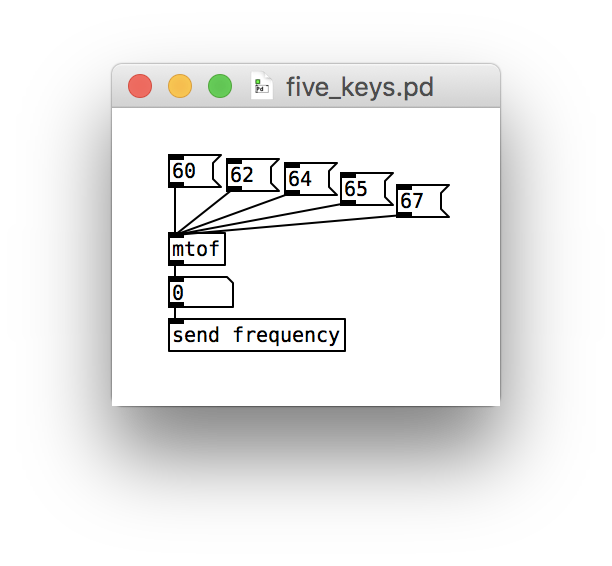
For the time being, we just send the frequency along. Later we’ll add some receivers.
Weights
Our next step is to provide an interface for controlling the weights of the waves. We could use Pure Data’s slider objects, but since we have a collection of waves, it’s easier to use an array. Add one, name it weights, and give it a size of 10. We’ll combine 10 waves to produce our custom timbre.
After the array has been made, right-click on it and select Properties. In the Canvas Properties window, change the Y-range to span from 100 at the top to 0 at the bottom. The patch should look something like this:
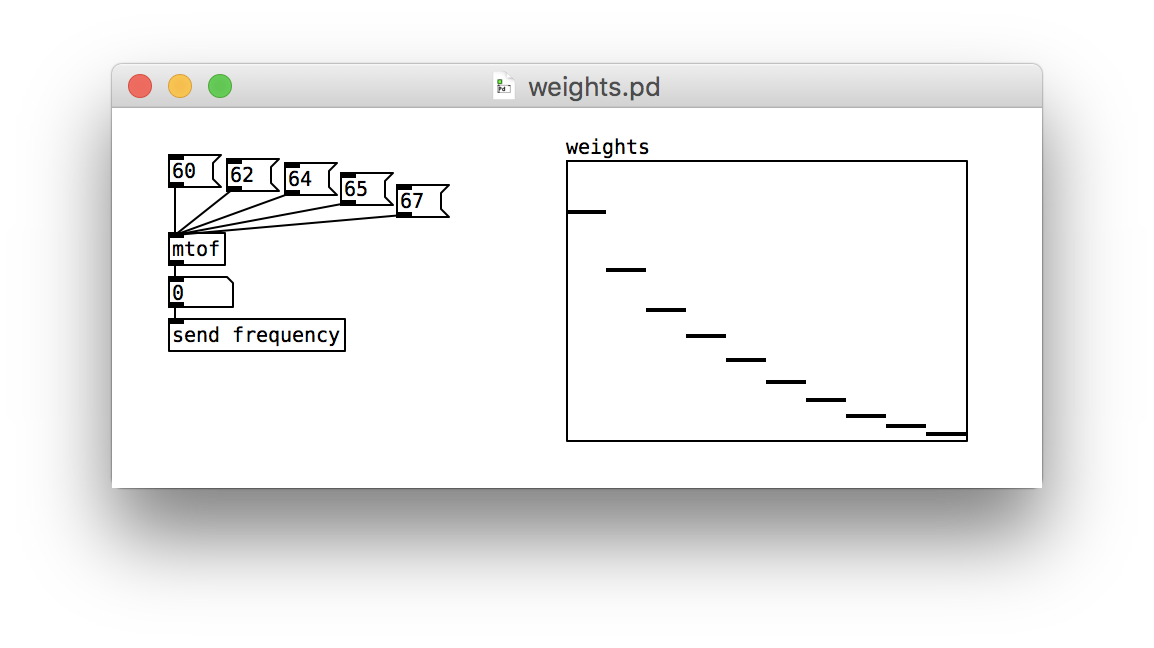
When you draw on the array with the mouse, you are setting the 10 weights. The leftmost weight corresponds to the strength of the fundamental frequency.
Normalizing
Imagine someone gave you a recipe for the perfect lemonade: 3 parts sugar, 2 parts water, and 1 part lemon juice. If you go to make this recipe, these numbers aren’t in and of themselves very helpful. We first need to convert them to proportions, and then we can apply the proportions to the amount of lemonade we want to make.
According to the recipe, there are 6 parts in total. 3 of the 6, or 50%, is sugar. 2/6 or 33% is water. 1/6 or 17% is lemon juice.
So it is with the weights in our array. They are relative weights, and we need to convert them to proportions by dividing by their total.
There are several ways we can calculate the total and divide each number. The method with the fewest steps requires a couple of packages. Click Window / Find Externals and install zexy and list-abs. You might need the extended versions of these libraries. (I’m afraid I don’t quite understand the differences between the various versions.)
We’ll use tabdump command to convert the weights array into a list. The list is then fed into a sum object to calculate the total. Then each element of the list is divided by the total using the list-apply object.
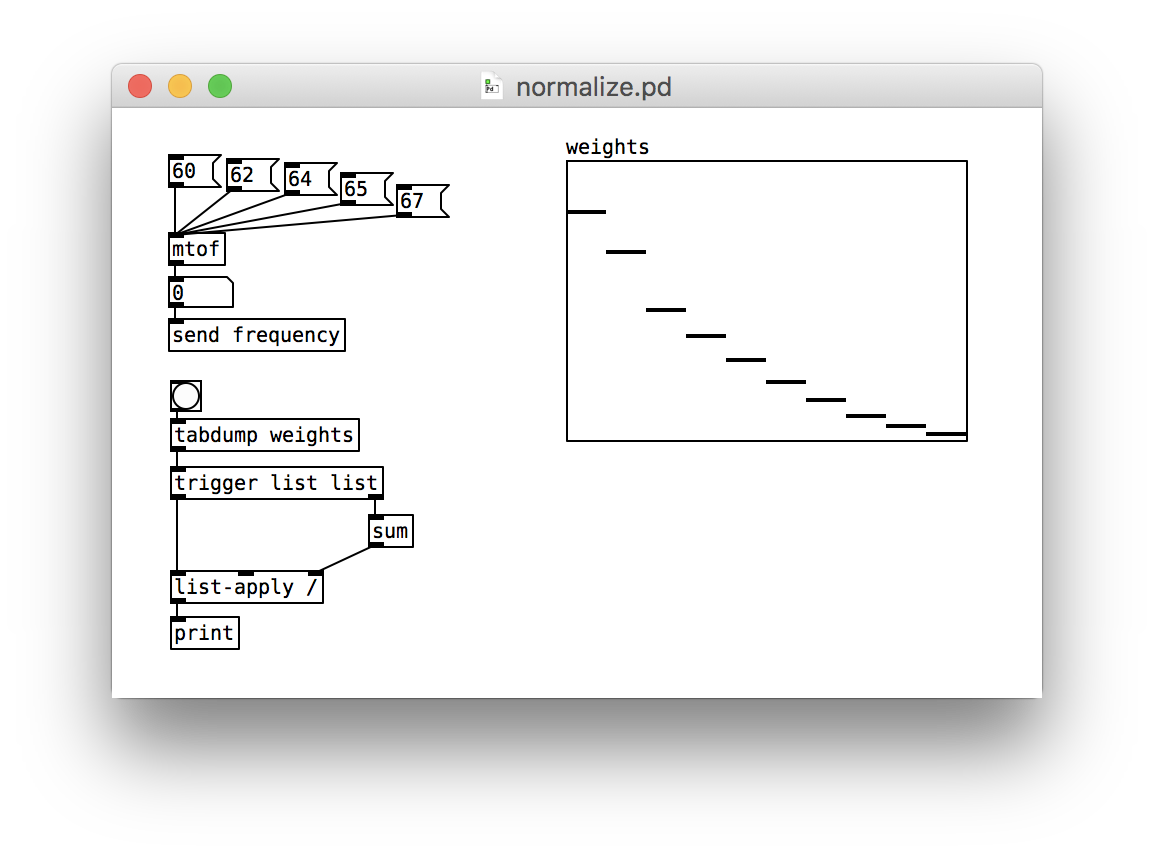
When you click on the bang, you’ll see a list of 10 numbers in the console. They should all add up to 1.
Harmonic Abstraction
With the proportions calculated, let’s now create a wave for each harmonic. Recall that harmonics are integer multiples of the fundamental frequency. We’ll say that the fundamental frequency is harmonic 1, twice the fundamental frequency is harmonic 2, thrice is harmonic 3, and so on.
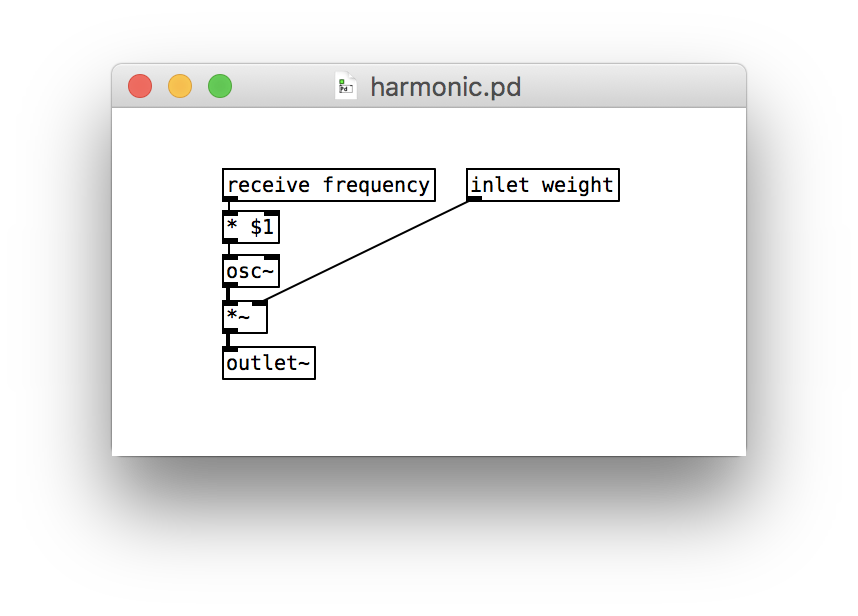
Each harmonic needs its own oscillator. It will need to oscillate at the specified multiple of the fundamental frequency, and its strength will be determined by multiplying by the weight. The stronger the weight, the louder the sound. Since all the harmonics behave similarly, and there are ten of them, we should probably make an abstraction.
The abstraction must receive three pieces of data. The fundamental frequency will come in from the main patch through a receive. The integer coefficient will come in as a creation argument. And the weight will come in through an inlet.
We multiply the fundamental frequency by the coefficient to get the harmonic’s frequency. Then we fire up an oscillator, but scale its amplitude by the weight.
All told, our abstraction looks like this:
Combining Harmonics
The last step is to wire 10 instances of harmonic into our main patch. We pass along the integer coefficients as creation arguments. We must also pass the weights in via their inlets. The weights are locked up in a list, but we can decompose the list into 10 separate numbers using the unpack object. We write unpack f f f f f f f f f f to unpack the list into 10 floats. To add up all of the waves, we feed all the harmonics into the left inlet of a +~ object.
The end result is quite messy:
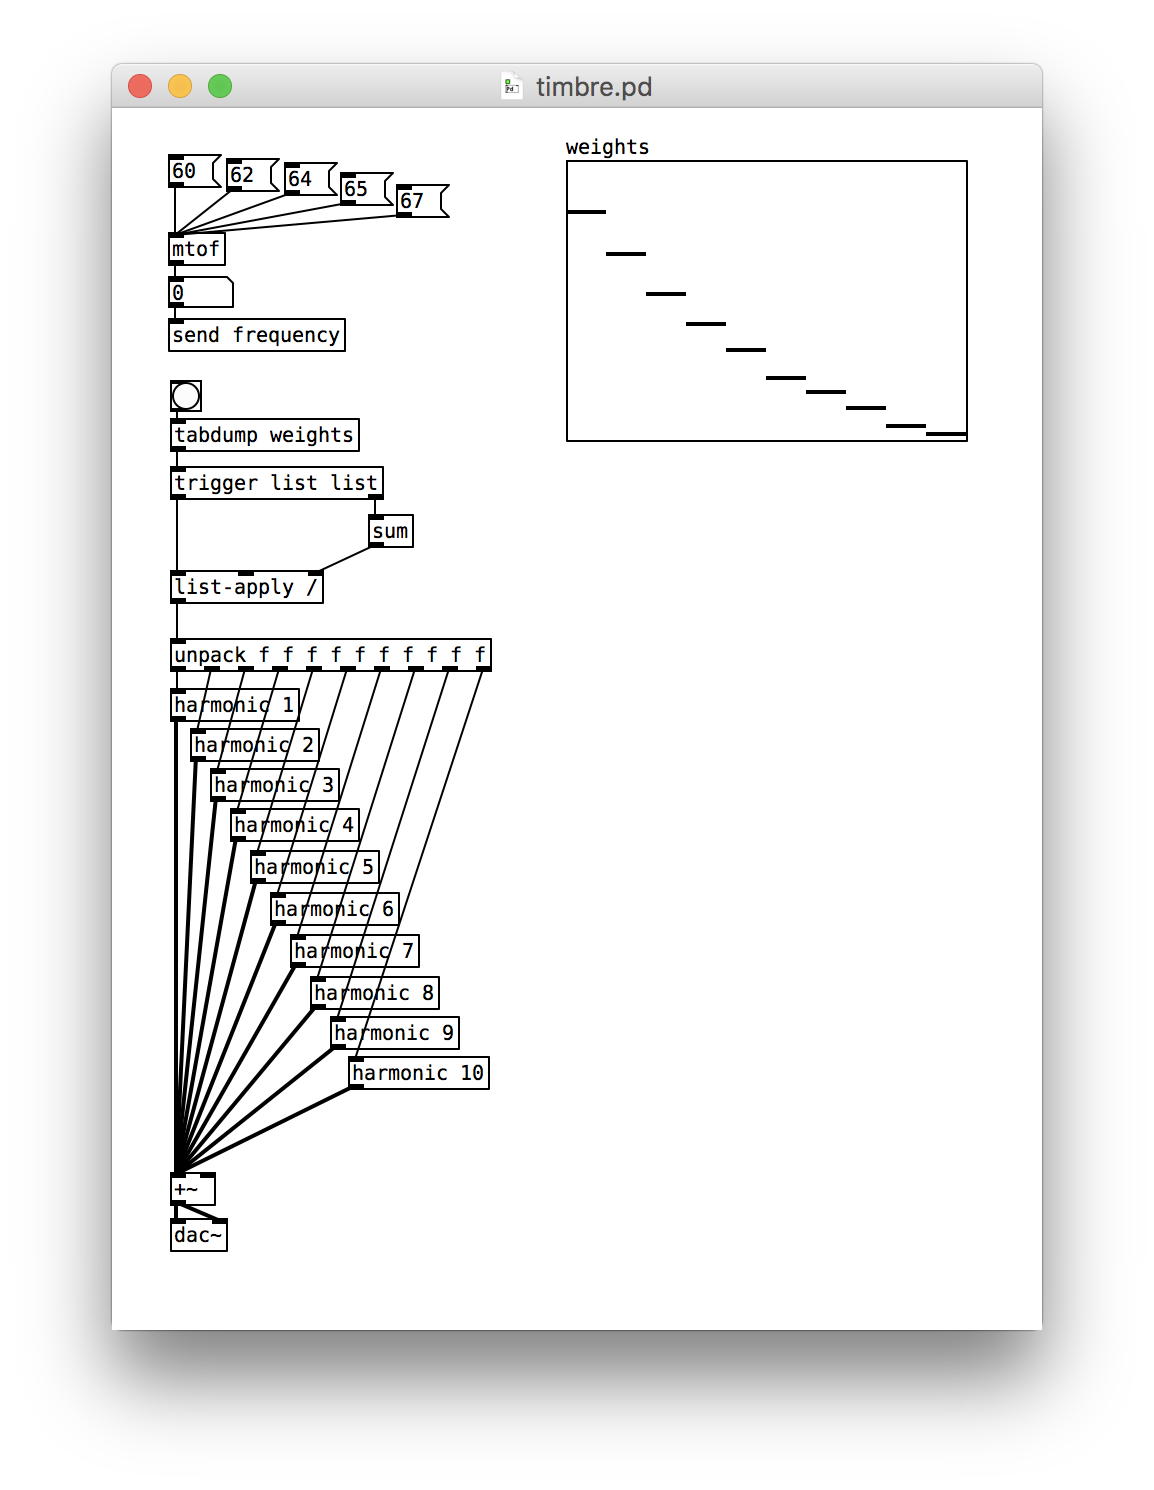
To play your new instrument, with its customizable timbre, click on the five MIDI notes. Change the timbre by drawing on the array and firing the bang. As a challenge, investigate the harmonic spectrum of the clarinet and try to emulate its sound.
]]>Deprecated: Creation of dynamic property WP_Term::$cat_ID is deprecated in /var/www/twodee/blog/wp-includes/category.php on line 378
Deprecated: Creation of dynamic property WP_Term::$category_count is deprecated in /var/www/twodee/blog/wp-includes/category.php on line 379
Deprecated: Creation of dynamic property WP_Term::$category_description is deprecated in /var/www/twodee/blog/wp-includes/category.php on line 380
Deprecated: Creation of dynamic property WP_Term::$cat_name is deprecated in /var/www/twodee/blog/wp-includes/category.php on line 381
Deprecated: Creation of dynamic property WP_Term::$category_nicename is deprecated in /var/www/twodee/blog/wp-includes/category.php on line 382
Deprecated: Creation of dynamic property WP_Term::$category_parent is deprecated in /var/www/twodee/blog/wp-includes/category.php on line 383
Deprecated: Creation of dynamic property WP_Term::$cat_ID is deprecated in /var/www/twodee/blog/wp-includes/category.php on line 378
Deprecated: Creation of dynamic property WP_Term::$category_count is deprecated in /var/www/twodee/blog/wp-includes/category.php on line 379
Deprecated: Creation of dynamic property WP_Term::$category_description is deprecated in /var/www/twodee/blog/wp-includes/category.php on line 380
Deprecated: Creation of dynamic property WP_Term::$cat_name is deprecated in /var/www/twodee/blog/wp-includes/category.php on line 381
Deprecated: Creation of dynamic property WP_Term::$category_nicename is deprecated in /var/www/twodee/blog/wp-includes/category.php on line 382
Deprecated: Creation of dynamic property WP_Term::$category_parent is deprecated in /var/www/twodee/blog/wp-includes/category.php on line 383
Deprecated: Creation of dynamic property WP_Term::$cat_ID is deprecated in /var/www/twodee/blog/wp-includes/category.php on line 378
Deprecated: Creation of dynamic property WP_Term::$category_count is deprecated in /var/www/twodee/blog/wp-includes/category.php on line 379
Deprecated: Creation of dynamic property WP_Term::$category_description is deprecated in /var/www/twodee/blog/wp-includes/category.php on line 380
Deprecated: Creation of dynamic property WP_Term::$cat_name is deprecated in /var/www/twodee/blog/wp-includes/category.php on line 381
Deprecated: Creation of dynamic property WP_Term::$category_nicename is deprecated in /var/www/twodee/blog/wp-includes/category.php on line 382
Deprecated: Creation of dynamic property WP_Term::$category_parent is deprecated in /var/www/twodee/blog/wp-includes/category.php on line 383
Earlier we created this ticker abstraction to walk steadily through a range of numbers:
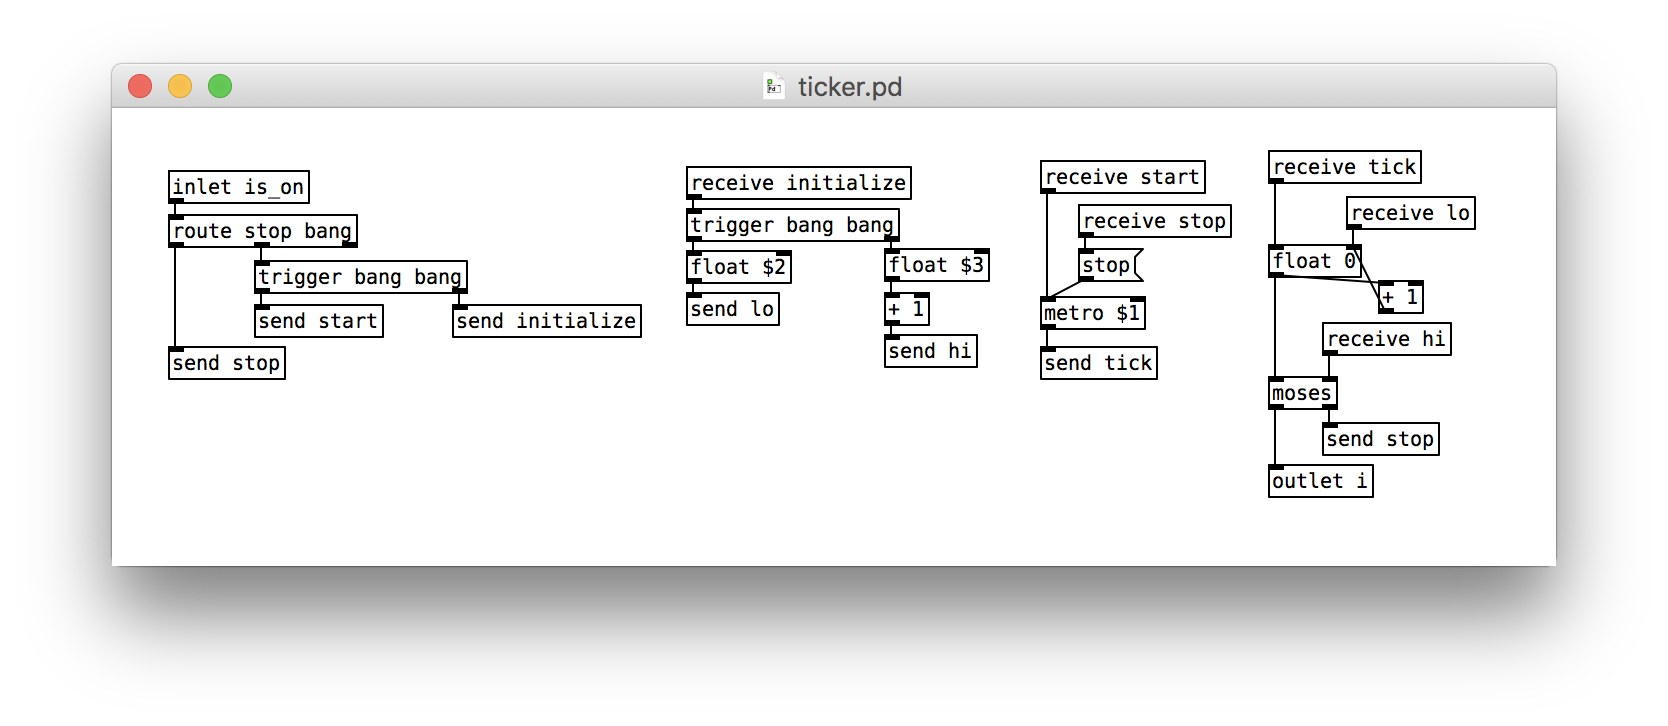
In this exercise we explore changing MIDI instruments and using two of these tickers together.
Changing Instruments
In MIDI terms, each instrument is a program. To change which instrument or program plays a note, we feed a number in [1, 128] to the pgmout command. The MIDI standard defines the mapping between these numbers and instruments.
We can test this changing of instruments with a quick patch:
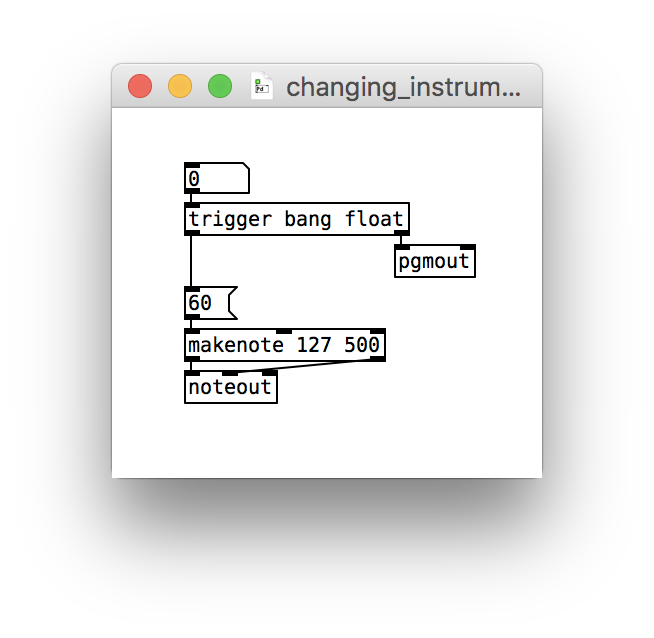
When you drag on the number box, we first feed the instrument number to pgmout, and then we fire off a middle C. You hear a slurry of various instruments. Let’s use ticker to slow down this slurry and showcase the whole cast of instruments.
Ticker Ticker
Suppose we wanted a ticker to fire off another ticker. One loop would be triggering another loop. We write nested loops like this often to traverse 2D space or mix and match one collection with another. For instance, maybe we want to loop through a set of instruments, and for each of those instruments, we’ll have it play a little tune. In a text-based language, we’d write something like this:
for each instrument number
  set instrument
  for each note number in tune
    play note
Each for loop represents a ticker. To keep things simple, let’s just print the numbers coming from the two tickers:
for each instrument number
  print instrument
  for each note number in tune
    print note
Suppose we want instruments 1, 2, and 3 to play notes 60, 61, and 62. We’d expect this output when we run our code:
instrument: 1
note: 60
note: 61
note: 62
instrument: 2
note: 60
note: 61
note: 62
instrument: 3
note: 60
note: 61
note: 62
Let’s create a patch with two tickers that implements this pseudocode. It might look something like this patch:
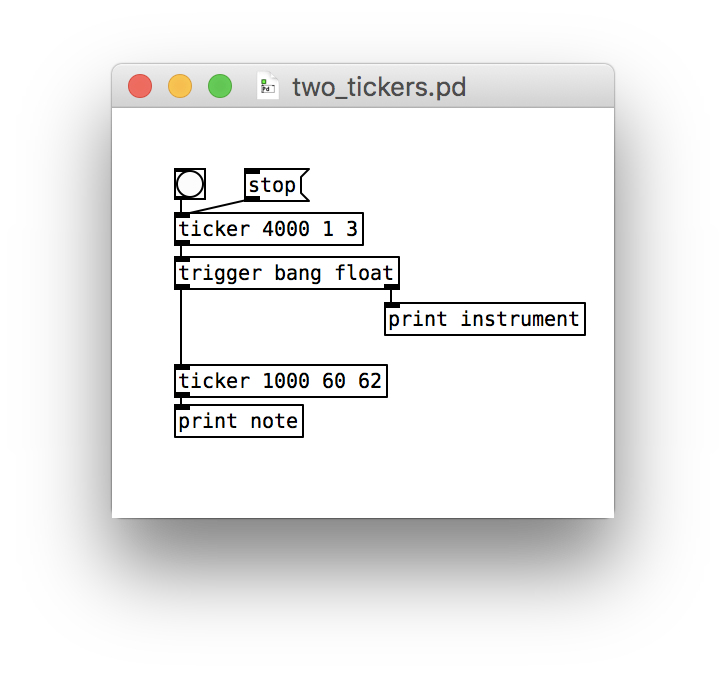
We use a trigger to make the sequencing clear and to convert the numeric output of the first ticker into a bang that the second ticker is expecting. Here’s the actual output that we see:
note: 1
instrument: 1
note: 2
instrument: 2
note: 3
instrument: 3
That’s definitely not what we expected. What went wrong? The issue is that the two instances of ticker are interfering with each other. The names that we send to and receive from are shared by both tickers. When the first ticker issues send tick, both of them will receive it and print the same number. That’s what we’re seeing in the output. Likewise, when the first issues send stop, both of them will receive it and stop.
Instance Variables
To keep two or more instances of the same abstraction from interfering with each other, we can assign the send and receive targets unique names. How do we generate unique names? We could pass in an extra creation argument: ticker 4000 1 3 instrument-loop and ticker 1000 60 62 note-loop. And then we could send stop-$4 and receive stop-$4. The $4 would get expanded to the identifier that we passed in to the ticker. Each instance of ticker, then, will have its own channels for send and receive. As long as the identifiers are unique, this will solve our problem.
However, we don’t need $4. Pure Data already provides an identifier unique to each instance of an abstraction. It’s named $0. We tweak our ticker implementation by appending -$0 to each of the names we send and receive from:
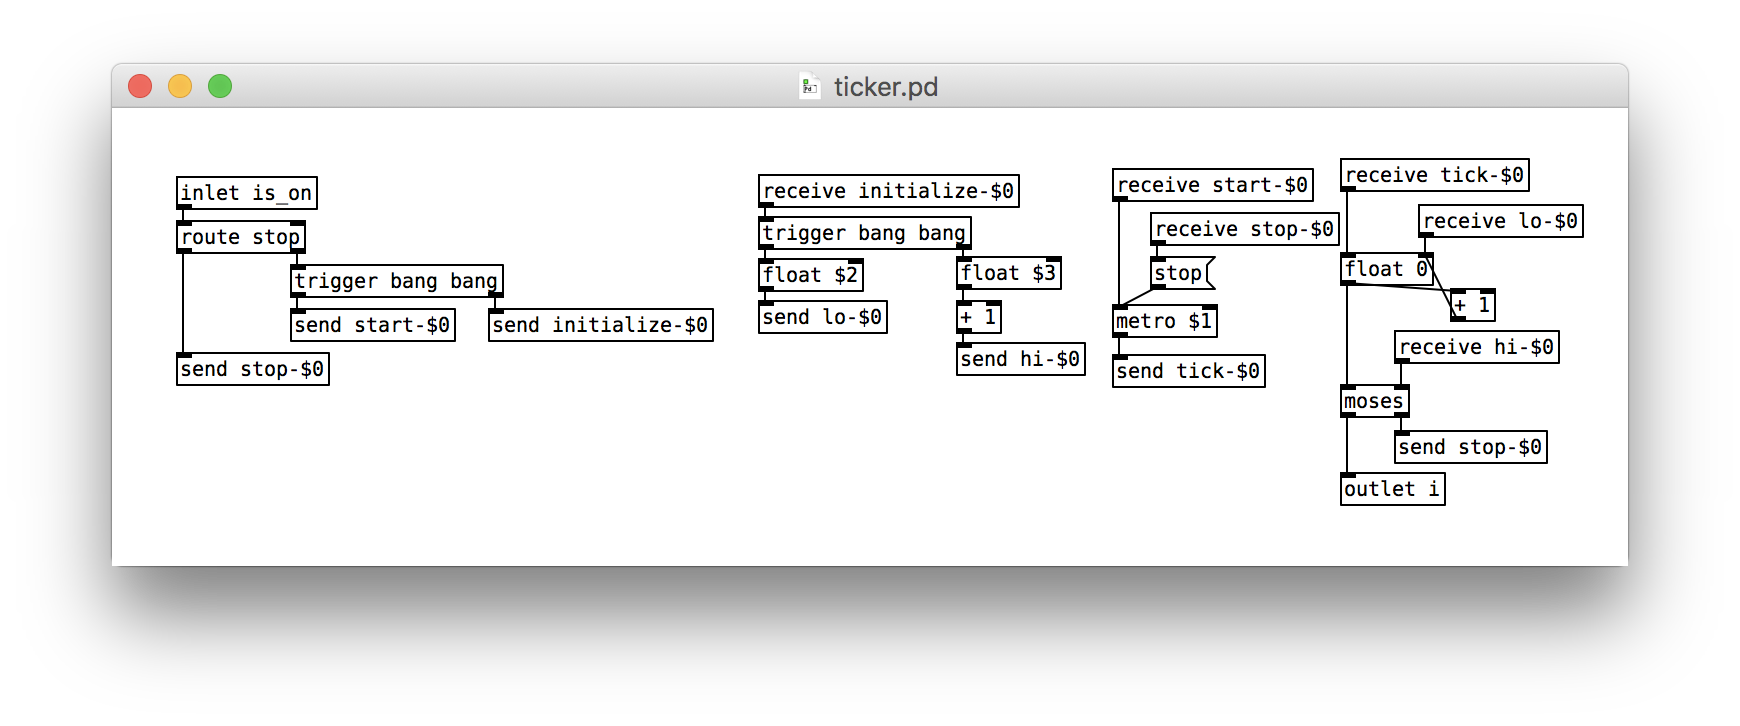
Be sure not to miss any! With these changes applied, we now see the expected output.
Showcase
Our last step is to walk through all 128 MIDI instruments and have each play a short sequence of notes. Our first ticker will iterate through [1, 128], set the MIDI program, and fire off another ticker that marches through 1, 2, and 3. These numbers will tick through an arpeggio of the C major I chord—which is made up of MIDI notes 60, 64, and 67. Our patch might look something like this:
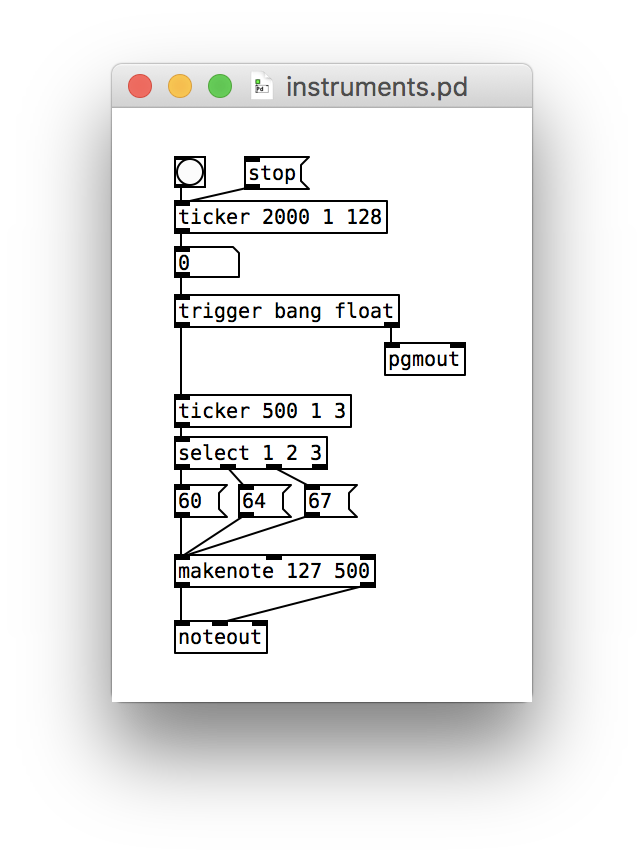
This patch should give you a good sampling of the instruments. It does get long, however, so don’t forget that you can send a stop message.
Deprecated: Creation of dynamic property WP_Term::$cat_ID is deprecated in /var/www/twodee/blog/wp-includes/category.php on line 378
Deprecated: Creation of dynamic property WP_Term::$category_count is deprecated in /var/www/twodee/blog/wp-includes/category.php on line 379
Deprecated: Creation of dynamic property WP_Term::$category_description is deprecated in /var/www/twodee/blog/wp-includes/category.php on line 380
Deprecated: Creation of dynamic property WP_Term::$cat_name is deprecated in /var/www/twodee/blog/wp-includes/category.php on line 381
Deprecated: Creation of dynamic property WP_Term::$category_nicename is deprecated in /var/www/twodee/blog/wp-includes/category.php on line 382
Deprecated: Creation of dynamic property WP_Term::$category_parent is deprecated in /var/www/twodee/blog/wp-includes/category.php on line 383
Deprecated: Creation of dynamic property WP_Term::$cat_ID is deprecated in /var/www/twodee/blog/wp-includes/category.php on line 378
Deprecated: Creation of dynamic property WP_Term::$category_count is deprecated in /var/www/twodee/blog/wp-includes/category.php on line 379
Deprecated: Creation of dynamic property WP_Term::$category_description is deprecated in /var/www/twodee/blog/wp-includes/category.php on line 380
Deprecated: Creation of dynamic property WP_Term::$cat_name is deprecated in /var/www/twodee/blog/wp-includes/category.php on line 381
Deprecated: Creation of dynamic property WP_Term::$category_nicename is deprecated in /var/www/twodee/blog/wp-includes/category.php on line 382
Deprecated: Creation of dynamic property WP_Term::$category_parent is deprecated in /var/www/twodee/blog/wp-includes/category.php on line 383
Deprecated: Creation of dynamic property WP_Term::$cat_ID is deprecated in /var/www/twodee/blog/wp-includes/category.php on line 378
Deprecated: Creation of dynamic property WP_Term::$category_count is deprecated in /var/www/twodee/blog/wp-includes/category.php on line 379
Deprecated: Creation of dynamic property WP_Term::$category_description is deprecated in /var/www/twodee/blog/wp-includes/category.php on line 380
Deprecated: Creation of dynamic property WP_Term::$cat_name is deprecated in /var/www/twodee/blog/wp-includes/category.php on line 381
Deprecated: Creation of dynamic property WP_Term::$category_nicename is deprecated in /var/www/twodee/blog/wp-includes/category.php on line 382
Deprecated: Creation of dynamic property WP_Term::$category_parent is deprecated in /var/www/twodee/blog/wp-includes/category.php on line 383
Musicians are servants of the beat. But who controls the beat? In this exercise, we do. We will create an abstraction named ticker that provides a steady pulse that will drive our music forward.
Client View
Clients of ticker will want to start ticking and stop it, so we’ll need to send two different types of messages to our abstraction. Let’s use a bang to start and an explicit stop message to stop. To keep things simple, let’s pass the delay between beats as a creation argument.
Here, for example, we drop a beat every 1000 milliseconds:
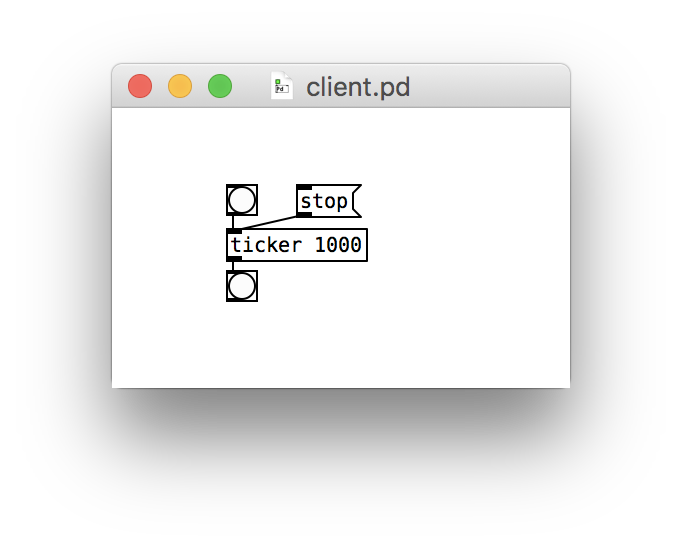
We don’t hear the beat, but we see the bottommost bng flash in time.
Steady Pulse
With the client’s view in mind, we are ready to implement our abstraction in ticker.pd. A couple of objects will be very helpful here.
The first is route, which we use to fire off different parts of our patch depending on whether we are starting or stopping. Object route expects a list of possible messages and sends a bang along the matching outlet.
The second is metro, which fires off bang messages every so many milliseconds. It starts pulsing when it receives a bang message and stops when it receives a stop message. But isn’t this exactly what we want ticker to do? Why not just use metro directly? Ultimately, as you’ll see, we want to send more than just bang messages, but our first step is to wrap around metro.
To keep the patch organized in cohesive chunks, let’s use send and receive to communicate between chunks. This may seem to add unnecessary complexity, but it will pay off later. Here’s our first draft:
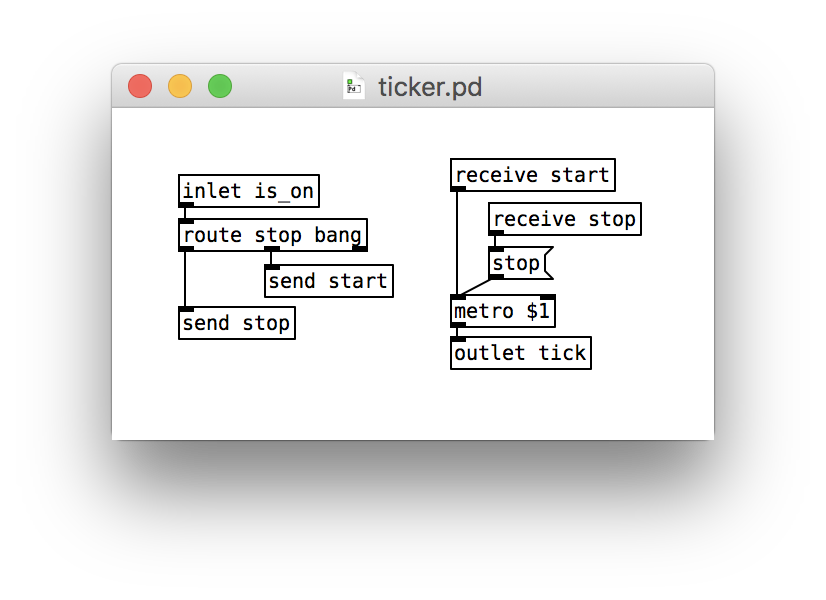
Note how we pick up the creation argument using metro $1. The pulse is sent back to the client through outlet. When we fire off a bang in the client, we should see our ticker give a steady pulse.
MIDI Beat
Instead of just pulsing a bng, let’s use ticker to generate MIDI notes. When the client receives a pulse, we use makenote and noteout to play MIDI note 60 for 500 milliseconds:
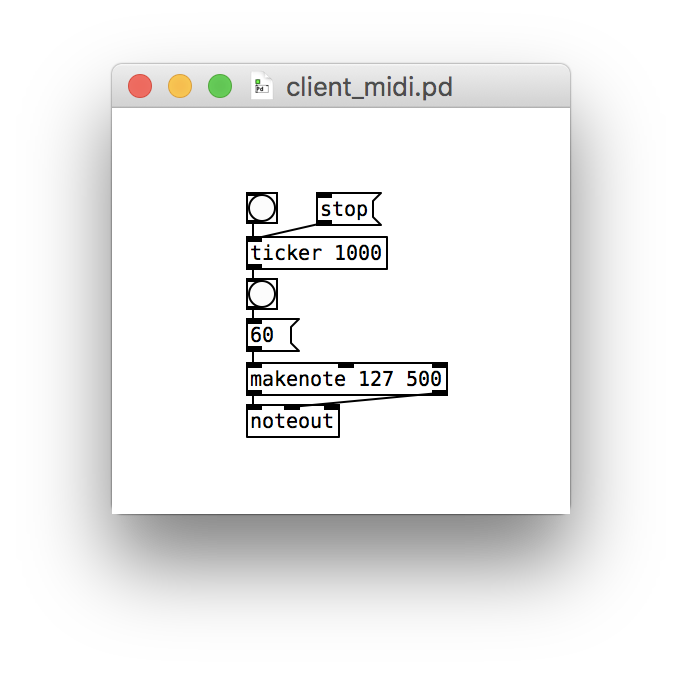
Counting
Currently ticker just provides a flat pulse. What if we wanted to tick through a range of numbers instead, just like we do with loops in other programming languages? We could use the numbers that are output to generate scales or indices. This client, for example, plays a chromatic scale from MIDI notes 60 to 72:
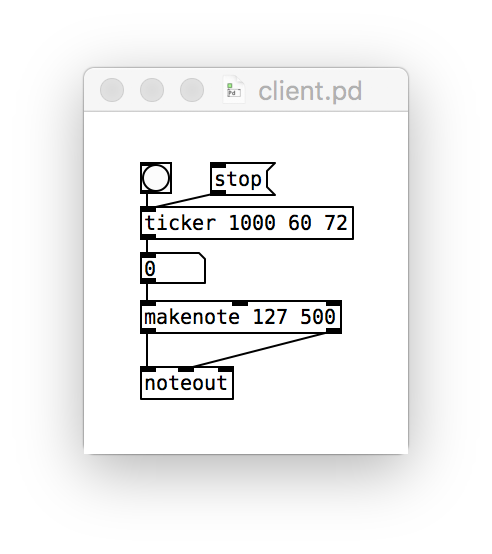
Note how we’ve added two more creation arguments to ticker to express the range of numbers we want to tick through. The output is now a number, not a bang.
Let’s add counting to ticker in several stages.
Outputting Lo
First, instead of walking through the whole range, let’s just emit the starting number on every pulse. The starting number will arrive in our abstraction under the name $2.
We’ll add two new chunks to our patch. The first, which will be triggered by an initialize signal, will be responsible for initializing the cold inlets of various objects based on our creation arguments.
The second, which will be triggered by a tick signal, will be responsible for handling each tick of the metronome. For the time being, we just emit a float that has been initialized to the starting number, which we call lo.
With our two new chunks, our abstraction looks like this:
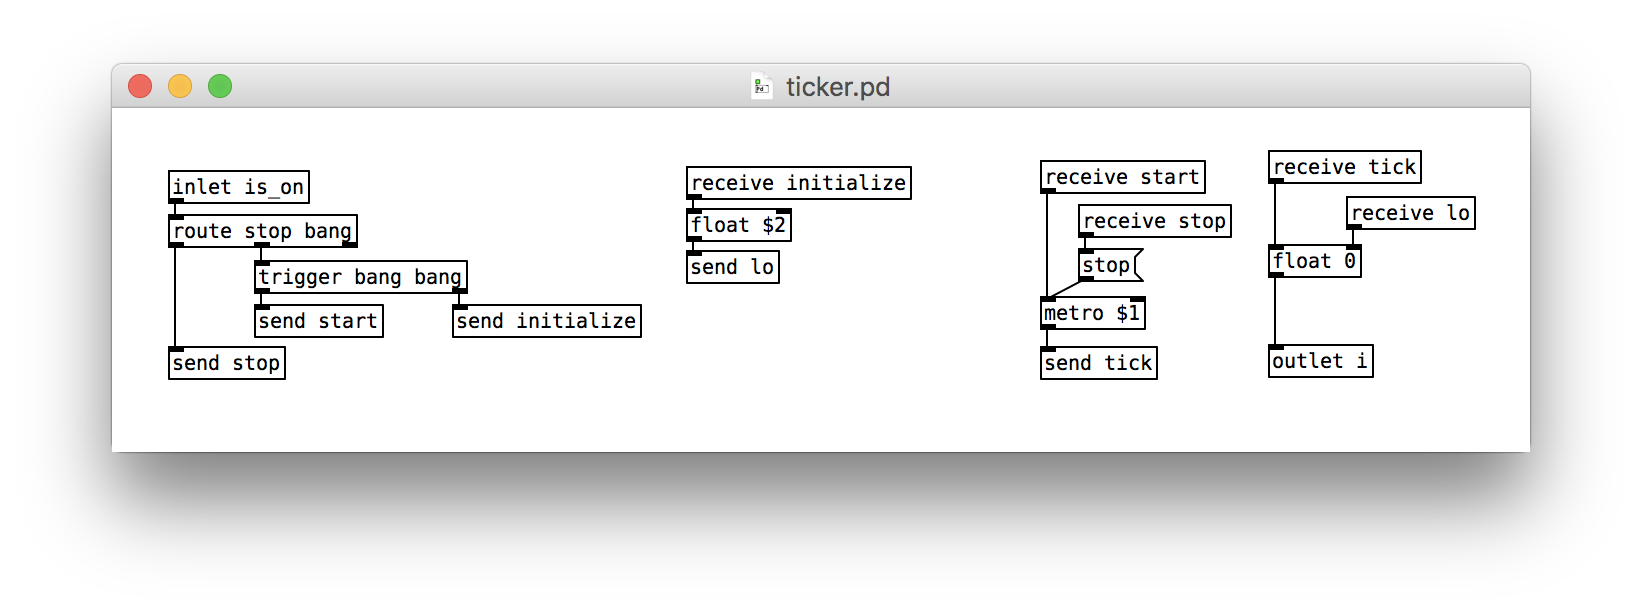
Note how route first signals initialize and then start when the ticking begins.
Incrementing
Our next step is to start counting up. We need only make one change, but it’s a weird, mind-bending change. At the same time that we emit a number back to the client, we also feed that number into a + 1 object. This incremented number is then fed back into our float that’s serving as our counter. The patch looks like this:
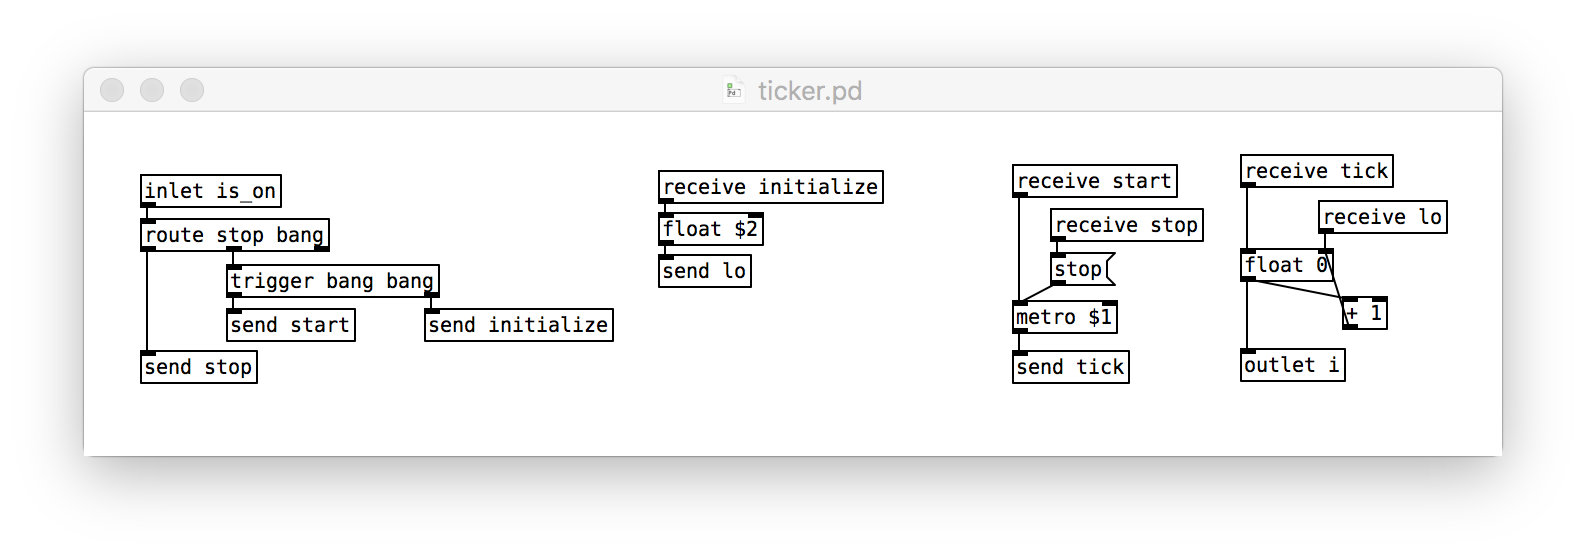
In any normal programming language, this would cause an infinite loop. But because we’re feeding the incremented number into the cold inlet of the float, nothing breaks, and the number does start counting up.
Stopping at Hi
Our last step is to stop ticking once we’ve reached the maximum value of the range. We use the moses object to trigger a stop message when we’ve gone past the maximum value. moses expects a threshold value and behaves a bit like this:
function moses(threshold)
  value = read left inlet
  if value >= threshold
    emit value on right outlet
  else
    emit value on left outlet
Our patch needs to be changed in a few places. We add the moses object to the chunk that handles ticks. It sends a stop message when it sees the first number beyond the range. Otherwise the number is emitted to the client as before. Also, we need to initialize the threshold value in the initialize chunk. We receive the ending number under the name $3. We add 1 to it and feed it to moses.
All told, our patch now looks like this:
When we fire off ticker in our client, we should now hear an octave of the chromatic scale.
Deprecated: Creation of dynamic property WP_Term::$cat_ID is deprecated in /var/www/twodee/blog/wp-includes/category.php on line 378
Deprecated: Creation of dynamic property WP_Term::$category_count is deprecated in /var/www/twodee/blog/wp-includes/category.php on line 379
Deprecated: Creation of dynamic property WP_Term::$category_description is deprecated in /var/www/twodee/blog/wp-includes/category.php on line 380
Deprecated: Creation of dynamic property WP_Term::$cat_name is deprecated in /var/www/twodee/blog/wp-includes/category.php on line 381
Deprecated: Creation of dynamic property WP_Term::$category_nicename is deprecated in /var/www/twodee/blog/wp-includes/category.php on line 382
Deprecated: Creation of dynamic property WP_Term::$category_parent is deprecated in /var/www/twodee/blog/wp-includes/category.php on line 383
Deprecated: Creation of dynamic property WP_Term::$cat_ID is deprecated in /var/www/twodee/blog/wp-includes/category.php on line 378
Deprecated: Creation of dynamic property WP_Term::$category_count is deprecated in /var/www/twodee/blog/wp-includes/category.php on line 379
Deprecated: Creation of dynamic property WP_Term::$category_description is deprecated in /var/www/twodee/blog/wp-includes/category.php on line 380
Deprecated: Creation of dynamic property WP_Term::$cat_name is deprecated in /var/www/twodee/blog/wp-includes/category.php on line 381
Deprecated: Creation of dynamic property WP_Term::$category_nicename is deprecated in /var/www/twodee/blog/wp-includes/category.php on line 382
Deprecated: Creation of dynamic property WP_Term::$category_parent is deprecated in /var/www/twodee/blog/wp-includes/category.php on line 383
Deprecated: Creation of dynamic property WP_Term::$cat_ID is deprecated in /var/www/twodee/blog/wp-includes/category.php on line 378
Deprecated: Creation of dynamic property WP_Term::$category_count is deprecated in /var/www/twodee/blog/wp-includes/category.php on line 379
Deprecated: Creation of dynamic property WP_Term::$category_description is deprecated in /var/www/twodee/blog/wp-includes/category.php on line 380
Deprecated: Creation of dynamic property WP_Term::$cat_name is deprecated in /var/www/twodee/blog/wp-includes/category.php on line 381
Deprecated: Creation of dynamic property WP_Term::$category_nicename is deprecated in /var/www/twodee/blog/wp-includes/category.php on line 382
Deprecated: Creation of dynamic property WP_Term::$category_parent is deprecated in /var/www/twodee/blog/wp-includes/category.php on line 383
In an earlier exercise, we created an abstraction to read in a sound file and play it. If you plan on playing the sound more than once, it doesn’t make a lot of sense to read it in each time. It repeats work unnecessarily, and reading from the computer’s hard drive can be slow.
Rather, we should separate the reading from the playing. Then we can read it once into the computer’s memory (RAM), which is must faster to access than disk, and play it as many times as we like.
Let’s design a new abstraction for doing the reading. We’ll call it load_sound_file. It needs to know two things: the file to read and the array to drop the sound data into. We’ll send it a message containing these two pieces of information. Here, for example, we read in song.wav and store it in the array clip:

We click on the loading message just once. The array will store the sound wave. Then we click on the bang as many time as we like to play it back.
How do we define load_sound_file? Recall that soundfiler responds to a read -resize PATH ARRAY message. If a list arrives at a message’s inlet, the list’s elements can be referenced within the message using $1, $2, and so on. So, we turn the PATH ARRAY message passed to the abstraction into a list and pass it to the read message. The soundfiler then does the hard work. All told, our abstraction looks like this:

Deprecated: Creation of dynamic property WP_Term::$cat_ID is deprecated in /var/www/twodee/blog/wp-includes/category.php on line 378
Deprecated: Creation of dynamic property WP_Term::$category_count is deprecated in /var/www/twodee/blog/wp-includes/category.php on line 379
Deprecated: Creation of dynamic property WP_Term::$category_description is deprecated in /var/www/twodee/blog/wp-includes/category.php on line 380
Deprecated: Creation of dynamic property WP_Term::$cat_name is deprecated in /var/www/twodee/blog/wp-includes/category.php on line 381
Deprecated: Creation of dynamic property WP_Term::$category_nicename is deprecated in /var/www/twodee/blog/wp-includes/category.php on line 382
Deprecated: Creation of dynamic property WP_Term::$category_parent is deprecated in /var/www/twodee/blog/wp-includes/category.php on line 383
Deprecated: Creation of dynamic property WP_Term::$cat_ID is deprecated in /var/www/twodee/blog/wp-includes/category.php on line 378
Deprecated: Creation of dynamic property WP_Term::$category_count is deprecated in /var/www/twodee/blog/wp-includes/category.php on line 379
Deprecated: Creation of dynamic property WP_Term::$category_description is deprecated in /var/www/twodee/blog/wp-includes/category.php on line 380
Deprecated: Creation of dynamic property WP_Term::$cat_name is deprecated in /var/www/twodee/blog/wp-includes/category.php on line 381
Deprecated: Creation of dynamic property WP_Term::$category_nicename is deprecated in /var/www/twodee/blog/wp-includes/category.php on line 382
Deprecated: Creation of dynamic property WP_Term::$category_parent is deprecated in /var/www/twodee/blog/wp-includes/category.php on line 383
Deprecated: Creation of dynamic property WP_Term::$cat_ID is deprecated in /var/www/twodee/blog/wp-includes/category.php on line 378
Deprecated: Creation of dynamic property WP_Term::$category_count is deprecated in /var/www/twodee/blog/wp-includes/category.php on line 379
Deprecated: Creation of dynamic property WP_Term::$category_description is deprecated in /var/www/twodee/blog/wp-includes/category.php on line 380
Deprecated: Creation of dynamic property WP_Term::$cat_name is deprecated in /var/www/twodee/blog/wp-includes/category.php on line 381
Deprecated: Creation of dynamic property WP_Term::$category_nicename is deprecated in /var/www/twodee/blog/wp-includes/category.php on line 382
Deprecated: Creation of dynamic property WP_Term::$category_parent is deprecated in /var/www/twodee/blog/wp-includes/category.php on line 383
This post is part of a series of notes and exercises for a summer camp on making musical instruments with Arduino and Pure Data.
The Arduino side of the Music Mouse is working. Whew! All that’s left is to interpret the messages it sends out in Pure Data. Soon we’ll have music.
Pure Data Interpreter
Create a new file in Pure Data and follow these steps to birth your very own Music Mouse:
- Add the standard serial port messages and
comportobject. - Add a
repack 4object to collect up the four bytes of each message from the Arduino. - Add a
route 0 1object to divert the message along different branches of your patch based on the message type, the first byte of each message. - Feed the outlet of
repackto the inlet ofroute. - The browser-based Music Mouse lets its notes ring out for a long time. Let’s do that too. Add a
makenote 100 10000object. This makes a note with velocity 100 that lasts 10000 milliseconds = 10 seconds. - Add an
unpack float float floatobject to tease apart the three bytes of the harmony message. - Feed the chord, which comes from from the 0-outlet of
route, to the inlet ofunpack. - Feed each of the three outlets of
unpackto the first inlet ofmakenote. - Add an
unpack floatobject to tease apart the three bytes of the melody message. By listing only a single parameter afterunpack, we effectively throw away the two zeroes. - Feed the melody bytes, which come from the 1-outlet of
route, to the inlet of this secondunpack. - Feed the melody’s MIDI number, which comes from the outlet of this second
unpack, into the left inlet of themakenoteobject. - Add a
noteoutobject. - Feed the first outlet (the MIDI number) of
makenoteto the first inlet ofnoteout. - Feed the second outlet (the velocity) of
makenoteto the second inlet ofnoteout.
Test your patch. Your should able to produce music with the joystick!
]]>Deprecated: Creation of dynamic property WP_Term::$cat_ID is deprecated in /var/www/twodee/blog/wp-includes/category.php on line 378
Deprecated: Creation of dynamic property WP_Term::$category_count is deprecated in /var/www/twodee/blog/wp-includes/category.php on line 379
Deprecated: Creation of dynamic property WP_Term::$category_description is deprecated in /var/www/twodee/blog/wp-includes/category.php on line 380
Deprecated: Creation of dynamic property WP_Term::$cat_name is deprecated in /var/www/twodee/blog/wp-includes/category.php on line 381
Deprecated: Creation of dynamic property WP_Term::$category_nicename is deprecated in /var/www/twodee/blog/wp-includes/category.php on line 382
Deprecated: Creation of dynamic property WP_Term::$category_parent is deprecated in /var/www/twodee/blog/wp-includes/category.php on line 383
Deprecated: Creation of dynamic property WP_Term::$cat_ID is deprecated in /var/www/twodee/blog/wp-includes/category.php on line 378
Deprecated: Creation of dynamic property WP_Term::$category_count is deprecated in /var/www/twodee/blog/wp-includes/category.php on line 379
Deprecated: Creation of dynamic property WP_Term::$category_description is deprecated in /var/www/twodee/blog/wp-includes/category.php on line 380
Deprecated: Creation of dynamic property WP_Term::$cat_name is deprecated in /var/www/twodee/blog/wp-includes/category.php on line 381
Deprecated: Creation of dynamic property WP_Term::$category_nicename is deprecated in /var/www/twodee/blog/wp-includes/category.php on line 382
Deprecated: Creation of dynamic property WP_Term::$category_parent is deprecated in /var/www/twodee/blog/wp-includes/category.php on line 383
Deprecated: Creation of dynamic property WP_Term::$cat_ID is deprecated in /var/www/twodee/blog/wp-includes/category.php on line 378
Deprecated: Creation of dynamic property WP_Term::$category_count is deprecated in /var/www/twodee/blog/wp-includes/category.php on line 379
Deprecated: Creation of dynamic property WP_Term::$category_description is deprecated in /var/www/twodee/blog/wp-includes/category.php on line 380
Deprecated: Creation of dynamic property WP_Term::$cat_name is deprecated in /var/www/twodee/blog/wp-includes/category.php on line 381
Deprecated: Creation of dynamic property WP_Term::$category_nicename is deprecated in /var/www/twodee/blog/wp-includes/category.php on line 382
Deprecated: Creation of dynamic property WP_Term::$category_parent is deprecated in /var/www/twodee/blog/wp-includes/category.php on line 383
This post is part of a series of notes and exercises for a summer camp on making musical instruments with Arduino and Pure Data.
In this exercise, we prepare our Music Mouse to send messages to a Pure Data patch. When the musician goes up or down in the Music Mouse interface, we issue a message containing a single note to be played. This will be the melody. When the joystick goes left or right, however, we issue a message containing several notes to be played. This will be the harmony.
In this exercise, we design a protocol, a language for describing how two systems communicate with each other.
Melody Message
We need to distinguish between melody and harmony messages in Pure Data. Let’s support this on the Arduino side by sending a message type as the first byte in each message we send. We’ll use a 1 to denote a melody message. The melody, which is controlled by vertical motion, plays a single note at a time, so we technically need only send one MIDI number across the serial port. However, we will need four numbers in our harmony messages.
To make our work in Pure Data easier, let’s make both messages take up four bytes. Melody messages will have this form:
1 y 0 0
You should already have code that prints y. Precede it with code to print 1. Print two meaningless zeros after y.
Harmony Message
We’ll use 0 to denote a harmony message. When the horizontal position changes, we want to print more than x. We also want to print the partner notes of the chord. A harmony message will have this form:
0 x (x + offset to middle) (x + offset to middle + offset to final)
Let’s figure out what these partner notes are using Tero Parviainen’s Music Mouse implementation.
Move the mouse so that the leftmost note of the chord is on a C, which is any white key immediately to the left of a pair of black keys. Observe the other two keys that are played above or to the right of the C. Count the number of keys or halfsteps it takes to jump up to these higher notes.
- How many halfsteps above the C is the middle note of the chord?
7
- How many halfsteps above the middle note is the final note of the chord starting on C?
9. All told, the chord includes C, C + 7, and C + 7 + 9.
Do all the chords have the same offsets? Let’s check. Move the mouse so that the bottom note of the chord is on a D, which is any white key between a pair of black keys.
- How many halfsteps above the D is the middle note of the chord?
7
- How many halfsteps above the middle note is the third note of the chord starting on D?
8. Ugh. The chords do not all have the same offsets. Let’s create two arrays to record the offsets:
int middle_offsets[] = {7, 7, ?, ?, ?, ?, ?};
int final_offsets[] = {9, 8, ?, ?, ?, ?, ?};
Use Music Mouse and determine the rest of the offsets.
What did you come up with?
int middle_offsets[] = {7, 7, 7, 7, 7, 7, 6};
int final_offsets[] = {9, 8, 8, 9, 9, 8, 9};
Now we are ready to send a complete message for the harmony. You should already be printing x. Precede it with a 0. After printing x, print the MIDI numbers of the middle and final notes. Which offset we use depends on our current position in the scale. What do we have that can tell us our current position in the scale?
Upload your code. You should see both message types. When you see the messages following the protocol, change all your println calls to write calls. We’re heading to Pure Data next.
Deprecated: Creation of dynamic property WP_Term::$cat_ID is deprecated in /var/www/twodee/blog/wp-includes/category.php on line 378
Deprecated: Creation of dynamic property WP_Term::$category_count is deprecated in /var/www/twodee/blog/wp-includes/category.php on line 379
Deprecated: Creation of dynamic property WP_Term::$category_description is deprecated in /var/www/twodee/blog/wp-includes/category.php on line 380
Deprecated: Creation of dynamic property WP_Term::$cat_name is deprecated in /var/www/twodee/blog/wp-includes/category.php on line 381
Deprecated: Creation of dynamic property WP_Term::$category_nicename is deprecated in /var/www/twodee/blog/wp-includes/category.php on line 382
Deprecated: Creation of dynamic property WP_Term::$category_parent is deprecated in /var/www/twodee/blog/wp-includes/category.php on line 383
Deprecated: Creation of dynamic property WP_Term::$cat_ID is deprecated in /var/www/twodee/blog/wp-includes/category.php on line 378
Deprecated: Creation of dynamic property WP_Term::$category_count is deprecated in /var/www/twodee/blog/wp-includes/category.php on line 379
Deprecated: Creation of dynamic property WP_Term::$category_description is deprecated in /var/www/twodee/blog/wp-includes/category.php on line 380
Deprecated: Creation of dynamic property WP_Term::$cat_name is deprecated in /var/www/twodee/blog/wp-includes/category.php on line 381
Deprecated: Creation of dynamic property WP_Term::$category_nicename is deprecated in /var/www/twodee/blog/wp-includes/category.php on line 382
Deprecated: Creation of dynamic property WP_Term::$category_parent is deprecated in /var/www/twodee/blog/wp-includes/category.php on line 383
Deprecated: Creation of dynamic property WP_Term::$cat_ID is deprecated in /var/www/twodee/blog/wp-includes/category.php on line 378
Deprecated: Creation of dynamic property WP_Term::$category_count is deprecated in /var/www/twodee/blog/wp-includes/category.php on line 379
Deprecated: Creation of dynamic property WP_Term::$category_description is deprecated in /var/www/twodee/blog/wp-includes/category.php on line 380
Deprecated: Creation of dynamic property WP_Term::$cat_name is deprecated in /var/www/twodee/blog/wp-includes/category.php on line 381
Deprecated: Creation of dynamic property WP_Term::$category_nicename is deprecated in /var/www/twodee/blog/wp-includes/category.php on line 382
Deprecated: Creation of dynamic property WP_Term::$category_parent is deprecated in /var/www/twodee/blog/wp-includes/category.php on line 383
This post is part of a series of notes and exercises for a summer camp on making musical instruments with Arduino and Pure Data.
We’ve got horizontal motion working in the Music Mouse. Let’s add vertical motion. This will be very similar to the horizontal motion, but there is an important difference.
Vertical Motion
In loop, read and print the value from pin A1. This pin controls the y-position. Upload and run the program. Inspect the values you see and answer these questions:
- What value do you see when the joystick is pushed all the way down?
~1023
- What value do you see when the joystick is pushed all the way up?
~0
It’d be nice if pushing down made the number go negative, idle was 0, and pushing up made the number go positive. Let’s make that happen. We want to turn a number in the top range into a number in the bottom range:
How do we do that?
No, really. How do we do that?
Center the reading and test that it works.
Create variable dy and calculate it similarly to dx. Create variable scale_index_y. Add code to handle changes to y just like you did with the horizontal motion—but use the vertical variables instead.
Upload your code and test that you can change both x and y.
Deprecated: Creation of dynamic property WP_Term::$cat_ID is deprecated in /var/www/twodee/blog/wp-includes/category.php on line 378
Deprecated: Creation of dynamic property WP_Term::$category_count is deprecated in /var/www/twodee/blog/wp-includes/category.php on line 379
Deprecated: Creation of dynamic property WP_Term::$category_description is deprecated in /var/www/twodee/blog/wp-includes/category.php on line 380
Deprecated: Creation of dynamic property WP_Term::$cat_name is deprecated in /var/www/twodee/blog/wp-includes/category.php on line 381
Deprecated: Creation of dynamic property WP_Term::$category_nicename is deprecated in /var/www/twodee/blog/wp-includes/category.php on line 382
Deprecated: Creation of dynamic property WP_Term::$category_parent is deprecated in /var/www/twodee/blog/wp-includes/category.php on line 383
Deprecated: Creation of dynamic property WP_Term::$cat_ID is deprecated in /var/www/twodee/blog/wp-includes/category.php on line 378
Deprecated: Creation of dynamic property WP_Term::$category_count is deprecated in /var/www/twodee/blog/wp-includes/category.php on line 379
Deprecated: Creation of dynamic property WP_Term::$category_description is deprecated in /var/www/twodee/blog/wp-includes/category.php on line 380
Deprecated: Creation of dynamic property WP_Term::$cat_name is deprecated in /var/www/twodee/blog/wp-includes/category.php on line 381
Deprecated: Creation of dynamic property WP_Term::$category_nicename is deprecated in /var/www/twodee/blog/wp-includes/category.php on line 382
Deprecated: Creation of dynamic property WP_Term::$category_parent is deprecated in /var/www/twodee/blog/wp-includes/category.php on line 383
Deprecated: Creation of dynamic property WP_Term::$cat_ID is deprecated in /var/www/twodee/blog/wp-includes/category.php on line 378
Deprecated: Creation of dynamic property WP_Term::$category_count is deprecated in /var/www/twodee/blog/wp-includes/category.php on line 379
Deprecated: Creation of dynamic property WP_Term::$category_description is deprecated in /var/www/twodee/blog/wp-includes/category.php on line 380
Deprecated: Creation of dynamic property WP_Term::$cat_name is deprecated in /var/www/twodee/blog/wp-includes/category.php on line 381
Deprecated: Creation of dynamic property WP_Term::$category_nicename is deprecated in /var/www/twodee/blog/wp-includes/category.php on line 382
Deprecated: Creation of dynamic property WP_Term::$category_parent is deprecated in /var/www/twodee/blog/wp-includes/category.php on line 383
This post is part of a series of notes and exercises for a summer camp on making musical instruments with Arduino and Pure Data.
Music Mouse walks the horizontal axis in steps of one right now. If we were to interpret the x-position as a MIDI number and move along one halfstep at a time, we’d be walking the chromatic scale. It’s just like walking up a piano one key at a time.
We don’t normally play music in the chromatic scale. Let’s have Music Mouse walk the major scale instead.
Moving Right
When the joystick is pressed right, we want the Music Mouse to get to the next note in the major scale. We’re probably going to need a list of the offsets between the notes of the major scale.
What were those offsets again?
Declare a global array named jumpUps that holds these offsets. When the joystick is pressed right, we want to apply one of these offsets the current x-position. But which offset?
We don’t know. We don’t have enough information to know where we’re at in the scale. So, let’s declare a global int named scale_index_x and assign it 0. We’ll use it to track our current position in the scale.
When we change the x-position, instead of adding dx, add on the offset for our current position in the scale:
x += jumpUps[scale_index_x];
Also, advance our position in the scale by adding 1 on to scale_index_x.
Upload and test your code. If you start at 60 and press right, you should advance to 62, 64, 65, 67, 69, 71, 72, and so on.
Wrap Around
When you advance past 72, you probably see some strange results.
Why?
scale_index_x is 7, which is no longer a valid index into the array. It is accessing memory beyond the end of the array, and who knows what’s in that memory. This is called a buffer overflow error, and it is commonly exploited by ne’er-do-wells to hijack software.
To fix this, we need to have scale_index_x wrap back around to 0. We could implement this wraparound as a conditional statement:
if scale_index_x > 6
  scale_index_x = 0
But there’s an operator that can do this more succinctly. To get a feel for it, visit your instructor’s Mod Walk graph on Desmos, add a row and set $x_1$ to 1. Observe how $y$ is calculated and the pair is plotted. Keep adding rows for all $x_1$ in [0, 25] or so. (Hit return on the bottom row and Desmos will automatically increment.)
See how this mod function wraps our progression? Much like how a clock wraps around after it hits 12? In C++, we can apply this wrapping to scale_index_x using the modulus operator:
scale_index_x = (scale_index_x + 1) % 7;
We add 1 and then wrap back around to 0 if we’ve reached 7 or greater. We read % 7 as “mod 7”.
Add this wraparound and test your code. Does it effectively start the scale over as you advance past 72?
Moving Left
Okay, we’ve got the joystick’s right action working.
What happens when you press left?
Declare a global array named jumpDowns. Assign it a list of seven numbers that describe how many halfsteps we should jump down to get to the previous note in the major scale.
What are those numbers?
The assignment to x needs to get a bit more complicated. We have to choose between jumping up and jumping down. This sounds like a conditional statement, and we’ll use dx to arbitrate between our choices. Update your code to match this pseudocode:
if old_dx and dx are different
  if we're not idling
    if we're going right
      x = x + jumpUps[scale_index_x]
      increment scale_index_x with wraparound
    else
      x = x - jumpDowns[scale_index_x]
      decrement scale_index_x with wraparound
  old_dx = dx
For the decrementing, you might have written this:
scale_index_x = (scale_index_x - 1) % 7;
Sadly, the mod operator doesn’t quite do what we want for negative numbers. In particular, it yields negative numbers, which are inappropriate for indexing into an array. Consider the following table that shows what values we want and what % actually yields:
| value | value % 7 | what we want |
|---|---|---|
| 6 | 6 | 6 |
| 5 | 5 | 5 |
| 4 | 4 | 4 |
| 3 | 3 | 3 |
| 2 | 2 | 2 |
| 1 | 1 | 1 |
| 0 | 0 | 0 |
| -1 | -1 | 6 |
| -2 | -2 | 5 |
| -3 | -3 | 4 |
| -4 | -4 | 3 |
| -5 | -5 | 2 |
| -6 | -6 | 1 |
What expression takes us from the left column to the right column?
| value | value % 7 + 7 | what we want |
|---|---|---|
| 6 | 13 | 6 |
| 5 | 12 | 5 |
| 4 | 11 | 4 |
| 3 | 10 | 3 |
| 2 | 9 | 2 |
| 1 | 8 | 1 |
| 0 | 7 | 0 |
| -1 | 6 | 6 |
| -2 | 5 | 5 |
| -3 | 4 | 4 |
| -4 | 3 | 3 |
| -5 | 2 | 2 |
| -6 | 1 | 1 |
Bummer. Adding 7 worked for the negative numbers, but not the positive numbers. Here’s a little trick. Instead of adding 7 after the %, let’s add it before. Examine this table to prove to yourself that this works:
| value | value + 7 | (value + 7) % 7 | what we want |
|---|---|---|---|
| 6 | 13 | 6 | 6 |
| 5 | 12 | 5 | 5 |
| 4 | 11 | 4 | 4 |
| 3 | 10 | 3 | 3 |
| 2 | 9 | 2 | 2 |
| 1 | 8 | 1 | 1 |
| 0 | 7 | 0 | 0 |
| -1 | 6 | 6 | 6 |
| -2 | 5 | 5 | 5 |
| -3 | 4 | 4 | 4 |
| -4 | 3 | 3 | 3 |
| -5 | 2 | 2 | 2 |
| -6 | 1 | 1 | 1 |
So our assignment statement for moving left is this:
scale_index_x = (scale_index_x - 1 + 7) % 7;