Deprecated: Creation of dynamic property WP_Term::$cat_ID is deprecated in /var/www/twodee/blog/wp-includes/category.php on line 378
Deprecated: Creation of dynamic property WP_Term::$category_count is deprecated in /var/www/twodee/blog/wp-includes/category.php on line 379
Deprecated: Creation of dynamic property WP_Term::$category_description is deprecated in /var/www/twodee/blog/wp-includes/category.php on line 380
Deprecated: Creation of dynamic property WP_Term::$cat_name is deprecated in /var/www/twodee/blog/wp-includes/category.php on line 381
Deprecated: Creation of dynamic property WP_Term::$category_nicename is deprecated in /var/www/twodee/blog/wp-includes/category.php on line 382
Deprecated: Creation of dynamic property WP_Term::$category_parent is deprecated in /var/www/twodee/blog/wp-includes/category.php on line 383
Our mission’s nearly over. You asked me to give you homework and projects so that you could learn full-stack web development. I’ve done that, and all that’s left is project 2 and the final exam. We won’t see each other again as a CS 347 family, so this is where we say goodbye. Before we part, however, I think we should reflect on what just happened.
I had a friend who talked frequently of finding the “story” for each course he taught. When he knew the story and stuck to the story, he felt good about his teaching. Otherwise he felt miserable. Sometimes it would take him a few semesters to figure out the story.
This is my second time teaching a course like CS 347, and here’s what I’m starting to think is its story:
Some classes are about algorithms. Some are about data structures. Some are about networking. Some are about human users. Some are about graphical user interfaces. A web development course is about all of these at the same time. The course is about their unification.
While the unification of so many subdisciplines makes for a packed course, we apply these ideas rather than learn their theoretical origins. If we “apply” long enough, we end up with an application. That’s what we have learned to build this semester: web applications. This is a good thing to learn, because while the web may have started as a system for sharing text documents that could link to each other, it has stolen a lot of responsibility from the desktop and become a platform on which our everyday applications run.
I originally signed up to teach this course because I had reached a crisis of confidence in my own application development. Every time I started a new program, I would reach a point where I needed a graphical user interface so that other humans could use it. I would turn to wxWidgets, Qt, Swing, and JavaFX, but I enjoyed none of them—in part because I had grown tired of C++ and in part because they limited who could run my programs. With Qt and wxWidgets, I’d need to compile a version for each of the different operating systems. With Java, I wouldn’t have platform-specific issues, but I would need my users to be able to install software on their machines. That doesn’t seem like much to ask, but it is when there’s the web sitting right there, happy to run my apps without installation. Better still, the web made it easy for me to update my apps. I just went to the server and pulled down my changes. The web improves the computing experience for developers and users. It doesn’t feel like it’s dying. It’s where I wanted to spend my time.
Please don’t let me influence you too much. There will always be a place for desktop development. Sometimes we need the hardware and the software to be very intimately connected. I don’t want all of my data to be on the web. I would be very sad if the browser was the only platform we had.
Last week you all provided me with your thoughts on how you’d run this course if you were teaching it. I wanted to share with you my own vision of what I would do if I were to teach CS 347 again. Here’s my list of plans.
- I would recruit a bunch of friendly and mature students like yourselves. Seriously, I am very impressed by how you all communicated with me. Thank you for treating me like a fellow human.
- A committee of several faculty are going to suggest to the department that the course be split into two different courses. If we have our druthers, there will be a required CS 247 that covers HTML, CSS, and JavaScript. Students would likely take this during their second year, and it would be a prerequisite for CS 345. Many of you mentioned in your blogs that the HTML and CSS material was compressible and that more time on JavaScript and React would be nice. By breaking the lighter material into a 200-level course, second-years would get some exposure to front-end development before going on internships. CS 347 would continue to be an elective and would cover back-end topics like web services and front-end topics like React.
- The biggest issue of the course, in my opinion and in many of yours, is the uneven participation in the breakout rooms. Grading was largely based on showing up, and some of us made a habit of not doing more than that. I knew this was going to be an issue, and I intentionally chose to ignore it because I care more about your well-being than the course objectives. Covid-19 has added a lot of complication to our lives, and I didn’t want to be in the business of micro-managing you. As we adjust to quarantine life, and as I gain my footing in this department, I will raise my expectations.
- In an open-ended project-based course, it is easy to feel like you don’t know anything. You are not continually seeing measures of your learning. Rather, you spend all your time dealing with the things you don’t know. I will probably switch away from exams to weekly quizzes so that students can have more periodic check-ins to assert their knowledge.
- Someone suggested in their post that project 2 be broken into two separate deliverables: the web service and the React client. I think this is a fabulous idea and will be adopting it.
- One thing I need to keep thinking about is the mode of delivery. Many of you found the lab time to be helpful, and many of you wished for more live instruction. At my previous university, we could have a schedule where we had two days with hour-long lectures and one day with a two-hour lab. I’d love to have something like that here.
- A modest number of you bristled at the open-endedness of the blogs and projects. I’m afraid that you didn’t convince me to switch away from that. One of you paraphrased it nicely: “I think the beauty of the class is also sometimes the problem. Oftentimes things felt vague and up to us to learn and grow.” School makes you think that everything has a right answer. That’s a lie. As computer scientists, you will often be in the position of making something new, in which right and wrong haven’t been decided yet. On your resume, would you rather put that you know HTML, CSS, and JavaScript or that you built your own MP3 player over winter break?
I will keep going through your posts and thinking about how to teach this course. The semester has been a great big brain explosion for me as I’ve learned a new workplace and gotten a much firmer grasp on the modern web. Thanks for making this move feel like an upgrade in every possible way. As you go about your futures, I welcome keeping in touch on Twitter, LinkedIn, or email. I only talk about politics on Facebook.
TODO
Here’s your TODO list for next time:
- Complete the end-of-semester evaluations. You can find a link in MyMadison.
- Add your project 2 URLs to the document I shared in Slack #project2.
- Keep plugging away at project 2.
- Watch for an email on Tuesday containing a link for the final exam. It will be 30 multiple choice and fill-in-the-blank questions. You have until Thursday at 3 PM to finish it. I trust you to complete the exam on your own. It’s better to lose a point than your soul. You are free to consult any existing resource, but please do not solicit any answers or write anything to the web related to the exam.
There is no next time, so I won’t see you then.

Deprecated: Creation of dynamic property WP_Term::$cat_ID is deprecated in /var/www/twodee/blog/wp-includes/category.php on line 378
Deprecated: Creation of dynamic property WP_Term::$category_count is deprecated in /var/www/twodee/blog/wp-includes/category.php on line 379
Deprecated: Creation of dynamic property WP_Term::$category_description is deprecated in /var/www/twodee/blog/wp-includes/category.php on line 380
Deprecated: Creation of dynamic property WP_Term::$cat_name is deprecated in /var/www/twodee/blog/wp-includes/category.php on line 381
Deprecated: Creation of dynamic property WP_Term::$category_nicename is deprecated in /var/www/twodee/blog/wp-includes/category.php on line 382
Deprecated: Creation of dynamic property WP_Term::$category_parent is deprecated in /var/www/twodee/blog/wp-includes/category.php on line 383
Today we discuss OAuth2, a popular system for managing access to data controlled by a web service but accessed by a separate client application. I will be frank with you. Security is not my favorite subject, and I do not feel qualified to be speaking on it. However, OAuth2 is too much of a superpower to ignore, and many web services are not even usable without it.
OAuth2 is something I use nearly every day. When you find a typo in one of my blog posts, I change my local copy of the post and upload it to WordPress instantaneously thanks to OAuth2. On GitHub I have 93 repositories, on Bitbucket 85, and on GitLab 60. Backing all these up could be very painful, but with OAuth2, I can access these providers’ services and get a list of all of them. If I want to mine your Slack posts, I’d use OAuth2.
We start our discussion of OAuth2 with an overview of its workflow. Then we’ll write a script that lists all of my files on Google Drive, something that we simply cannot do without OAuth2.
Authentication vs. Authorization
On Twitter recently I saw a computer science professor recall the time he got corrected for confusing the terms authorization and authentication. Let’s start there since the difference is probably something many of us may not be able to articulate.
Authentication is the process of confirming that users are who they claim to be. I say that I am JOHNS8CR and authenticate that claim by providing my password. That’s a 1-factor authentication scheme. We also have 2-factor authentication schemes in which we provide further evidence. The first factor is something we know: our password. The second factor is something we have: our phone. We click a button on our phone’s Duo client. We haven’t yet reached a third factor at JMU, which might be something that we are, like our fingerprints or retinal patterns.
Authorization is the process of granting access to a resource. OAuth2 is an authorization protocol. It’s purpose is to allow the user to tell a service that it’s okay for a third-party app to access the user’s data. One of its steps may be an authentication, but ultimately OAuth2 is about permission.
Protocol
Suppose we have an application that needs to access a web service on a user’s behalf. What must we do to authorize the application with the service with OAuth2? There are several steps, some of which need to be done more often than others.
The OAuth2 specification includes several protocols. The discussion here is limited to the authorization code grant type.
Per Application
The developer of the application registers the application with the service. The service grants the application a client ID and a client secret. These should be kept private. If a nefarious party gets hold of them, others can masquerade as your app. They might do this to make users run an app that they are not actually running. They may also run up the developer’s bill with the service provider, since the accesses will count against the developer.
Generally the ID and secret are generated only once. If a developer accidentally leaks the ID or secret by embedding them literally in source code or pushing a credentials file to a public repository, then a new ID and secret should be generated.
Per Authorization
When a user runs the application for the first time (or a previous authorization has expired or been revoked), these several steps must be followed for the application to gain authorization:
- The application requests authorization from the service, sending along its client ID and client secret.
- The service prompts the user to authenticate and authorize the application’s access. The application is not involved in this step. By design, it never gets its hands on the user’s credentials.
- The service sends the application an authorization code. This authorization code is housed within a URL parameter and is by itself not considered very secure. Any party sniffing traffic could get their hands on an authorization code.
- The application sends the authorization code and its secret to the service. These two paired together are more secure.
- The service sends back an access token and possibly a refresh token. Unlike the authorization code, these are tucked away inside the body an encrypted HTTP response.
The tokens are often stored by the application and reused on subsequent accesses, so these steps do not need to be completed every time the application accesses the service. If the access token expires, the refresh token may be used to secure a new one without going through the complete authorization process.
Per Request
When the application submits a request to an endpoint of the service, it includes a header containing the access token. The service compares this access token to the one it has on file. If the tokens match, the request is authorized and the user’s data is sent in the response.
Accessing Google Drive
The high-level view seems innocent. The actual implementation is mired in technical details. But let’s talk about them anyway. Let’s write a Node.js script that lists all the files I have on my Google Drive account.
Register Application
The first step is to register our application with Google.
- Visit the Google API Console.
- Add a new project.
- Enable the Google Drive API for this project.
We next configure the authorization screen that the user sees when the service takes over.
- Click OAuth Consent Screen.
- Set the User Type to External. If we were part of an organization participating in Google’s G Suite program, we could choose Internal, and Google would consider our application to be in-house and waive verification. Since we are not in G Suite, our app will be branded as not verified.
- On the first screen, enter the application name and your email address where prompted. The other fields can be left empty since we are not going to verify our application.
- On the second screen, declare what kind of access your application needs. The levels of access are called scopes. Google provides a list of all of its service’s scopes. For today, we will use
https://www.googleapis.com/auth/drive.readonly. - On the third screen, add the accounts that should be allowed to authorize the unverified application.
Finally we secure a client ID and secret.
- In the Credentials panel, click Create Credentials.
- Choose OAuth Client ID.
- Set the application type to Web application and enter a name.
- Add the redirect URI
http://localhost:4545. We’ll come back to the significance of this in a moment. - Copy the client ID and secret to file
credentials.jsonusing a format like this:{ "clientId": "...", "clientSecret": "..." }
Load Credentials
We have registered our application with Google, and now it’s time to write that application. It first needs to load in its ID and secret. We’ll use the fs package to read in the file. We’ll use the asynchronous version of readFile and fulfill the promise in its callback.
const fs = require('fs');

function loadConfig() {
  return new Promise((resolve, reject) => {
    fs.readFile('credentials.json', 'utf8', (error, data) => {
      if (error) {
        reject(error);
      } else {
        resolve(JSON.parse(data));
      }
    });
  })
}

loadConfig()
  .then(config => console.log(config));
Gain Authorization
Next our application must seek authorization. Google documents how this is done. In short, the application needs to send an HTTP request to particular Google URL and provide some required parameters.
To stay organized, let’s add a new step to our promise pipeline. We start by creating an object to hold the parameters we want to pass.
const redirectUri = 'http://localhost:4545';

function authorize(config) {
  return new Promise((resolve, reject) => {
    const parameters = {
      scope: 'https://www.googleapis.com/auth/drive.readonly',
      response_type: 'code',
      redirect_uri: redirectUri,
      client_id: config.clientId,
      access_type: 'offline',
    };

    // access Google URL
  });
}

loadConfig()
  .then(config => authorize(config));
After initiating the authorization, the application must step back while the user talks to the service directly to authenticate and authorize. The application triggers the Google URL to be loaded in the web browser. To make that task a little easier, we write a couple of help functions for forming the URL and opening the browser.
const childProcess = require('child_process');
const authorizationEndpoint = 'https://accounts.google.com/o/oauth2/v2/auth';

function makeUrl(baseUrl, parameters) {
  const url = new URL(baseUrl);
  for (let [key, value] of Object.entries(parameters)) {
    url.searchParams.append(key, value);
  }
  return url;
}

function open(url) {
  var start = process.platform === 'darwin' ? 'open' : process.platform === 'win32' ? 'start': 'xdg-open';
  childProcess.exec(`${start} "${url}"`);
}

function authorize(config) {
  return new Promise((resolve, reject) => {
    // ...
    open(makeUrl(authorizationEndpoint, parameters).href);
  });
}
The next step is my least favorite part of the workflow. After the user and service are done talking to each other, the service has to give control back to the application somehow and give the application an authorization code. The mechanism is to redirect the browser to a URL that ties in with the application somehow. For us, “somehow” means we’ll start our own little server that handles the redirect.
const net = require('net');

function authorize(config) {
  return new Promise((resolve, reject) => {
    // ...

    const server = net.createServer();

    server.listen(4545, 'localhost', () => {
      console.log('listening...');
    });

    server.on('connection', socket => {
      socket.setEncoding('utf8');

      socket.on('data', data => {
        console.log(data);
      });

      socket.on('close', () => {
        server.close();
      });
    });
  });
}
In our data listener, we must parse the body and pull out the authorization code. There are robust ways to do this, and then there’s our way. We’ll just rip out the code using a regular expression. Once we have it, we can resolve our promise by passing along config with the code included, and we send back an HTTP response to the browser.
function authorize(config) {
  return new Promise((resolve, reject) => {
    // ...

    const server = net.createServer();

    server.listen(4545, 'localhost', () => {
      console.log('listening...');
    });

    server.on('connection', socket => {
      socket.setEncoding('utf8');

      socket.on('data', data => {
        const matches = data.match(/code=([^&\s]+)/);
        if (matches) {
          const code = decodeURIComponent(matches[1]);
          resolve({
            ...config,
            authorizationCode: code,
          });

          socket.write("HTTP/1.1 200\r\n");
          socket.write("Content-Type: text/html\r\n");
          socket.write("\r\n");
          socket.write("You have authorized the app. Close this window.")
          socket.end();
        } else {
          reject(Error('no code given'));
        }
      });

      socket.on('close', () => {
        server.close();
      });
    });
  });
}
A better application would ensure that all the requested scopes were granted.
Gain Access Token
With the authorization code in hand, the application trades it in for an access token. It does this by accessing another one of Google’s URLs, but this time, the user isn’t involve. The URL is accessed programmatically. We use a version of fetch written for Node.js. This time we POST the parameters instead of passing them in the URL.
const fetch = require('node-fetch');
const tokenEndpoint = 'https://oauth2.googleapis.com/token';

function tokenize(config) {
  return new Promise((resolve, reject) => {
    const tokenParameters = {
      code: config.authorizationCode,
      client_id: config.clientId,
      client_secret: config.clientSecret,
      redirect_uri: redirectUri,
      grant_type: 'authorization_code',
    };

    const options = {
      method: 'POST',
      headers: {
        'Content-Type': 'application/json',
      },
      body: JSON.stringify(tokenParameters),
    };

    fetch(tokenEndpoint, options)
      .then(response => response.json())
      .then(data => resolve({
        ...config,
        accessToken: data.access_token,
      }));
  });
}

loadConfig()
  .then(config => authorize(config))
  .then(config => tokenize(config))
  .then(config => console.log(config));
The parameters and URL are documented in Google’s OAuth2 workflow.
Consume Endpoints
With the access token, the application can get the user’s data from the service. The service is accessed through its endpoints just like we’ve accessed other services this semester—with one exception. Any requests must pass along the access token in a custom header of the form Authorization: Bearer ACCESS-TOKEN.
To get a list of files from Google Drive, we consult the Drive API reference. We find that a GET request to /files gives us back an array of file objects. Let’s map this array to just a list of names.
const filesEndPoint = 'https://www.googleapis.com/drive/v3/files';

function fetchFiles(accessToken) {
  return new Promise((resolve, reject) => {
    const options = {
      headers: {
        'Authorization': `Bearer ${accessToken}`,
      },
    };

    fetch(filesEndPoint, options)
      .then(response => response.json())
      .then(data => resolve(data.files.map(file => file.name)));
  });
}

loadConfig()
  .then(config => authorize(config))
  .then(config => tokenize(config))
  .then(config => fetchFiles(config.accessToken))
  .then(files => console.log(files));
Next
That’s a first peek at OAuth2. We have built an application that can access a user’s data. Our application is specific to Google Drive, but most web service providers offer similar workflows. We just need to swap in the URLs of their OAuth2 endpoints, tweak the parameters that we pass on to these endpoints, and tailor our calls to the service according their service’s API.
There are a few things we haven’t done in our application that would make it nicer. Really, we should store the access token. Google’s tokens last for 3600 seconds. Even when they do expire, we can use the refresh token that Google also gives the application to get a new one. But that’s enough detail for today.
TODO
Here’s your TODO list for next time:
- Write your last blog post for the semester before Friday morning. Usually you read up and write on a technical topic. This week your task is different. Imagine that you are teaching CS 347 next fall. How would you design your version of the course? What would you have the students do? What helped you learn the material of this course and what do you think would help your students learn?
- Keep plugging away at project 2.
- Be prepared for the final peer review of the semester on Thursday.
See you next time.
Deprecated: Creation of dynamic property WP_Term::$cat_ID is deprecated in /var/www/twodee/blog/wp-includes/category.php on line 378
Deprecated: Creation of dynamic property WP_Term::$category_count is deprecated in /var/www/twodee/blog/wp-includes/category.php on line 379
Deprecated: Creation of dynamic property WP_Term::$category_description is deprecated in /var/www/twodee/blog/wp-includes/category.php on line 380
Deprecated: Creation of dynamic property WP_Term::$cat_name is deprecated in /var/www/twodee/blog/wp-includes/category.php on line 381
Deprecated: Creation of dynamic property WP_Term::$category_nicename is deprecated in /var/www/twodee/blog/wp-includes/category.php on line 382
Deprecated: Creation of dynamic property WP_Term::$category_parent is deprecated in /var/www/twodee/blog/wp-includes/category.php on line 383
Welcome to lab. This lab is a continuation of the previous lab.
Team, complete the assigned task below. Host, be careful not to dominate. All members should contribute ideas.
Task
Your task is to write a music library explorer called MyTunes—which could sometime be fleshed out to be a full-fledged web-based MP3 player. You will create views for a list of artists, a list of a single’s artists albums or discography, and a list of an album’s tracks. The music data will be provided by an RESTful API that I provide.
This lab is broken into two parts. In the first part, we focused on the web service and Redux. In this second part, we add multiple pages using React Router.
Router
Follow these steps to switch between multiple pages in your single-page application.
Submission
Host, when your group is done or when time is up, submit just your group’s actions.js on Crowdsource.
Reference Implementation
Album.js
import React, {useEffect} from 'react';
import {useSelector, useDispatch} from 'react-redux';
import {fetchAlbum} from './actions';
import {Link} from 'react-router-dom';
import {Spinner} from './Spinner';
export function Album(props) {
const isWaiting = useSelector(state => state.isWaiting);
const {artistName, albumName} = props;
const album = useSelector(state => state.album);
const dispatch = useDispatch();
useEffect(() => {
dispatch(fetchAlbum(artistName, albumName));
}, [dispatch, artistName, albumName]);
return (
<React.Fragment>
<nav>
<Link to="/artists">artists</Link> > <Link to={`/artist/${encodeURIComponent(artistName)}`}>{artistName}</Link>
</nav>
<h1>
{albumName}
{album.tracks && <button onClick={() => dispatch(playMany(album.tracks))}>▶</button>}
{album.tracks && <button onClick={() => dispatch(pushMany(album.tracks))}>➕</button>}
</h1>
<h3>{artistName}</h3>
{isWaiting && <Spinner />}
<ul className="track-list">
{album.tracks?.map(track =>
<Track key={track.index} track={track} />
)}
</ul>
</React.Fragment>
);
}
function Track({track}) {
const dispatch = useDispatch();
return (
<li>
<button onClick={() => dispatch(playOne(track))}>▶</button>
<button onClick={() => dispatch(pushOne(track))}>➕</button>
{track.title}
</li>
);
}
App.css
.App {
  margin: 0;
  display: grid;
  grid-template-columns: 3fr 2fr;
  grid-template-rows: 1fr auto;
  height: 100vh;
}

h1 {
  margin: 0;
}

#audio-player {
  grid-column: 1 / span 2;
  width: 100%;
  border-radius: 0;
  outline: none;
  padding: 0;
  margin: 0;
}

/* Browser-dependent. */
audio::-webkit-media-controls-enclosure {
  border-radius: 0;
}

.track-list {
  list-style-type: none;
  padding-left: 0;
}

button {
  background: none;
  border: none;
  cursor: pointer;
  outline: none;
}

button:hover {
  color: orange;
}

#queue-root {
  background-color: black;
  color: white;
  overflow-y: auto;
}

#content-root {
  overflow: auto;
  position: relative;
}

#queue-root, #content-root {
  padding: 20px;
  min-width: 200px;
}

.search-box {
  margin-left: auto;
  display: block;
}

.spinner {
  position: absolute;
  width: 100px;
  height: 100px;
  border: 15px solid cornflowerblue;
  border-top-color: lightgray;
  border-radius: 50%;
  top: 50%;
  left: 50%;
  margin-left: -50px;
  margin-top: -50px;
  animation: spin 1s infinite linear;
}

@keyframes spin {
  from {
    transform: rotate(0deg);
  }

  to {
    transform: rotate(360deg);
  }
}

nav {
  text-align: right;
  margin-bottom: 20px;
}

h3 {
  margin-top: 5px;
  font-weight: normal;
  font-style: italic;
}

a, a:visited {
  color: mediumblue;
}
App.js
import React from 'react';
import {Switch, Route, Redirect} from 'react-router-dom';
import './App.css';
import {Artists} from './Artists';
import {Artist} from './Artist';
import {Album} from './Album';

function App() {
  return (
    <div className="App">
      <div id="content-root">
        <Switch>
          <Route exact path="/artists">
            <Artists />
          </Route>
          <Route exact path="/artist/:artist" children={props =>
            <Artist artistName={decodeURIComponent(props.match.params.artist)} />
          } />
          <Route exact path="/artist/:artist/album/:album" children={props =>
            <Album
              artistName={decodeURIComponent(props.match.params.artist)}
              albumName={decodeURIComponent(props.match.params.album)}
            />
          } />
          <Redirect to="/artists" />
        </Switch>
      </div>
    </div>
  );
}

export default App;
Artist.js
import React, {useEffect} from 'react';
import {useSelector, useDispatch} from 'react-redux';
import {Link} from 'react-router-dom';
import {fetchArtist} from './actions';
import {Spinner} from './Spinner';

export function Artist(props) {
  const isWaiting = useSelector(state => state.isWaiting);
  const {artistName} = props;
  const artist = useSelector(state => state.artist);
  const dispatch = useDispatch();

  useEffect(() => {
    dispatch(fetchArtist(artistName));
  }, [dispatch, artistName]);

  return (
    <React.Fragment>
      <nav>
        <Link to="/artists">artists</Link>
      </nav>
      <h1>{artistName}</h1>
      {isWaiting && <Spinner />}
      <ul>
        {artist.albums?.map(album => <li key={album}><Link to={`/artist/${encodeURIComponent(artistName)}/album/${encodeURIComponent(album)}`}>{album}</Link></li>)}
      </ul>
    </React.Fragment>
  );
}
Artists.js
import React, {useEffect} from 'react';
import {useSelector, useDispatch} from 'react-redux';
import {Link} from 'react-router-dom';
import {fetchArtists} from './actions';

export function Artists(props) {
  const artists = useSelector(state => state.artists);
  const dispatch = useDispatch();

  useEffect(() => {
    dispatch(fetchArtists());
  }, [dispatch]);

  return (
    <React.Fragment>
      <h1>Artists</h1>
      <ul>
        {artists.map(artist => <li key={artist}><Link to={`/artist/${encodeURIComponent(artist)}`}>{artist}</Link></li>)}
      </ul>
    </React.Fragment>
  );
}
actions.js
export const Action = Object.freeze({
  LoadArtists: 'LoadArtists',
  LoadArtist: 'LoadArtist',
  LoadAlbum: 'LoadAlbum',
});

export const loadArtists = artists => ({
  type: Action.LoadArtists,
  payload: artists,
});

export const loadArtist = albums => ({
  type: Action.LoadArtist,
  payload: albums,
});

export const loadAlbum = album => ({
  type: Action.LoadAlbum,
  payload: album,
});

const url = 'https://twodee.org:3997';

export function fetchArtists() {
  return dispatch => {
    dispatch(startWaiting());
    fetch(`${url}/artists`)
      .then(response => response.json())
      .then(data => {
        dispatch(loadArtists(data));
      });
  };
}

export function fetchArtist(artist) {
  return dispatch => {
    dispatch(startWaiting());
    fetch(`${url}/artist/${encodeURIComponent(artist)}`)
      .then(response => response.json())
      .then(data => {
        dispatch(loadArtist(data));
      });
  };
}

export function fetchAlbum(artist, album) {
  return dispatch => {
    dispatch(startWaiting());
    fetch(`${url}/artist/${encodeURIComponent(artist)}/album/${encodeURIComponent(album)}`)
      .then(response => response.json())
      .then(data => {
        console.log(data);
        const album = {
          artist: data.artist,
          album: data.album,
          tracks: data.tracks.map(track => ({
            album: data.album,
            artist: data.artist,
            title: track.title,
            index: track.index,
            key: `${data.artist}/${data.album}/${track.index}`
          })),
        };
        dispatch(loadAlbum(album));
      });
  };
}
index.js
import React from 'react';
import ReactDOM from 'react-dom';
import './index.css';
import App from './App';
import {Provider} from 'react-redux';
import store from './store';
import {BrowserRouter} from 'react-router-dom';

ReactDOM.render(
  <React.StrictMode>
    <Provider store={store}>
      <BrowserRouter>
        <App />
      </BrowserRouter>
    </Provider>
  </React.StrictMode>,
  document.getElementById('root')
);
reducer.js
import {Action} from './actions';

const initialState = {
  artists: [],
  artist: {},
  album: {},
};

function reducer(state = initialState, action) {
  switch (action.type) {
    case Action.LoadArtists:
      return {
        ...state,
        album: {},
        artist: {},
        artists: action.payload,
        isWaiting: false,
      };
    case Action.LoadArtist:
      return {
        ...state,
        album: {},
        artist: action.payload,
        isWaiting: false,
      };
    case Action.LoadAlbum:
      return {
        ...state,
        album: action.payload,
        isWaiting: false,
      };
    default:
      return state;
  }
}

export default reducer;
store.js
import {createStore, applyMiddleware} from 'redux';
import thunk from 'redux-thunk';
import reducer from './reducer';

const store = createStore(reducer, applyMiddleware(thunk));
export default store;
Deprecated: Creation of dynamic property WP_Term::$cat_ID is deprecated in /var/www/twodee/blog/wp-includes/category.php on line 378
Deprecated: Creation of dynamic property WP_Term::$category_count is deprecated in /var/www/twodee/blog/wp-includes/category.php on line 379
Deprecated: Creation of dynamic property WP_Term::$category_description is deprecated in /var/www/twodee/blog/wp-includes/category.php on line 380
Deprecated: Creation of dynamic property WP_Term::$cat_name is deprecated in /var/www/twodee/blog/wp-includes/category.php on line 381
Deprecated: Creation of dynamic property WP_Term::$category_nicename is deprecated in /var/www/twodee/blog/wp-includes/category.php on line 382
Deprecated: Creation of dynamic property WP_Term::$category_parent is deprecated in /var/www/twodee/blog/wp-includes/category.php on line 383
React lifts the burden of manipulating the DOM, which is nice, but some desirable features are also thrown out—like a site organized into multiple pages. With what we’ve seen of React so far, multiple pages are not really an option, as all views must be corraled under the almighty App component. In this two-part lecture, we examine ways to make a React app for recording notes feel like it has multiple pages.
This is the second lecture covering our Router-based note taking app.
Here’s your TODO list:
See you next time.
Deprecated: Creation of dynamic property WP_Term::$cat_ID is deprecated in /var/www/twodee/blog/wp-includes/category.php on line 378
Deprecated: Creation of dynamic property WP_Term::$category_count is deprecated in /var/www/twodee/blog/wp-includes/category.php on line 379
Deprecated: Creation of dynamic property WP_Term::$category_description is deprecated in /var/www/twodee/blog/wp-includes/category.php on line 380
Deprecated: Creation of dynamic property WP_Term::$cat_name is deprecated in /var/www/twodee/blog/wp-includes/category.php on line 381
Deprecated: Creation of dynamic property WP_Term::$category_nicename is deprecated in /var/www/twodee/blog/wp-includes/category.php on line 382
Deprecated: Creation of dynamic property WP_Term::$category_parent is deprecated in /var/www/twodee/blog/wp-includes/category.php on line 383
Deprecated: Creation of dynamic property WP_Term::$cat_ID is deprecated in /var/www/twodee/blog/wp-includes/category.php on line 378
Deprecated: Creation of dynamic property WP_Term::$category_count is deprecated in /var/www/twodee/blog/wp-includes/category.php on line 379
Deprecated: Creation of dynamic property WP_Term::$category_description is deprecated in /var/www/twodee/blog/wp-includes/category.php on line 380
Deprecated: Creation of dynamic property WP_Term::$cat_name is deprecated in /var/www/twodee/blog/wp-includes/category.php on line 381
Deprecated: Creation of dynamic property WP_Term::$category_nicename is deprecated in /var/www/twodee/blog/wp-includes/category.php on line 382
Deprecated: Creation of dynamic property WP_Term::$category_parent is deprecated in /var/www/twodee/blog/wp-includes/category.php on line 383
Deprecated: Creation of dynamic property WP_Term::$cat_ID is deprecated in /var/www/twodee/blog/wp-includes/category.php on line 378
Deprecated: Creation of dynamic property WP_Term::$category_count is deprecated in /var/www/twodee/blog/wp-includes/category.php on line 379
Deprecated: Creation of dynamic property WP_Term::$category_description is deprecated in /var/www/twodee/blog/wp-includes/category.php on line 380
Deprecated: Creation of dynamic property WP_Term::$cat_name is deprecated in /var/www/twodee/blog/wp-includes/category.php on line 381
Deprecated: Creation of dynamic property WP_Term::$category_nicename is deprecated in /var/www/twodee/blog/wp-includes/category.php on line 382
Deprecated: Creation of dynamic property WP_Term::$category_parent is deprecated in /var/www/twodee/blog/wp-includes/category.php on line 383
Welcome to lab. By now you have already watched the lecture videos on your own. Now we will apply the ideas from those videos in an exercise, which you will complete in small groups.
Within your breakout room, designate one of your team to be the host. Host, claim your group’s task on Crowdsource. Make sure to enter every group member’s JMU eID so that they receive credit. Your group will be assigned a task number.
Team, complete the assigned task below. Host, be careful not to dominate. All members should contribute ideas.
Task
Your task is to write a music library explorer called MyTunes—which could sometime be fleshed out to be a full-fledged web-based MP3 player. You will create views for a list of artists, a list of a single’s artists albums or discography, and a list of an album’s tracks. The music data will be provided by an RESTful API that I provide.
This lab will be broken into two parts. In this first part, we focus on the web service and Redux. In the second part, we’ll add multiple pages using React Router.
Setup
Host, follow these steps:
The next three sections can be done in parallel. Split them up between team members.
Store
Create store.js that looks just like the one made in the videos. It uses the reducer (defined elsewhere) and the thunk middleware.
Provider
In index.js, add a Provider component and pass your store as a prop as demonstrated in the videos.
Reducer
Create reducer.js with a similar structure to the one made in the videos. Use this initial state:
const initialState = {
  artists: [],
  artist: {},
  album: {},
};
Each entry in this state holds the data for one of the views described below.
The reducer function should handle just the default case for the moment. Whatever the action, return the unmodified state.
Actions
The actions for
App
In part 2 of this lab, you will add pages to your app using React Router. For the time being, we’ll just use App as a staging ground to test your components one at a time. Right now, have it return a blank div.
Artists
Define an Artists component in Artists.js. It grabs the list of artists from the store and displays a heading with the text “Artists” and the artists’ names in an unordered list. It also fires off a fetchArtists action when the component first renders. (What hook do you use to fire off a callback only on the first render?)
Have App render your Artists component. After the fetch fires off and dispatches loadArtists, your component will rerender because the list of artists in the store has changed. You should see a list of artist names.
Artist
Define an Artist component in Artist.js. It receives a prop named artistName. It grabs the artist from the store and displays the artist’s name in a heading and the artist’s album names in an unordered list. It also fires off a fetchArtist action when the component first renders.
Have App render your Artist component instead of Artists. Pass in an artistName prop. After the fetch fires off and dispatches loadArtist, your component will rerender because the artist in the store has changed. You should see a list of album names.
Album
Define an Album component in Album.js. It receives props named artistName and albumName. It grabs the album from the store and displays the artist and album names in headings and the album’s track names in an ordered list. It also fires off a fetchAlbum action when the component first renders.
Have App render your Album component instead of Artist. Pass in artistName and albumName props. After the fetch fires off and dispatches loadAlbum, your component will rerender because the album in the store has changed. You should see a list of track names.
Submission
Screen sharer, when your group is done or when time is up, submit just your group’s actions.js on Crowdsource.
Peer Review
After you have submitted the exercise, transition into your peer review for project 2. The following things should happen:
Deprecated: Creation of dynamic property WP_Term::$cat_ID is deprecated in /var/www/twodee/blog/wp-includes/category.php on line 378
Deprecated: Creation of dynamic property WP_Term::$category_count is deprecated in /var/www/twodee/blog/wp-includes/category.php on line 379
Deprecated: Creation of dynamic property WP_Term::$category_description is deprecated in /var/www/twodee/blog/wp-includes/category.php on line 380
Deprecated: Creation of dynamic property WP_Term::$cat_name is deprecated in /var/www/twodee/blog/wp-includes/category.php on line 381
Deprecated: Creation of dynamic property WP_Term::$category_nicename is deprecated in /var/www/twodee/blog/wp-includes/category.php on line 382
Deprecated: Creation of dynamic property WP_Term::$category_parent is deprecated in /var/www/twodee/blog/wp-includes/category.php on line 383
Many web apps evolve into miniature content management systems. Users upload their content to the back-end, and the front-end serves as an interface to this centralized storage. Sometimes the content is simple text and numbers that are stored in a database. But sometimes the data is more complex, like images and other media. In this lecture, we explore build a service that allows the user to upload images, which are stored not in a database but in the file system.
Here’s your TODO list:
See you next time.
Deprecated: Creation of dynamic property WP_Term::$cat_ID is deprecated in /var/www/twodee/blog/wp-includes/category.php on line 378
Deprecated: Creation of dynamic property WP_Term::$category_count is deprecated in /var/www/twodee/blog/wp-includes/category.php on line 379
Deprecated: Creation of dynamic property WP_Term::$category_description is deprecated in /var/www/twodee/blog/wp-includes/category.php on line 380
Deprecated: Creation of dynamic property WP_Term::$cat_name is deprecated in /var/www/twodee/blog/wp-includes/category.php on line 381
Deprecated: Creation of dynamic property WP_Term::$category_nicename is deprecated in /var/www/twodee/blog/wp-includes/category.php on line 382
Deprecated: Creation of dynamic property WP_Term::$category_parent is deprecated in /var/www/twodee/blog/wp-includes/category.php on line 383
Deprecated: Creation of dynamic property WP_Term::$cat_ID is deprecated in /var/www/twodee/blog/wp-includes/category.php on line 378
Deprecated: Creation of dynamic property WP_Term::$category_count is deprecated in /var/www/twodee/blog/wp-includes/category.php on line 379
Deprecated: Creation of dynamic property WP_Term::$category_description is deprecated in /var/www/twodee/blog/wp-includes/category.php on line 380
Deprecated: Creation of dynamic property WP_Term::$cat_name is deprecated in /var/www/twodee/blog/wp-includes/category.php on line 381
Deprecated: Creation of dynamic property WP_Term::$category_nicename is deprecated in /var/www/twodee/blog/wp-includes/category.php on line 382
Deprecated: Creation of dynamic property WP_Term::$category_parent is deprecated in /var/www/twodee/blog/wp-includes/category.php on line 383
Deprecated: Creation of dynamic property WP_Term::$cat_ID is deprecated in /var/www/twodee/blog/wp-includes/category.php on line 378
Deprecated: Creation of dynamic property WP_Term::$category_count is deprecated in /var/www/twodee/blog/wp-includes/category.php on line 379
Deprecated: Creation of dynamic property WP_Term::$category_description is deprecated in /var/www/twodee/blog/wp-includes/category.php on line 380
Deprecated: Creation of dynamic property WP_Term::$cat_name is deprecated in /var/www/twodee/blog/wp-includes/category.php on line 381
Deprecated: Creation of dynamic property WP_Term::$category_nicename is deprecated in /var/www/twodee/blog/wp-includes/category.php on line 382
Deprecated: Creation of dynamic property WP_Term::$category_parent is deprecated in /var/www/twodee/blog/wp-includes/category.php on line 383
React lifts the burden of manipulating the DOM, which is nice, but some desirable features are also thrown out—like a site organized into multiple pages. With what we’ve seen of React so far, multiple pages are not really an option, as all views must be corraled under the almighty App component. In this two-part lecture, we examine ways to make a React app for recording notes feel like it has multiple pages.
As with the Redux lectures, the videos for this lecture and the next are split based on time rather than on theme.
Here’s your TODO list:
See you next time.
Deprecated: Creation of dynamic property WP_Term::$cat_ID is deprecated in /var/www/twodee/blog/wp-includes/category.php on line 378
Deprecated: Creation of dynamic property WP_Term::$category_count is deprecated in /var/www/twodee/blog/wp-includes/category.php on line 379
Deprecated: Creation of dynamic property WP_Term::$category_description is deprecated in /var/www/twodee/blog/wp-includes/category.php on line 380
Deprecated: Creation of dynamic property WP_Term::$cat_name is deprecated in /var/www/twodee/blog/wp-includes/category.php on line 381
Deprecated: Creation of dynamic property WP_Term::$category_nicename is deprecated in /var/www/twodee/blog/wp-includes/category.php on line 382
Deprecated: Creation of dynamic property WP_Term::$category_parent is deprecated in /var/www/twodee/blog/wp-includes/category.php on line 383
Deprecated: Creation of dynamic property WP_Term::$cat_ID is deprecated in /var/www/twodee/blog/wp-includes/category.php on line 378
Deprecated: Creation of dynamic property WP_Term::$category_count is deprecated in /var/www/twodee/blog/wp-includes/category.php on line 379
Deprecated: Creation of dynamic property WP_Term::$category_description is deprecated in /var/www/twodee/blog/wp-includes/category.php on line 380
Deprecated: Creation of dynamic property WP_Term::$cat_name is deprecated in /var/www/twodee/blog/wp-includes/category.php on line 381
Deprecated: Creation of dynamic property WP_Term::$category_nicename is deprecated in /var/www/twodee/blog/wp-includes/category.php on line 382
Deprecated: Creation of dynamic property WP_Term::$category_parent is deprecated in /var/www/twodee/blog/wp-includes/category.php on line 383
Deprecated: Creation of dynamic property WP_Term::$cat_ID is deprecated in /var/www/twodee/blog/wp-includes/category.php on line 378
Deprecated: Creation of dynamic property WP_Term::$category_count is deprecated in /var/www/twodee/blog/wp-includes/category.php on line 379
Deprecated: Creation of dynamic property WP_Term::$category_description is deprecated in /var/www/twodee/blog/wp-includes/category.php on line 380
Deprecated: Creation of dynamic property WP_Term::$cat_name is deprecated in /var/www/twodee/blog/wp-includes/category.php on line 381
Deprecated: Creation of dynamic property WP_Term::$category_nicename is deprecated in /var/www/twodee/blog/wp-includes/category.php on line 382
Deprecated: Creation of dynamic property WP_Term::$category_parent is deprecated in /var/www/twodee/blog/wp-includes/category.php on line 383
Welcome to lab, which is a replay of the last lab that got nixed by technical difficults with NPM. By now you have already watched the lecture videos on your own. Now we will apply the ideas from those videos in an exercise, which you will complete in small groups.
Within your breakout room, designate one of your team to be the host. Host, claim your group’s task on Crowdsource. Make sure to enter every group member’s JMU eID so that they receive credit. Your group will be assigned a task number.
Team, complete the assigned task below. Host, be careful not to dominate. All members should contribute ideas.
Task
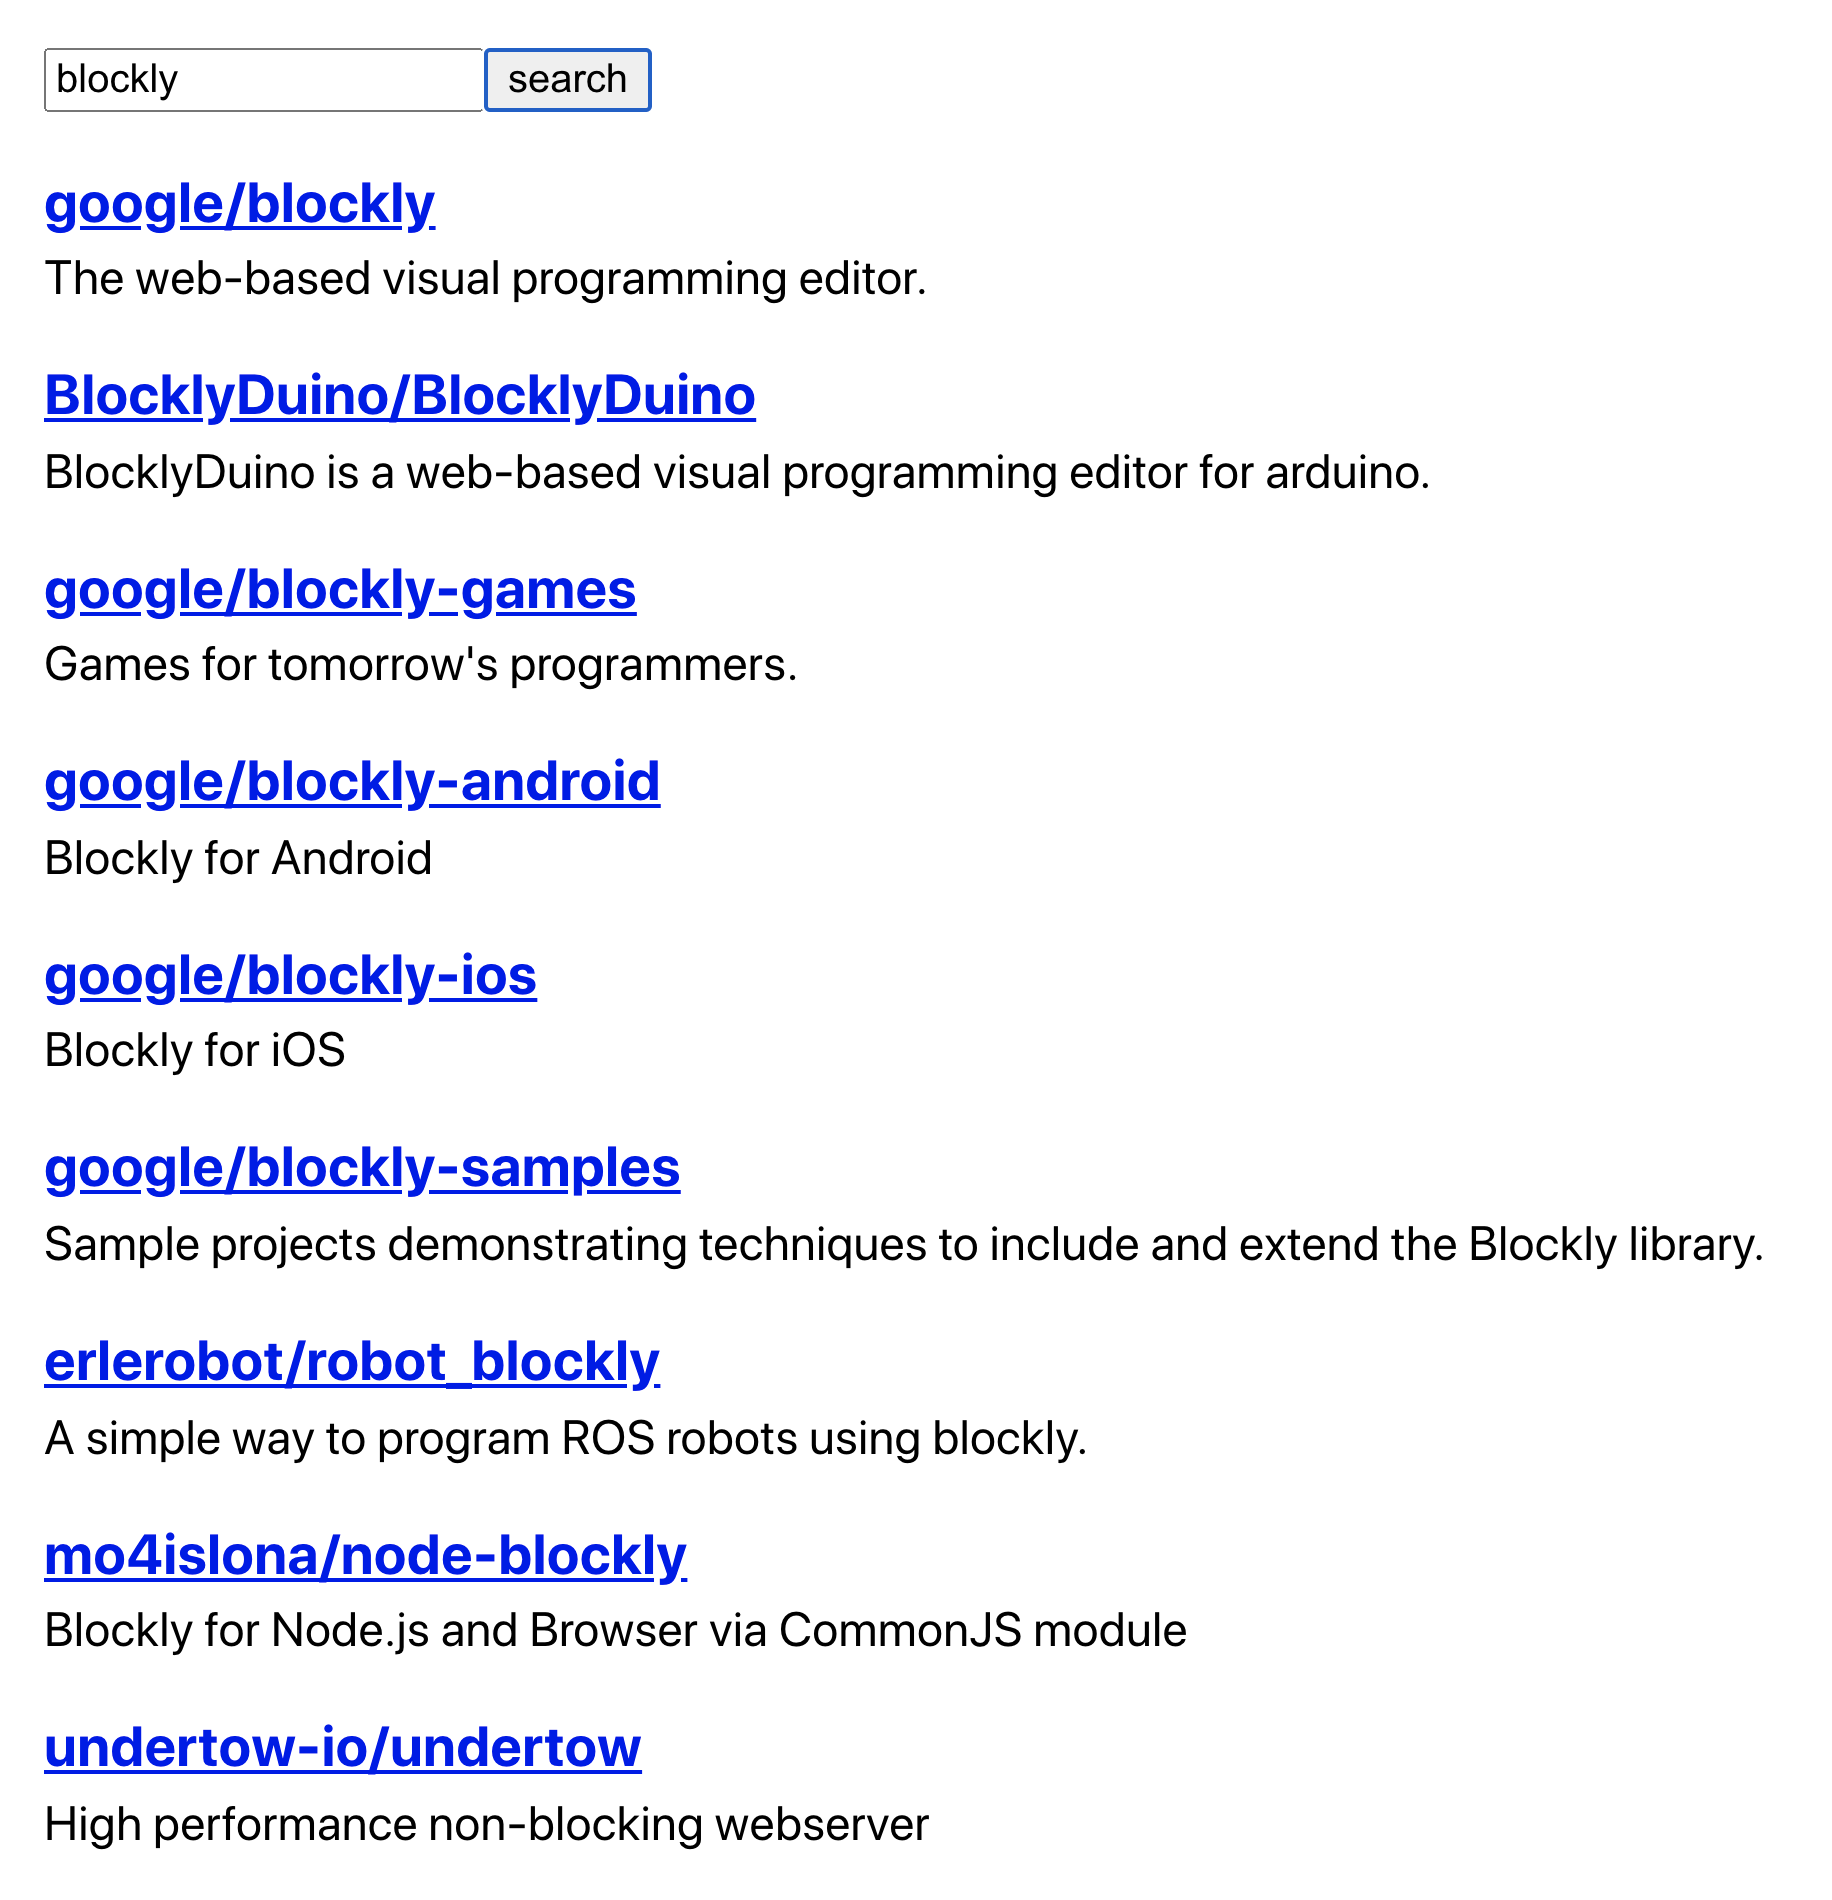
Your task is to write a React/Redux app that shows GitHub repositories matching a query. The matches will be provided by GitHub’s REST API. The end product will look something like this:
Setup
Host, follow these steps:
The next three sections can be done in parallel. Split them up between team members.
Store
Create store.js that looks just like the one made in the videos. It uses the reducer (defined elsewhere) and the thunk middleware.
Provider
In index.js, add a Provider component and pass your store as a prop as demonstrated in the videos.
Reducer
Create reducer.js with a similar structure to the one made in the videos. Use this initial state:
const initialState = {
  matches: [
    {
      full_name: 'twodee/fiction',
      description: 'This repository does not exist.',
      html_url: 'https://github.com/twodee/fiction',
    },
  ],
};
The reducer should handle just the default case for the moment. Whatever the action, return the unmodified state.
Repository
Define a Repository component in Repository.js. It receives a prop named repository, which is an object shaped like the example from the initial state shown above, having keys full_name, description, and html_url. Display the repository’s full name in an anchor tag and the repository’s description.
App
Your next task is to reach into the global store and turn its matches into viewable components. Complete the following steps in App.js.
Actions
Now that you’ve got the initial state showing, it’s time to add some actions to pull down new state from GitHub’s REST API. Complete the following steps.
Submission
Screen sharer, when your group is done or when time is up, submit just your group’s actions.js on Crowdsource.
Reference Implementation
App.css
.App {
  margin: 20px;
}

h3 {
  margin-bottom: 5px;
}
App.js
import {useState} from 'react';
import './App.css';
import {useSelector, useDispatch} from 'react-redux';
import {Repository} from './Repository';
import {startSearching} from './actions';

function App() {
  const matches = useSelector(state => state.matches);
  const [query, setQuery] = useState('');
  const dispatch = useDispatch();

  const onSearch = () => {
    dispatch(startSearching(query));
  };

  return (
    <div className="App">
      <input type="text" value={query} onInput={e => setQuery(e.target.value)} />
      <button onClick={onSearch}>search</button>
      {matches.map(match => <Repository key={match.full_name} repository={match} />)}
    </div>
  );
}

export default App;
Repository.js
import React from 'react';

export function Repository(props) {
  const {repository} = props;

  return (
    <div className="Repository">
      <h3><a href={repository.html_url}>{repository.full_name}</a></h3>
      {repository.description}
    </div>
  );
}
actions.js
export const Action = Object.freeze({
  LoadMatches: 'LoadMatches',
})

export function loadMatches(matches) {
  return {
    type: Action.LoadMatches,
    payload: matches,
  };
}

export function startSearching(query) {
  return dispatch => {
    fetch(`https://api.github.com/search/repositories?q=${query}`)
      .then(response => response.json())
      .then(data => {
        console.log(data);
        dispatch(loadMatches(data.items));
      })
  };
}
index.js
import React from 'react';
import ReactDOM from 'react-dom';
import './index.css';
import App from './App';
import {Provider} from 'react-redux';
import store from './store';

ReactDOM.render(
  <React.StrictMode>
    <Provider store={store}>
      <App />
    </Provider>
  </React.StrictMode>,
  document.getElementById('root')
);
reducer.js
import {Action} from './actions';

const initialState = {
  matches: [
    {
      full_name: 'twodee/fiction',
      description: 'This repository does not exist.',
      html_url: 'https://github.com/twodee/fiction',
    },
  ],
};

export function reducer(state = initialState, action) {
  switch (action.type) {
    case Action.LoadMatches:
      return {
        ...state,
        matches: action.payload,
      };
    default:
      return state;
  }
}

export default reducer;
store.js
import {createStore, applyMiddleware} from 'redux';
import thunk from 'redux-thunk';
import reducer from './reducer';

const store = createStore(reducer, applyMiddleware(thunk));
export default store;
Deprecated: Creation of dynamic property WP_Term::$cat_ID is deprecated in /var/www/twodee/blog/wp-includes/category.php on line 378
Deprecated: Creation of dynamic property WP_Term::$category_count is deprecated in /var/www/twodee/blog/wp-includes/category.php on line 379
Deprecated: Creation of dynamic property WP_Term::$category_description is deprecated in /var/www/twodee/blog/wp-includes/category.php on line 380
Deprecated: Creation of dynamic property WP_Term::$cat_name is deprecated in /var/www/twodee/blog/wp-includes/category.php on line 381
Deprecated: Creation of dynamic property WP_Term::$category_nicename is deprecated in /var/www/twodee/blog/wp-includes/category.php on line 382
Deprecated: Creation of dynamic property WP_Term::$category_parent is deprecated in /var/www/twodee/blog/wp-includes/category.php on line 383
Deprecated: Creation of dynamic property WP_Term::$cat_ID is deprecated in /var/www/twodee/blog/wp-includes/category.php on line 378
Deprecated: Creation of dynamic property WP_Term::$category_count is deprecated in /var/www/twodee/blog/wp-includes/category.php on line 379
Deprecated: Creation of dynamic property WP_Term::$category_description is deprecated in /var/www/twodee/blog/wp-includes/category.php on line 380
Deprecated: Creation of dynamic property WP_Term::$cat_name is deprecated in /var/www/twodee/blog/wp-includes/category.php on line 381
Deprecated: Creation of dynamic property WP_Term::$category_nicename is deprecated in /var/www/twodee/blog/wp-includes/category.php on line 382
Deprecated: Creation of dynamic property WP_Term::$category_parent is deprecated in /var/www/twodee/blog/wp-includes/category.php on line 383
Deprecated: Creation of dynamic property WP_Term::$cat_ID is deprecated in /var/www/twodee/blog/wp-includes/category.php on line 378
Deprecated: Creation of dynamic property WP_Term::$category_count is deprecated in /var/www/twodee/blog/wp-includes/category.php on line 379
Deprecated: Creation of dynamic property WP_Term::$category_description is deprecated in /var/www/twodee/blog/wp-includes/category.php on line 380
Deprecated: Creation of dynamic property WP_Term::$cat_name is deprecated in /var/www/twodee/blog/wp-includes/category.php on line 381
Deprecated: Creation of dynamic property WP_Term::$category_nicename is deprecated in /var/www/twodee/blog/wp-includes/category.php on line 382
Deprecated: Creation of dynamic property WP_Term::$category_parent is deprecated in /var/www/twodee/blog/wp-includes/category.php on line 383
We will continue examining ingedux through the lens of a client for our Today app. In this second part, we’ll use Redux to update the state as we create, update, and delete memories.
Here’s your TODO list:
See you next time.
Deprecated: Creation of dynamic property WP_Term::$cat_ID is deprecated in /var/www/twodee/blog/wp-includes/category.php on line 378
Deprecated: Creation of dynamic property WP_Term::$category_count is deprecated in /var/www/twodee/blog/wp-includes/category.php on line 379
Deprecated: Creation of dynamic property WP_Term::$category_description is deprecated in /var/www/twodee/blog/wp-includes/category.php on line 380
Deprecated: Creation of dynamic property WP_Term::$cat_name is deprecated in /var/www/twodee/blog/wp-includes/category.php on line 381
Deprecated: Creation of dynamic property WP_Term::$category_nicename is deprecated in /var/www/twodee/blog/wp-includes/category.php on line 382
Deprecated: Creation of dynamic property WP_Term::$category_parent is deprecated in /var/www/twodee/blog/wp-includes/category.php on line 383
Deprecated: Creation of dynamic property WP_Term::$cat_ID is deprecated in /var/www/twodee/blog/wp-includes/category.php on line 378
Deprecated: Creation of dynamic property WP_Term::$category_count is deprecated in /var/www/twodee/blog/wp-includes/category.php on line 379
Deprecated: Creation of dynamic property WP_Term::$category_description is deprecated in /var/www/twodee/blog/wp-includes/category.php on line 380
Deprecated: Creation of dynamic property WP_Term::$cat_name is deprecated in /var/www/twodee/blog/wp-includes/category.php on line 381
Deprecated: Creation of dynamic property WP_Term::$category_nicename is deprecated in /var/www/twodee/blog/wp-includes/category.php on line 382
Deprecated: Creation of dynamic property WP_Term::$category_parent is deprecated in /var/www/twodee/blog/wp-includes/category.php on line 383
Deprecated: Creation of dynamic property WP_Term::$cat_ID is deprecated in /var/www/twodee/blog/wp-includes/category.php on line 378
Deprecated: Creation of dynamic property WP_Term::$category_count is deprecated in /var/www/twodee/blog/wp-includes/category.php on line 379
Deprecated: Creation of dynamic property WP_Term::$category_description is deprecated in /var/www/twodee/blog/wp-includes/category.php on line 380
Deprecated: Creation of dynamic property WP_Term::$cat_name is deprecated in /var/www/twodee/blog/wp-includes/category.php on line 381
Deprecated: Creation of dynamic property WP_Term::$category_nicename is deprecated in /var/www/twodee/blog/wp-includes/category.php on line 382
Deprecated: Creation of dynamic property WP_Term::$category_parent is deprecated in /var/www/twodee/blog/wp-includes/category.php on line 383
Welcome to lab. By now you have already watched the lecture videos on your own. Now we will apply the ideas from those videos in an exercise, which you will complete in small groups.
Within your breakout room, designate one of your team to be the host. Host, claim your group’s task on Crowdsource. Make sure to enter every group member’s JMU eID so that they receive credit. Your group will be assigned a task number.
Team, complete the assigned task below. Host, be careful not to dominate. All members should contribute ideas.
Task
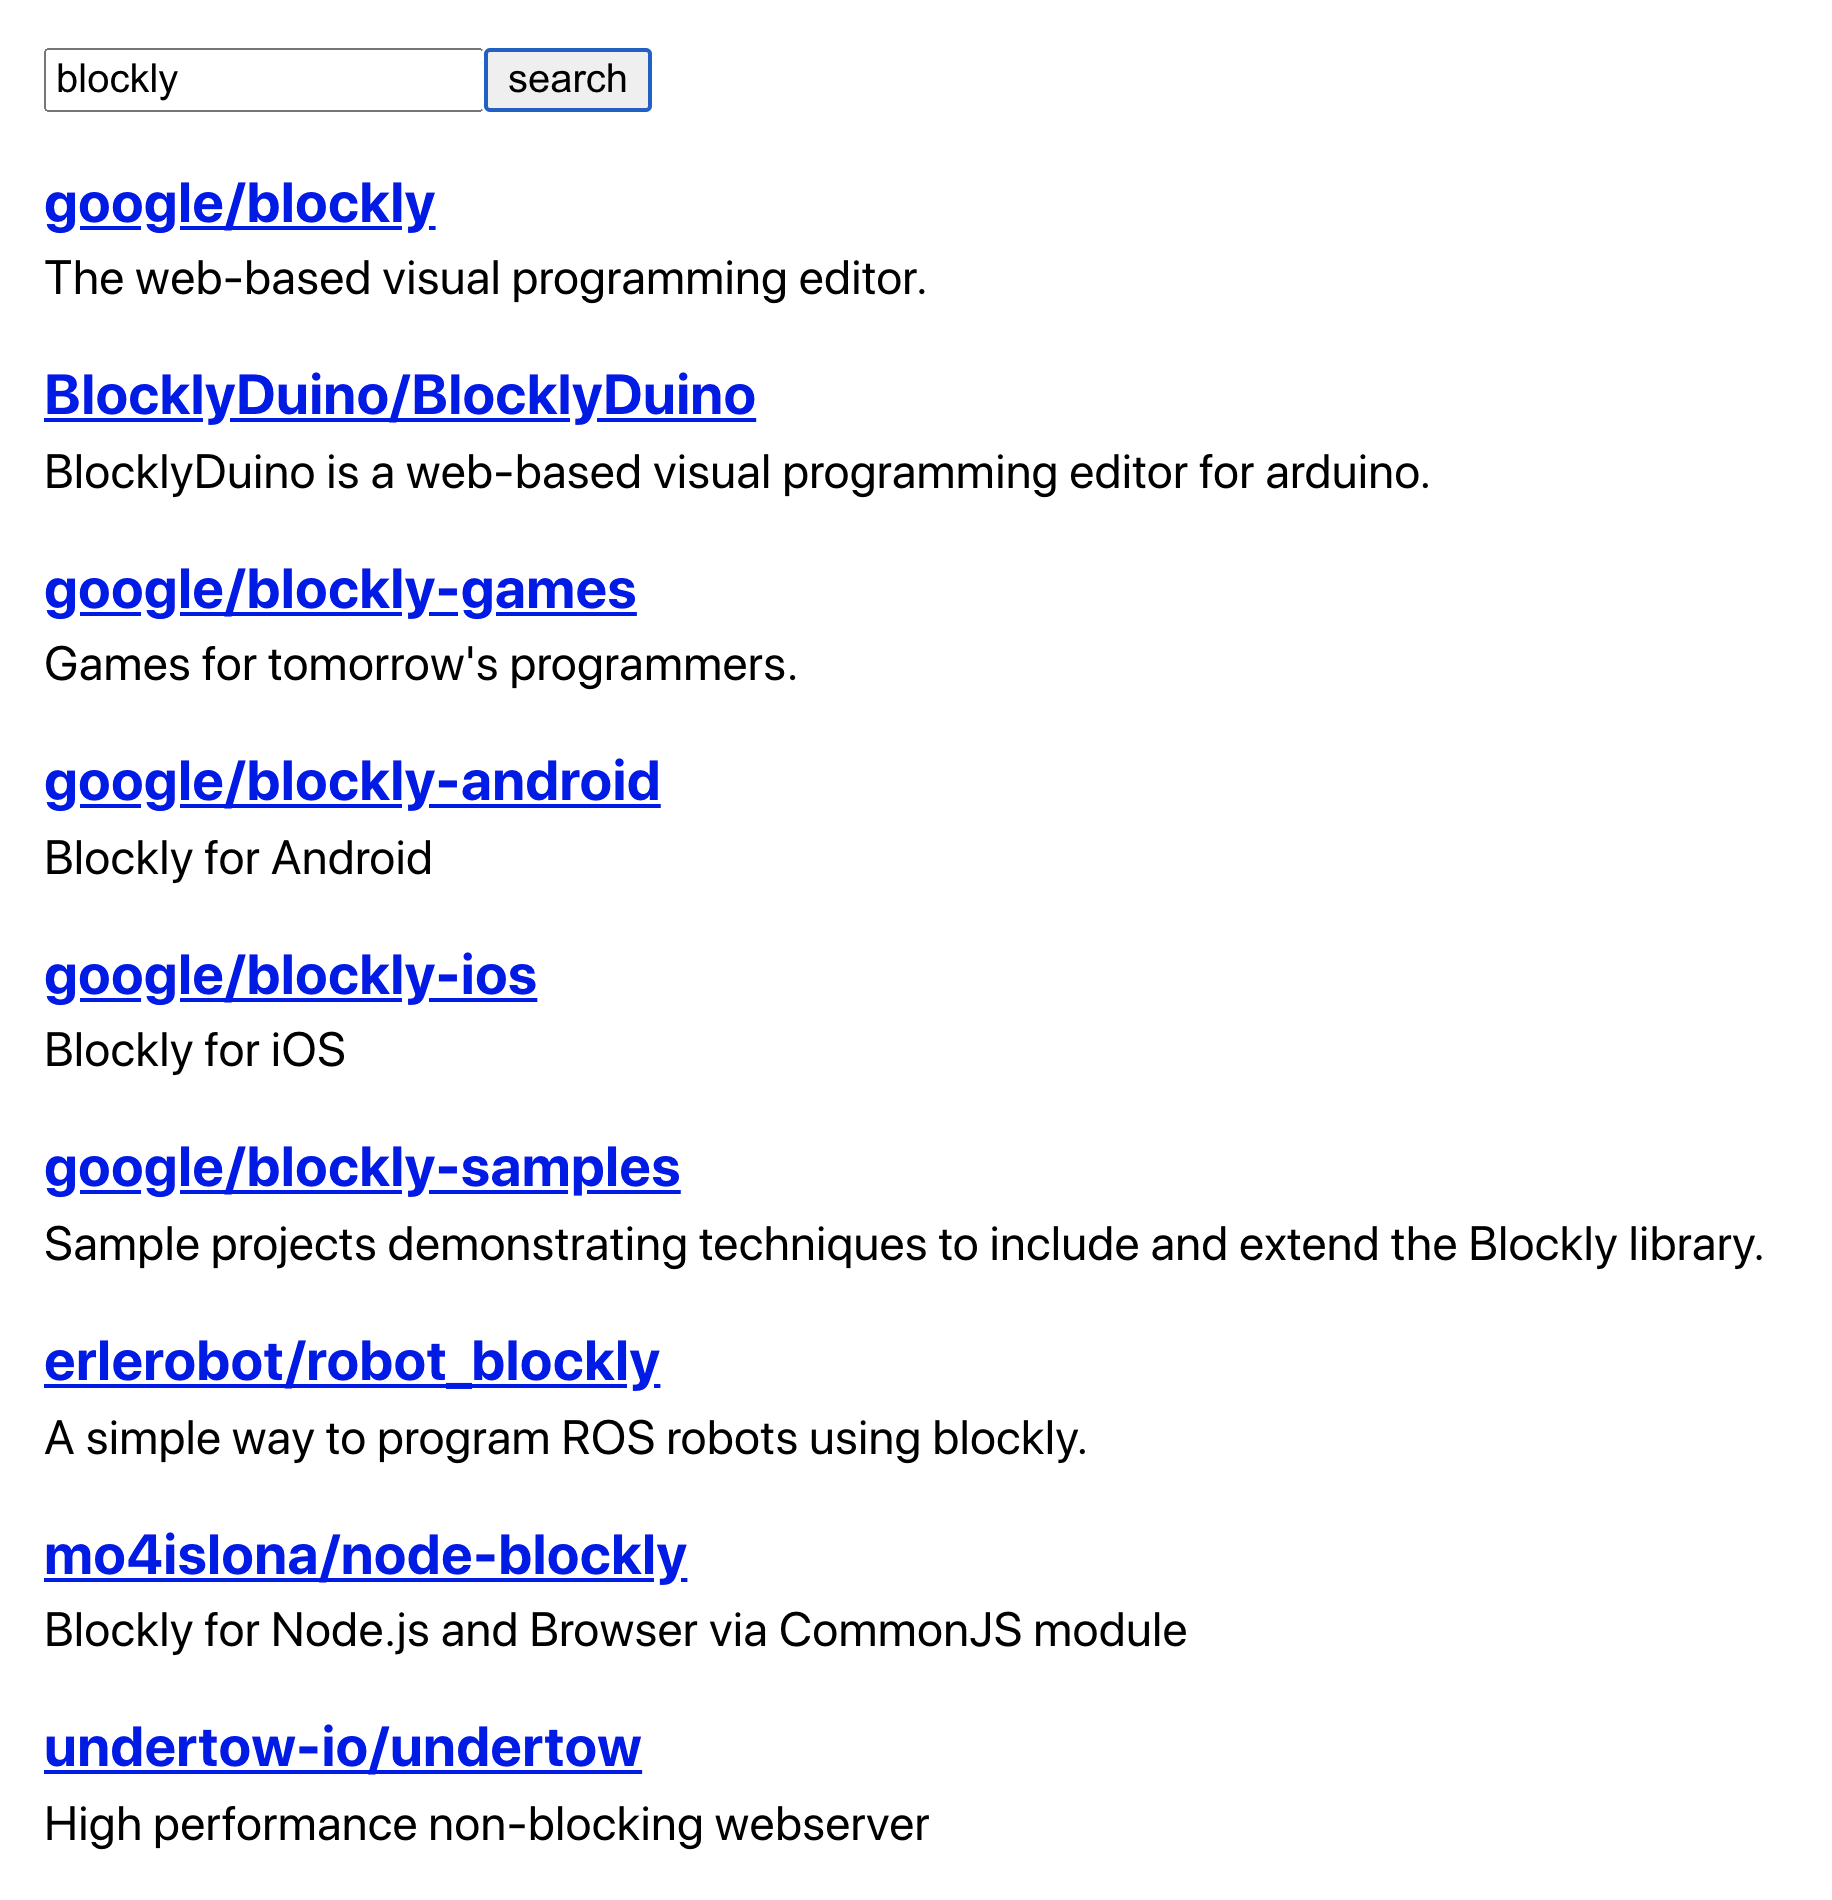
Your task is to write a React/Redux app that shows GitHub repositories matching a query. The matches will be provided by GitHub’s REST API. The end product will look something like this:
Setup
Host, follow these steps:
The next three sections can be done in parallel. Split them up between team members.
Store
Create store.js that looks just like the one made in the videos. It uses the reducer (defined elsewhere) and the thunk middleware.
Provider
In index.js, add a Provider component and pass your store as a prop as demonstrated in the videos.
Reducer
Create reducer.js with a similar structure to the one made in the videos. Use this initial state:
const initialState = {
  matches: [
    {
      full_name: 'twodee/fiction',
      description: 'This repository does not exist.',
      html_url: 'https://github.com/twodee/fiction',
    },
  ],
};
The reducer should handle just the default case for the moment. Whatever the action, return the unmodified state.
Repository
Define a Repository component in Repository.js. It receives a prop named repository, which is an object shaped like the example from the initial state shown above, having keys full_name, description, and html_url. Display the repository’s full name in an anchor tag and the repository’s description.
App
Your next task is to reach into the global store and turn its matches into viewable components. Complete the following steps in App.js.
Actions
Now that you’ve got the initial state showing, it’s time to add some actions to pull down new state from GitHub’s REST API. Complete the following steps.
Submission
Screen sharer, when your group is done or when time is up, submit just your group’s actions.js on Crowdsource.
Peer Review
After you have submitted the exercise, transition into your peer review for project 2. The following things should happen: