CS 491: Lecture 1 – Push Button
Welcome to CS 491! The Registrar doesn’t really give this elective class a name, but between you and me, I’m calling it Game Development and Physical Computing. The Game Development part means we’re going to be making games. The Physical Computing part means we’re going to be assembling hardware. That hardware will sense the world in order to control our games.
First, let’s address some expectations for this course:
- In this class you will be making a single game with two other people. You will self-assemble into teams. I will not be involved.
- We will use the Unity game engine. There are others, of course, but we need Unity for this class to run coherently.
- The theme for this semester is cooperative arcade games. Your games will be played by two or more people simultaneously.
- At least two of the players must be on the same team. You can have a team vs. team mode, but the cooperation must be an integral part of the game’s design.
- We will restrict ourselves to 2D games. There’s already enough to learn without adding in the third dimension.
- You will spend the semester on your game, and it should be fun and beautiful before the semester is over.
- You will demo your game to the university-wide CERCA event in early May.
- It is imperative that you commit to this class—your team, really—now. If you don’t have the time or interest to make something this semester, you should drop and let one of the seven people on the waiting list in.
Each week will look like this:
- On Mondays we will have a normal lecture. We will write code, examine new hardware, and explore features of the Unity game engine.
Today’s Monday, so let’s have a normal lecture. In fact, let’s make a game—one that uses hardware. The simplest piece of interactive hardware that exists is the pushbutton switch. It only lets current flow when the button is actively depressed. We will use it to make a one-button game.
The first step is to assemble a circuit. I don’t expect you to know anything about electronics. I know very little myself. We’re here to learn. We’ll use a standard push button, which has four pins. We only need two of them. Electrons will flow in one of them, and out the other if the button is depressed.
We wire it up this way initially:
- 5V to the bottom-left pin of the button.
- The bottom-right pin of the button to digital pin 7 on the Arduino.
An Arduino has a builtin main function that runs this algorithm:
void main() {
  setup();
  while (true) {
    loop();
  }
}
We must supply definitions for setup and loop. In setup, we tell the pins whether we will be reading from them or writing to them. We also initialize the serial port, which will be our communication channel to the computer. In loop, which runs repeatedly, we query pin 7 and send its data over the serial port. This Arduino sketch accomplishes these tasks:
#include "Arduino.h"

void setup() {
  pinMode(7, INPUT);
  Serial.begin(9600);
}

void loop() {
  int value = digitalRead(7);
  Serial.println(value);
  delay(100);
}
I use a tool called PlatformIO to compile and upload code to an Arduino and observe the serial port. These are the commands I use most often:
platformio init -b uno             # to initialize a project
platformio run -t upload           # to compile and upload
platformio device monitor -b 9600  # to listen to the serial port
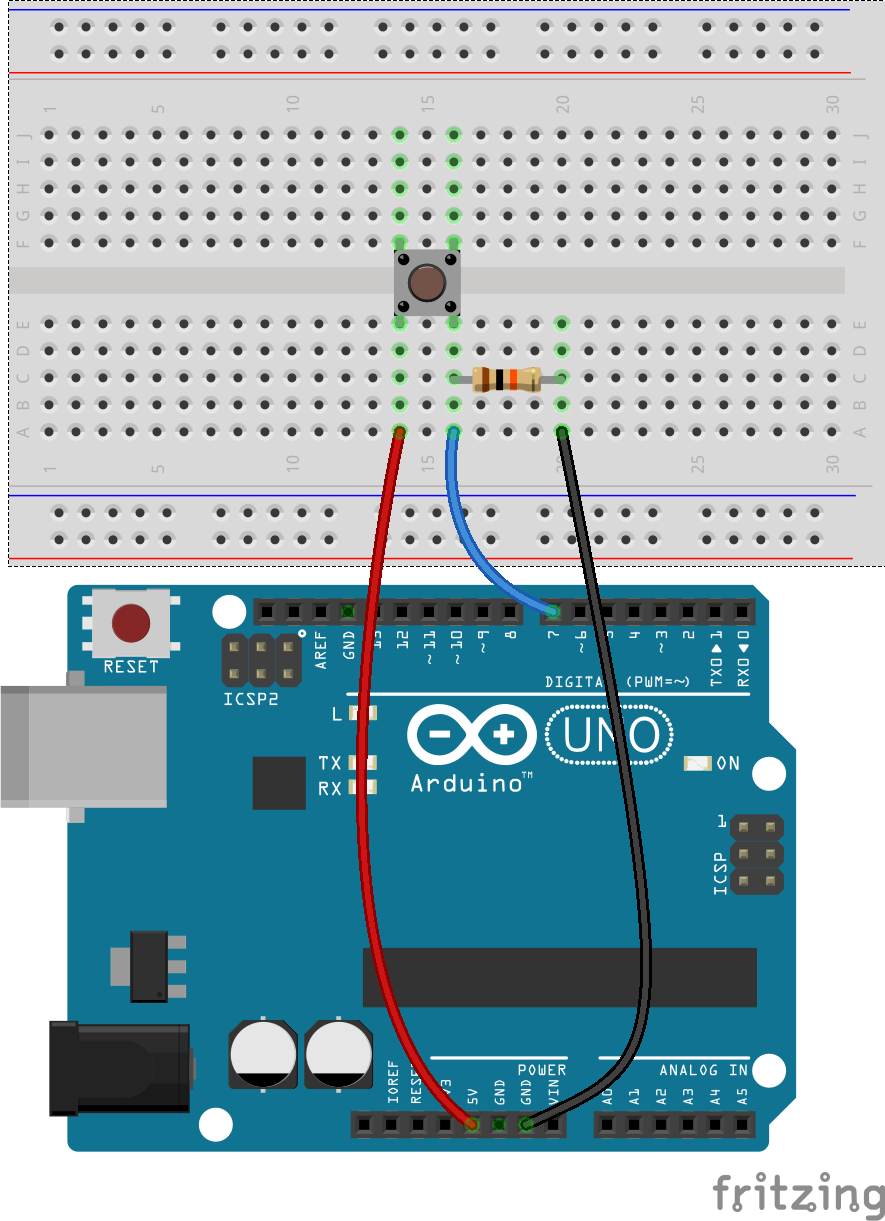
When I run this, I find that the Arduino continues to emit 1s or HIGHs long after I’ve released the button. There’s no longer a closed circuit between the button’s pins, but pin 7 has entered this indeterminate floating state. The Arduino documentation for digitalRead anticipates this. To force pin 7 to go LOW, we need to feed ground into it. Electrical voltage is often described as electrical pressure. That pressure disappears when the button is released, and we pull in ground instead. But we discourage ground by adding some resistance between it and pin 7. We use a 10K ohm resistor. The complete circuit looks like this:
We really only care about the transitions between pressed and non-pressed. Let’s add some history to our Arduino sketch so we detect those change events:
#include "Arduino.h"

int old_value = LOW;

void setup() {
  pinMode(7, INPUT);
  Serial.begin(9600);
}

void loop() {
  int value = digitalRead(7);
  if (old_value != value) {
    Serial.println(value);
    old_value = value;
  }
  delay(100);
}
In fact, for our game, we only really care about down events, so let’s be even more selective. We watch for those transitions that go from LOW to HIGH:
#include "Arduino.h"

int old_value = LOW;

void setup() {
  pinMode(7, INPUT);
  Serial.begin(9600);
}

void loop() {
  int value = digitalRead(7);
  if (value == HIGH && old_value == LOW) {
    Serial.println(value);
  }
  old_value = value;
  delay(100);
}
Now we are ready to hook up this controller to a game in Unity. Our game will be simple since we have only a single button. But that doesn’t mean it can’t completely lack story. Let’s place the player on a planet spinning around its axis. There’s a satellite orbiting the planet that has gone haywire and gets dangerously close to the planet, nearly hitting the player. The player can’t move, but he can reverse the direction of the planet’s spin by pressing the button.
We’ll do as much as we can of the following steps:
- Add a planet sprite.
- Get the planet spinning. Create a
GameControllerscript. Note that it has methodsStartandUpdate, which are identical in purpose to our Arduino functions. Declare a publicGameObjectfor the planet, and wire it in using the Inspector. InUpdate, rotate the planet with this code:planet.transform.Rotate(0, 0, angularVelocity);
- Add a satellite sprite.
- Rotate the satellite with the planet by making it a child of the planet.
- Make the satellite undulate by giving it its own
SatelliteControllerscript and adding in this logic inUpdate:We’ll need to tweak the numbers to fit our sprite’s size.int nbounces = 5; float amplitude = 0.4f; float radiusOffset = 1; transform.localPosition = new Vector2(Mathf.Sin(Time.time * nbounces) * amplitude + radiusOffset, 0);
- Support spin reversal by reading button presses from the serial port. First, we need to tweak our game settings so that Unity provides access to the serial API. Under Edit / Project Settings / Player, select .NET 2.0 for the Api Compability Level option. Then in
GameController, we add these lines:The path to the serial port is dependent on your OS and USB configuration. What works for me will probably not work for you. We’ll want to make that code more robust later on.using System.IO.Ports; ... private SerialPort serial; void Start() { serial = new SerialPort("/dev/tty.usbmodem1411", 9600); serial.Open(); } void Update() { if (serial.BytesToRead > 0 && serial.ReadByte() == 1) { angularVelocity *= -1; } ... }
I think that’s enough for our first day.
Here’s your TODO list for next time:
- Form your team. At the beginning of class on Wednesday, I need a piece of paper with the three team members’ names on it, plus the name of your studio. The skills that you will need this semester include game programming, hardware, art, and story. You are free to specialize or not. Next class is a work period where you will start to hash out a gameplan.
- Accept your Slack invitation.
- Read the syllabus.
- Watch some tutorials on Unity. If you find good ones, please share them on Slack in the #resources channel.
- We will be working through Ian Schreiber’s online game design course throughout the semester. It is packaged as a blog. Read Level 1: Overview / What is a Game?
- Post on Slack in the #general channel a question for your peers based on the reading. Also answer at least one other person’s question. Be thoughtful. This activity is worth a participation point.

P.S. It’s time for a haiku!
Simple fishing game
One button to cast, reel, net
I’ll call it Clickbait