CS 491: Meeting 1 – Push Button
Dear students:
Welcome to CS 491! The Registrar doesn’t really give this elective class a name, but between you and me, I’m calling it Game Development and Physical Computing. The Game Development part means we’re going to be making games. The Physical Computing part means we’re going to be assembling hardware. That hardware will sense the world in order to control our games.
Expectations
First, let’s address some expectations for this course:
- In this class you will be making a single game with two other people. You will self-assemble into teams. I will not be doing any match-making.
- We will use the Unity game engine. There are others, of course, like Unreal and Godot, but I think it’s important that we all use the same one in this community of CS 491. Unity is a reasonable choice, as it’s got robust documentation, a free license tier, and support for serial communication.
- The theme for this semester is multiplayer arcade games. Your games will be played by two or more people simultaneously that occupy the same physical space.
- We will restrict ourselves to 2D games. There’s already enough to learn without adding in the third dimension.
- You will spend the semester on your game, and it should be fun and beautiful before the semester is over.
- You will demo your game to the university-wide CERCA event in early May and at the end-of-year picnic for the Department of Computer Science.
- It is imperative that you commit to this class—your team, really—now. If you don’t have the time or interest to make something this semester, you should drop and let one of the people on the waiting list in.
Weekly Plan
Each week will look like this:
- On Tuesdays we will have in-class exercises. I will give you a challenge to complete with your team. It will address some topic related to Unity or Arduino.
- On Thursdays we will have work time. I will rove around and visit with each group.
- You should also plan to meet with your group outside of lecture at least once a week.
Exercise
Let’s make a game—one that uses hardware. The simplest piece of interactive hardware that exists is the push button switch. Surely we can make a game with just one button? When the button is pressed, let’s just have the boss disappear.
Circuit
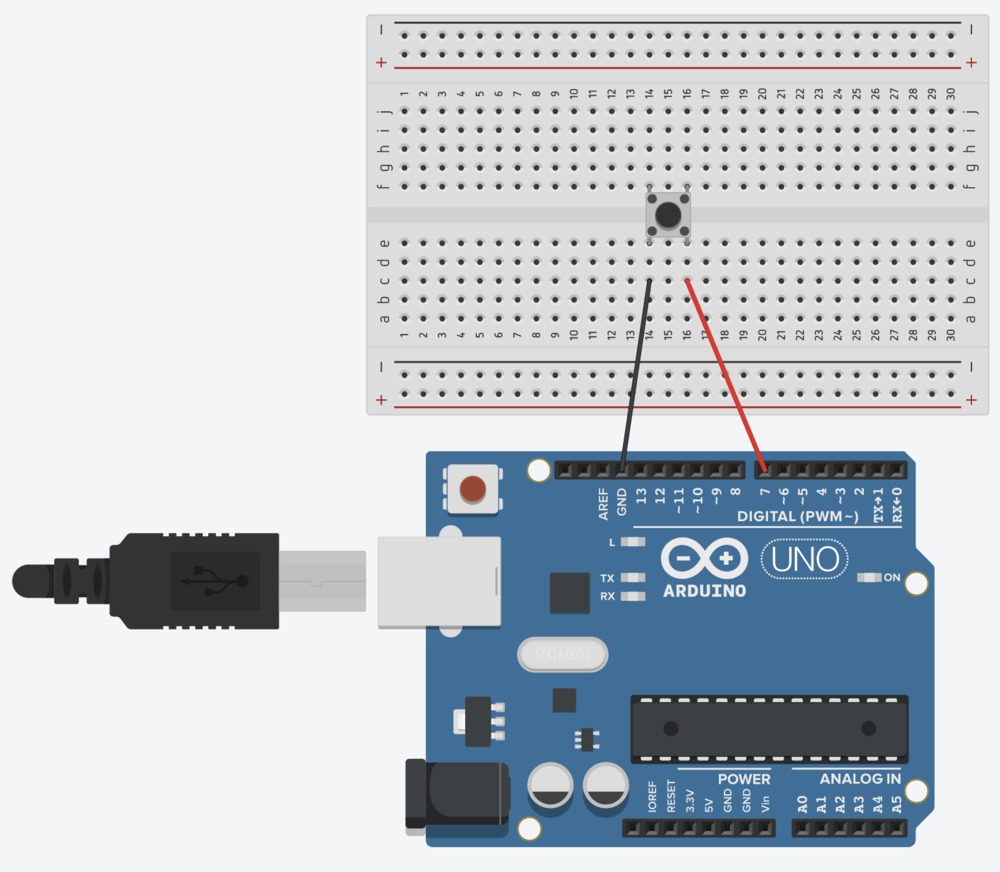
The first step is to assemble our controller’s circuit. Your instructor will provide you with a collection of hardware. For input, we’ll use a standard push button. Inspect the one that your instructor has provided. You’ll see it has four pins. We will use just two that are on the same side. Electrons will flow in one and out the other when the button is pressed.
Follow these steps to build your circuit:
- Do a quick web search on breadboards—which allow us to make ad hoc circuits—to see what’s going on under the plastic.
- Press the button into the breadboard so that it straddles the center line.
- Connect a wire from ground (GND; the electron source) on the Arduino to any of the four remaining holes in the same column as one of the button’s pins.
- Connect a wire from pin 7 on the Arduino to any of the four remaining holes in the same column as the button’s other pin.
All told, your controller should look like this:
Firmware
An Arduino is a miniature computer. It runs a single program, its firmware, which we write on a standard computer and then upload.
Our program must contain definitions for two functions: setup and loop. In setup, we initialize state and any global variables. In loop, we do the ongoing work of reading pins and communicating back to the computer.
Follow these steps to get your firmware up and running:
- Download and install the Arduino IDE.
- Download and install drivers for the Adafruit Metro. There are separate instructions for Windows and macOS.
- Open the Arduino IDE.
- Under Tools / Board, choose Arduino Uno. There are several types of Arduino boards; we are using Unos.
- Under Tools / Port, choose the port that the Adafruit documentation helped you identify.
- Create a new sketch (a program).
- Define
setupin the following way:We are going to read pin 7 to see if its got electrons coming through, so we set its mode tovoid setup() { pinMode(7, INPUT_PULLUP); Serial.begin(9600); }
INPUT. To communicate back to the computer running the game, we open a serial connection that sends messages at a rate of 9600 bits per second. - Define
loopin the following way:This reads pin 7.void loop() { int value = digitalRead(7); Serial.println(value); delay(100); }
valuewill be either 0 or 1. We print its current state to the serial port and then delay 100 milliseconds.
Note that the function is called loop, but it doesn’t actually contain a loop. The Arduino tooling automatically inserts a main function that effectively looks like this:
void main() {
  setup();
  while (true) {
    loop();
  }
}
But you don’t write this main.
Now we’re ready to install and test the firmware.
- Verify and upload this code using the toolbar in the Arduino IDE.
- Open the serial monitor by clicking Tools / Serial Monitor.
- Switch the bits per second (baud) rate to 9600.
- Press the button and verify that you see the output change when you press the button.
You should see a number once every 100 milliseconds, which is a lot of output. Let’s fix that with this open-ended challenge:
- Alter your program so that you only call
Serial.printlnwhen the reading changes, that is, when the button changes from pressed to unpressed and vice versa. - Tweak the logic so that a 1 is printed when the button is pressed, and a 0 is printed when the button is released.
Once your program is printing 0 and 1 only when the button changes, let’s do one last step:
Serial.printlnprints its argument as ASCII text. It’s easier to read binary values in Unity, not ASCII. We want to send a single byte value. SwitchSerial.printlntoSerial.write.
Unity
Now we are ready to hook up this controller to a game in Unity. Complete the following steps to build your game:
- Open Unity and create a new 2D project.
- Find or draw an image of boss.
- Drag the image into the Assets folder of the Project panel.
- Drag the image from Assets into the Scene panel. Note how the image also appears in the Hierarchy panel.
- In the Game panel, ensure that Maximize on Play is toggled on.
- Hit the play button in the toolbar.
Your game is running. There’s the boss—and there’s no way to get rid of it. What a hard game! Let’s get our boss-removing button controller integrated with these steps:
- Select the image object in the Hierarchy panel.
- Click the Add Component button at the bottom of the Inspector panel.
- Select New Script and name the script
BossController. - Note how the C# script appears in Assets. Double-click to open it.
- Tweak your game settings so that you have access to the serial port API. Under Edit / Project Settings / Player / Other Settings / Configuration, select .NET 4.x for the Api Compability Level option.
- Then edit
BossControllerto look like this:Replaceusing System.Collections; using System.Collections.Generic; using UnityEngine; using System.IO.Ports; public class BossController : MonoBehaviour { private SerialPort serial; void Start() { serial = new SerialPort("PORTNAME", 9600); serial.Open(); } void Update() { if (serial.BytesToRead > 0) { int state = serial.ReadByte(); Debug.Log(state); } } }
PORTNAMEwith the same text that you see in the Arduino IDE for the port. - Run the game. If you get an error about the port being in use, close the serial monitor in the Arduino IDE. Only one entity can read from a serial port at a time. You should see the 0s and 1s that you wrote across the serial port in the firmware appearing in the status bar of the Unity editor.
Let’s finish off the boss and the game with an open-ended exercise:
- When the button is pressed, remove the boss object from the game. Search the web or Unity documentation to figure out how to do this.
TODO
Here’s your TODO list for next time:
- Read the syllabus.
- Form your team. At the beginning of class on Thursday, I need a piece of paper with the three team members’ names on it, plus the name of your studio. Next class is a work period where you will start to hash out a gameplan.
- Accept your Slack invitation.
- Watch some tutorials on Unity. If you find good ones, please share them on Slack in the #resources channel.
See you next time!
