CS 491: Meeting 3 – Joystick
Dear students:
We have formed teams and are hashing out game ideas. Some of us are feeling the repressed artist inside of us wake up to the call of pixel art. We should keep that progress going. Right after a lab exercise!
Exercise
Let’s make a game—one that uses a two-axis joystick. We’ll move an avatar around the screen with the joystick, and when it runs into something, that something will disappear.
Arduino
Behold, the controller that we’ll make today:
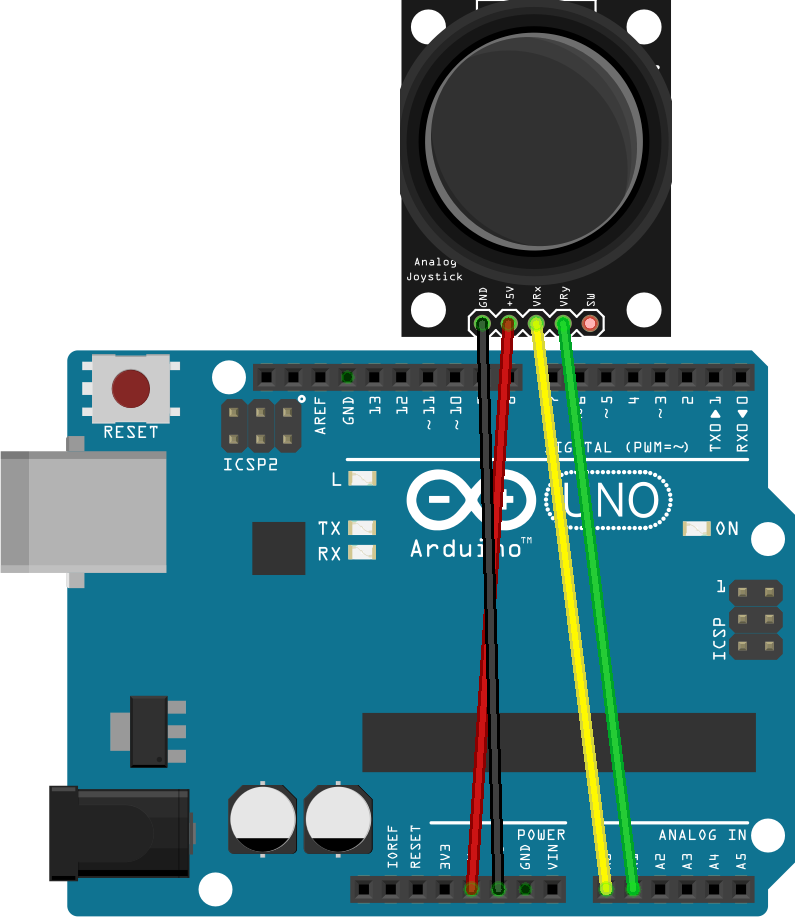
The joystick is an analog component. An analog component yields readings across a broad spectrum of values, whereas a digital component, like a button, only yields 0 and 1. This means that the joystick supports degrees of intensity that we cannot achieve with a button.
Assemble the controller as follows:
- Connect 5v on the Arduino to 5v on the joystick.
- Connect ground to ground.
- Connect the horizontal position pin (+VRx) to A0.
- Connect the vertical position pin (+VRy) to A1.
The fifth pin on the joystick is for the button press that you can achieve by pressing the joystick toward the board. We’re not using it today.
Once assembled, follow these steps to get your firmware up and running:
- In
setup, prepare pinsA0andA1forINPUT. - In
loop, read the two pin values withanalogRead. - Print just the horizontal reading from
A0. We’ll add the vertical reading later. - Add a slight delay between readings to slow down the console output a bit.
- Test your program.
What values do you see in the Serial Monitor?
Compare your answers against mine.It’d be nice if pushing left made the number go negative, idle was 0, and pushing right made the number go positive. Let’s make that happen. We want to turn a number in the top range into a number in the bottom range:
What calculation do we perform?
What if we want to perform this mapping, which is a reverse of the previous?
What math would we use here?
Let’s keep going.
- Edit your code to perform the range-mapping for the horizontal position.
- Read and print the vertical reading. What is different about the vertical reading?
- As with the horizontal reading, map the vertical reading to [-512, 511]. Make sure down maps to -512 and up maps to 511.
Once you have both numbers printing, we want to send them across the serial port to Unity. Last time we used Serial.write to send over a byte value in binary. We could try that here, but our numbers exceed what can be stored in a single byte. Perhaps we could do some bit twiddling to decompose the values into two separate bytes? All told, each message would be 4 bytes long.
However, we’re going to run into another issue with serial communication. The Arduino will be pushing out a steady stream of bytes. At some point our Unity game will start drawing from this stream of bytes and interpreting its contents. But it might not start at the first byte of a message. If it starts reading at the third byte, then x and y will be effectively flipped. If it starts reading at the second or fourth bytes, we’ll get some unintelligible results.
To help get our game and the Arduino in sync, let’s insert start and end markers around each message. And let’s eschew binary for the ASCII format.
- Print the horizontal and vertical readings in a string message of the form
[HORIZONTAL VERTICAL], withHORIZONTALandVERTICALreplaced by the actual numeric values. Here we have used square brackets as markers. Use your favorite markers that won’t appear in the body of the message. - Ensure that each message is a single line of text.
As you develop your controller firmware, you’ll need to establish a protocol like this describing your message format.
Unity
Now that we have a working controller, let’s turn to our game. Complete the following to establish our scene:
- Create a new 2D game in Unity. Or create a throwaway scene in your existing game.
- Switch to .NET 4.x in Project Settings.
- Add a cube, sphere, or other simple game object to the scene. Even though the game is 2D, Unity still considers the game world to be 3D. 3D game objects can be used in 2D, but they appear dark by default because they use a shaded material and there is no light source. The appearance doesn’t matter for the purposes of this exercise. (Fix it after you finish the other steps by adding a light source or changing the material.)
- Add a script named
PlayerControllerto the object. - In the controller’s
Startfunction, establish a serial connection. - In the controller’s
Updatefunction, read a line of input with theReadLinemethod of your serial connection. - Inspect the input with debugging messages. Does it look like what you sent over from the Arduino?
Once you have confirmed that messages are getting through, it’s time to push the game object around the scene based on the intensity and direction of the joystick. Follow these steps to get your object moving:
- If the message is properly formatted (bracketed by the start and end markers), strip off the ends and split the bracketed text into tokens. (Note that
ReadLineyields a string with the linebreak still attached.) - Convert each token into a
float. - Form an offset
Vector3using the two numbers. Scale the x- and y-components down to avoid big jumps. Set the z-component to 0. - Apply the offset to
transform.position.
You should now have a moving game object. For our final step, let’s add a second, stationary game object. When the player collides with it, the object disappears and the player wins. Follow these steps to achieve this endgame:
- Add a second game object.
- Remove any existing collider components from your two objects. 3D objects by default come with 3D colliders, which are not what we want in this 2D game.
- Add 2D circle collider or 2D box collider components to your two objects.
- Check Is Trigger for both colliders. Triggers are objects that we can pass through. Non-triggers are physical obstacles like walls that we cannot pass through.
- Add a 2D rigidbody to your player game object. This component is needed if you want Unity to perform collision detection.
- Set the rigidbody’s Body Type to Kinematic. We use this option when we are controlling the position of the object directly, through code. The default Dynamic option is for objects that should be positioned by the physics system.
- Add an
OnTriggerEntermethod toPlayerController. - The parameter to
OnTriggerEnterhas agameObjectproperty representing the object with which we are colliding. Delete this object.
Does it work? If so, show your working game to your instructor to receive credit for this lab.
TODO
Here’s your TODO list for next time:
- Next week we will informally share the first milestone of our project: the paper prototype. We will split our meeting time up into 10-minute time slots. Your team will present your prototype to at least three other teams for around 10 minutes. Shall we do this Tuesday or Thursday?
See you next time!
