CS 318 Lab 17 – Pseudoselectors and Dropdowns
Dear students,
Today’s lab is designed around something I saw in a lot of your mockups: dropdown navigation menus. There aren’t a lot of new ideas here, but application of old ones. So, I won’t talk much.
However, I did incorporate a few of the pseudoclass selectors that you met in CSS Diner. Let’s revisit some of those:
- What if you only want to apply a style to the element containing
A?When might be an occasion where this selector would be useful?<parent> <child>A</child> <child>B</child> </parent>
showThe selectorparent:first-childmight be useful if you have a list of team members and the first one is the captain, whose name should appear with emphasis. - What if you only want to apply a style to the element containing
A?When might be an occasion where this selector would be useful?<parent> <child>A</child> </parent> <parent> <child>B</child> <child>C</child> </parent>
showThe selectorparent:only-childmight be useful if you have a list of two-person teams and you want to highlight all the individuals that do not yet have a partner. - What if you only want to apply a style to the element containing
C?When might be an occasion where this selector would be useful?<parent> <child>A</child> <child>B</child> <child>C</child> </parent>
showThe selectorparent:last-childmight be useful if you have an image slideshow with previous and next links. On the last child, you could disable the next link. - What if you only want to apply a style to the element containing
B?When might be an occasion where this selector would be useful?<parent> <child>A</child> <child>B</child> <child>C</child> <child>D</child> </parent>
showThe selectorparent:nth-child(2)might be useful if you have a set of tables with headers, and you want to apply a particular style to the first non-header row. - What if you only want to apply a style to the elements containing
A,C, orE?When might be an occasion where this selector would be useful?<parent> <child>A</child> <child>B</child> <child>C</child> <child>D</child> <child>E</child> </parent>
showThe selectorparent:nth-child(odd)might be useful if you have a table and you want to apply a style to the odd rows. - What if you only want to apply a style to the element containing
A?When might be an occasion where this selector would be useful?<element>A</element> <element>B</element> <element>C</element>
showThe selectorelement:first-of-typemight be useful if you have a list of paragraphs, and you want the first to have larger text.
Here’s your TODO list:
- Read chapter 10 in your book.
- Complete the Codecademy exercise on forms. It is woefully incomplete and it uses single quotes around attributes, but it’s something.
- On a quarter sheet, design a form to gather input for some interesting purpose (like for vetting would-be employees, suitors, or babysitters). Make the widget types clear (text, radio, checkbox, slider, etc.).
See you next time!
Sincerely,

Lab
First create a lab17 directory. Add a partners.html and include your first names and last initials.
Spenditures
Create in spenditures.html (sic) a table displaying a breakdown of the federal budget of the United States. It looks like this:
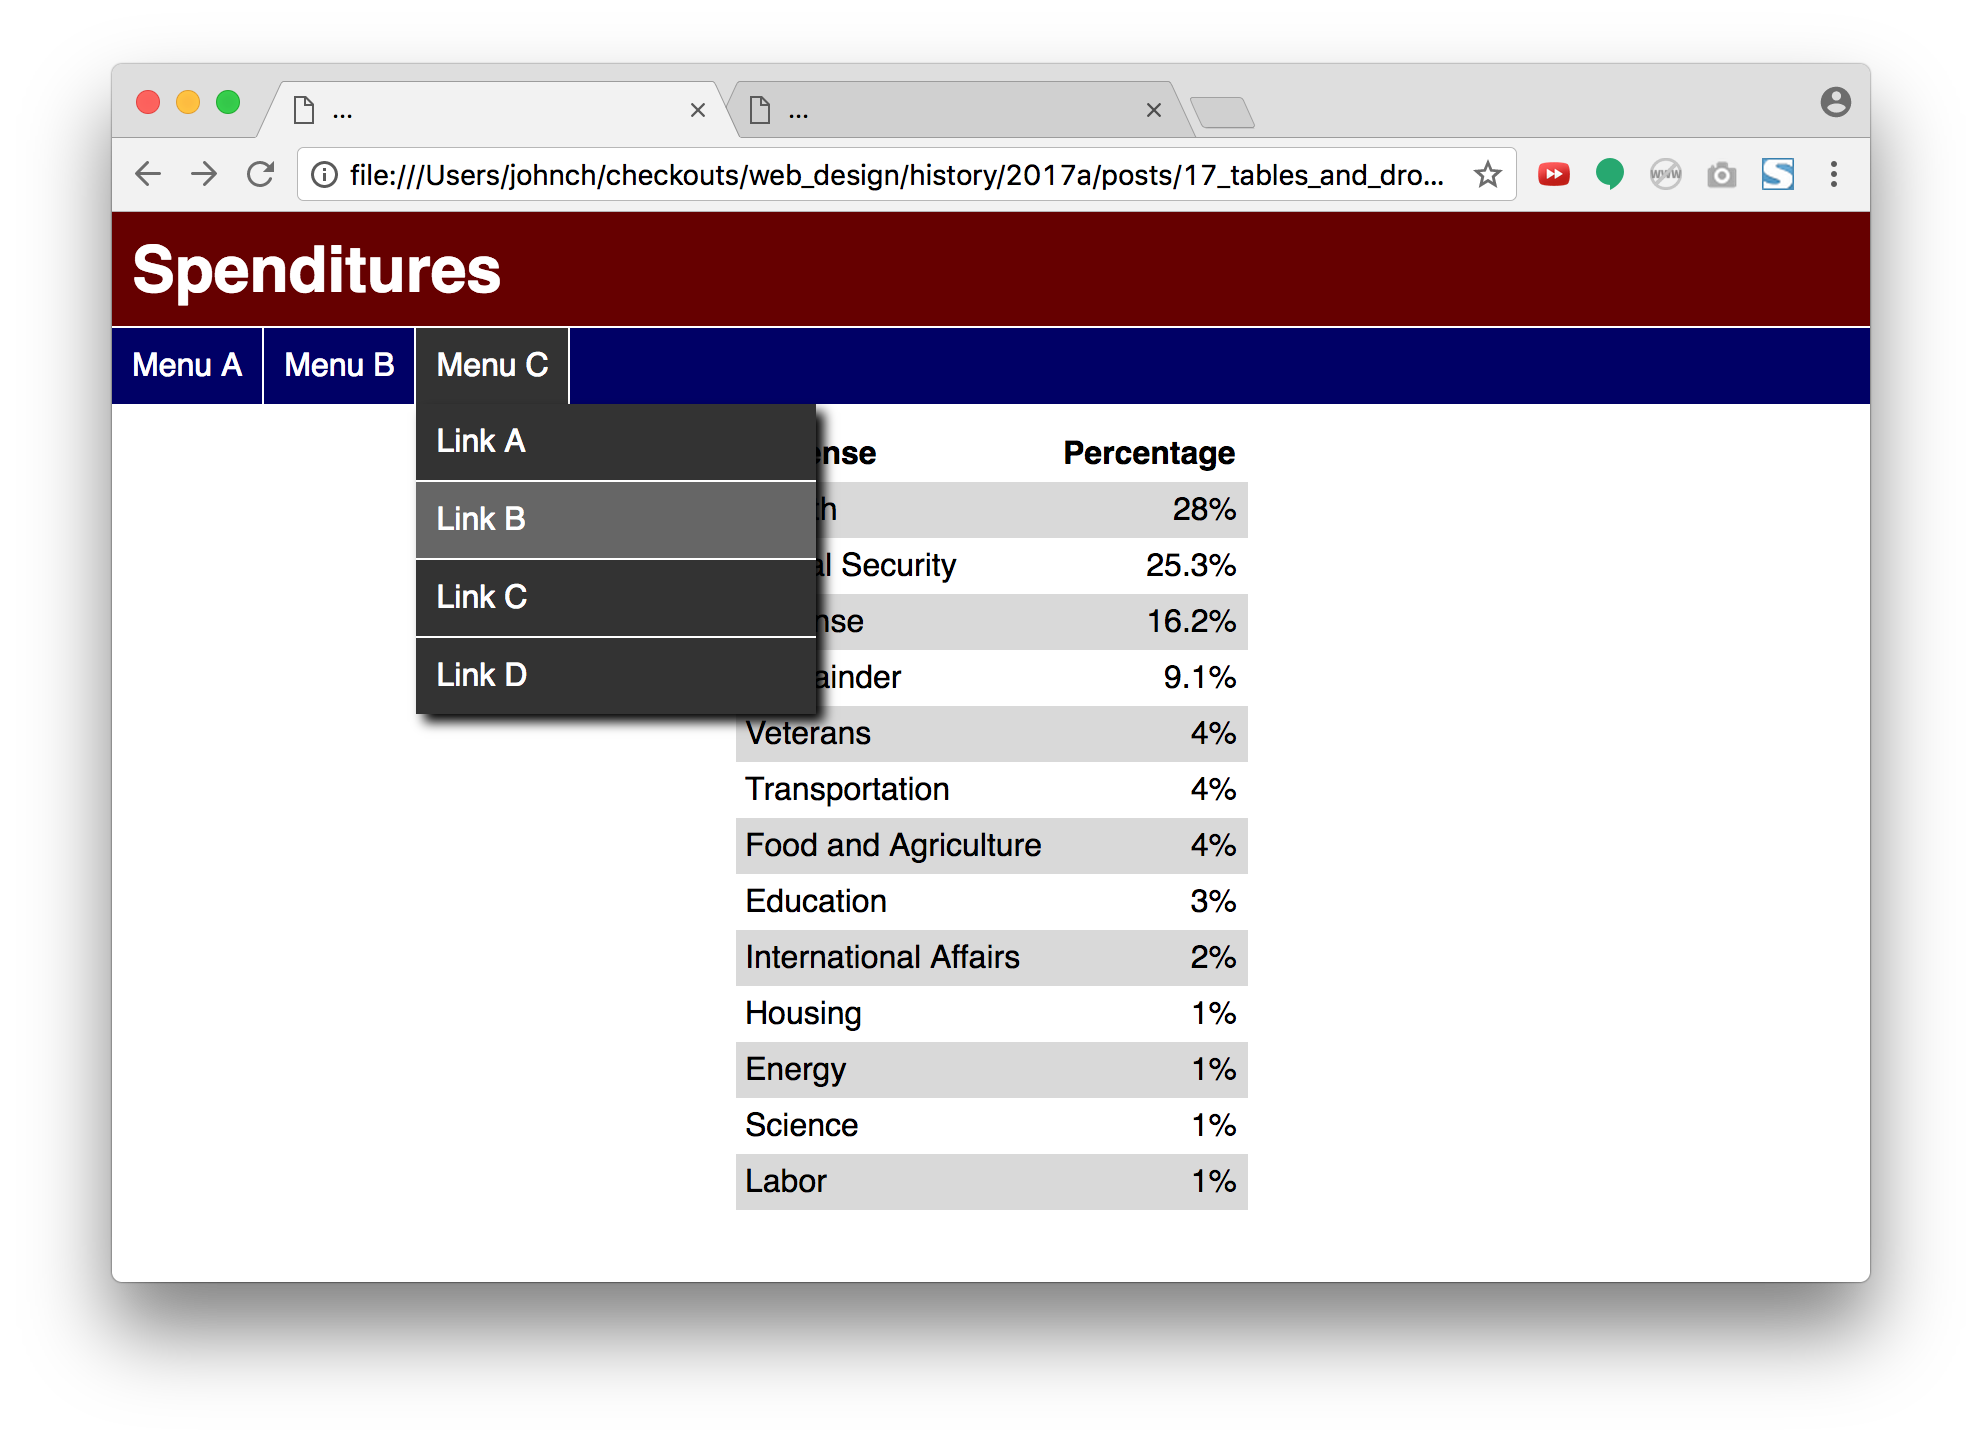
And it interacts with the viewer like this:
- Create a table showing the expenditure breakdown. Here’s the raw data taken from Politifact:
Health 28%
Social Security 25.3%
Defense 16.2%
Remainder 9.1%
Veterans 4%
Transportation 4%
Food and Agriculture 4%
Education 3%
International Affairs 2%
Housing 1%
Energy 1%
Science 1%
Labor 1%
- Style the table as shown in terms of spacing, coloring, and alignment. You should not need to add any classes or IDs to your HTML. Use pseudoclass selectors.
- Apply a sans-serif font to the entire page.
- In
header, place the page’s heading. Match the reference exactly, tweaking margins and padding as necessary. - In
nav, add an unordered list of the top-level menu labels. Put each in thelabelclass. Match the reference exactly. Include a 1-pixel right border above thenavand to the right of each list item. I recommend starting with just one item in the list but growing it after the first item behaves as you intend. - When the viewer hovers over a menu label in
nav, color it gray and change the cursor to a pointer with this CSS property:This will make the menu feel clickable, even though it isn’t a link.cursor: pointer;
- Add a
divto each menu item to hold the actual menu content: an unordered list of anchor elements. - Position each menu below its label with absolute positioning. (Recall that for this to work, the parent list item must be non-statically positioned. Relative positioning is a good alternative.) The menu and its parent should be aligned on their left edges, but for the menu to appear below the label, what must
topbe? You probably don’t know the exact height, but you can always use a percentage… - Color the menu the same gray as the hovered menu label.
- Provide a
box-shadowto the menu to increase the layering effect. Include enough vertical offset that the shadow can’t be seen at the top. We want the label and the menu to feel “attached,” and a visible shadow between them breaks that illusion. - Make the links white and not underlined. Have them link to a site of your choosing. Display them as
blocks so that the whole rectangular “button” is clickable—not just the text. - Place a 1-pixel white border below each link, save for the last. Again, don’t use a special class or ID for this. Use a pseudoclass selector.
- When an menu item is hovered, highlight it in a lighter gray.
- Have the menus not display initially. Use the
displayproperty. - When the menu item is hovered over, display its corresponding menu as a
block. This is most easily done by using a descendant selector:This rule applies to menus whose parent label is hovered over..label:hover .menu { ... }
- Add a few more menus to
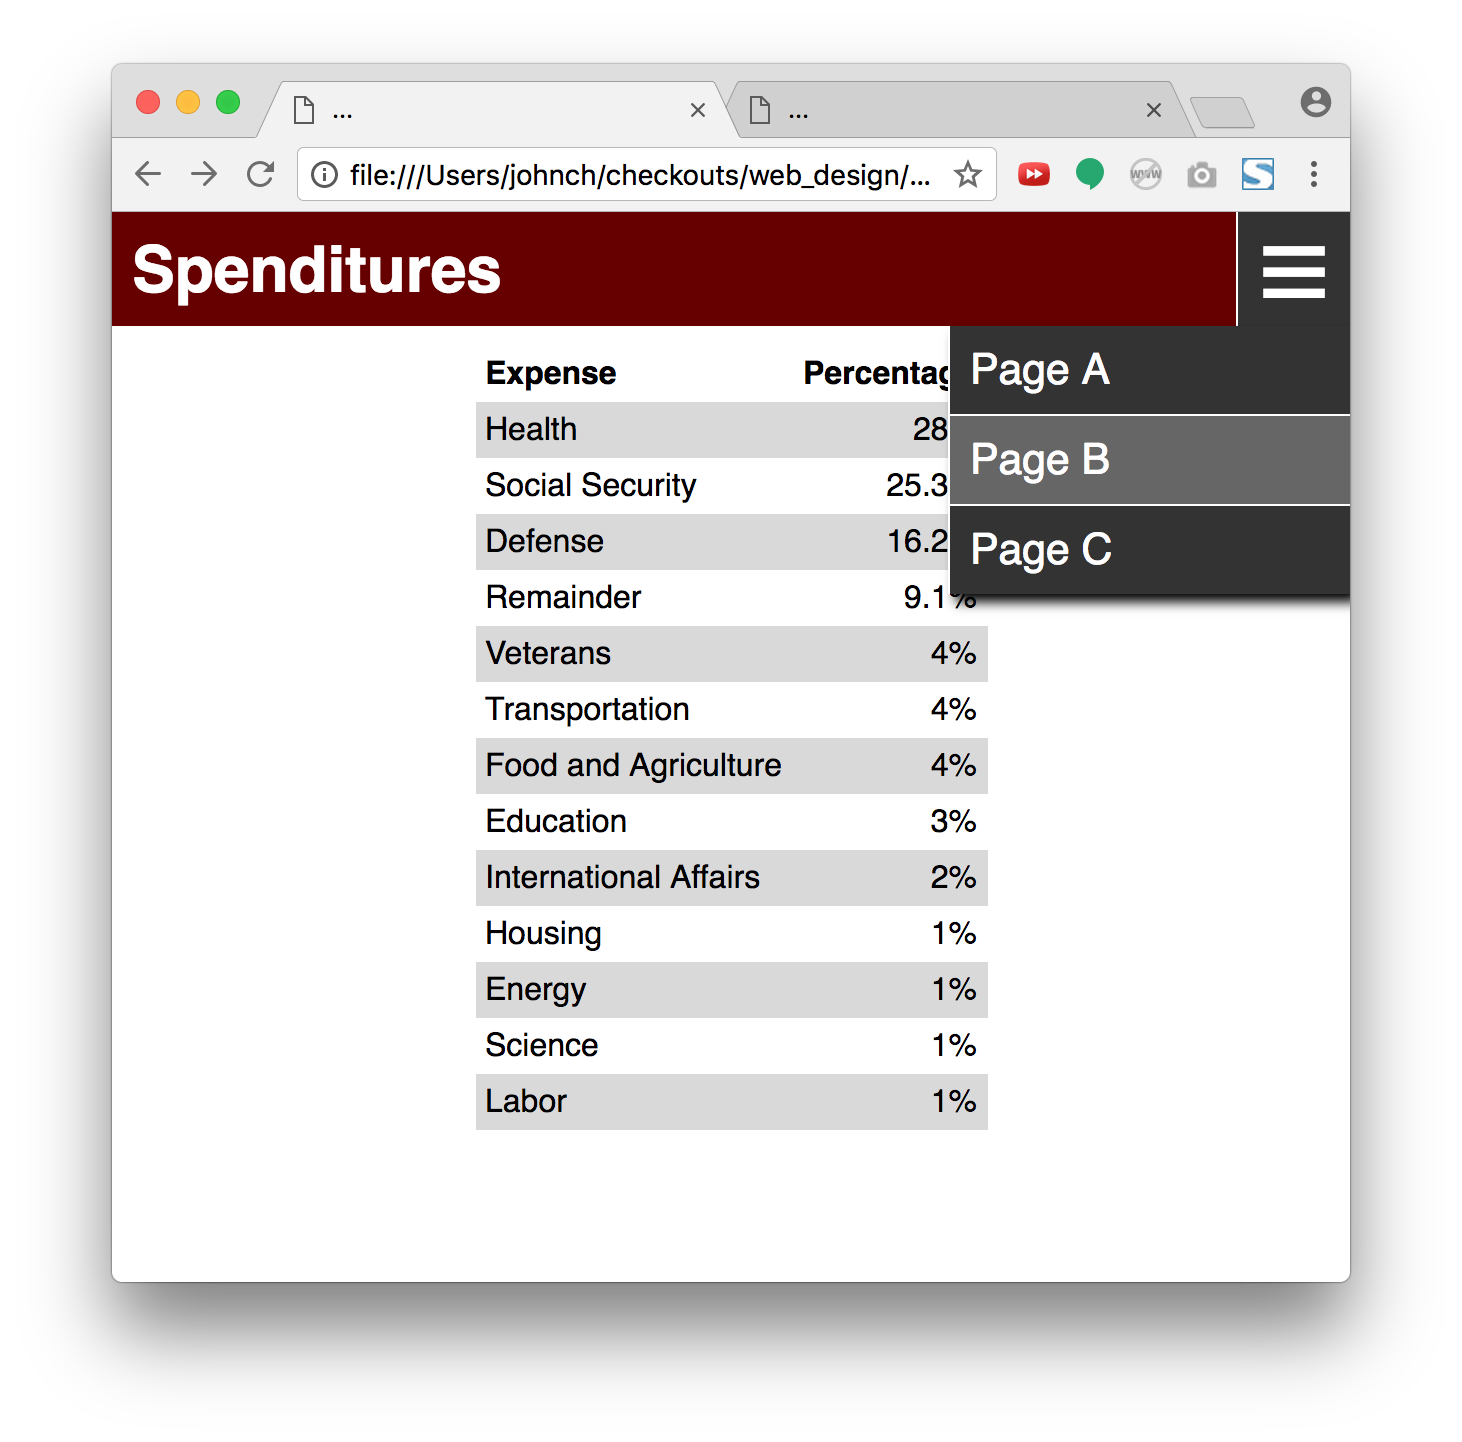
navand make sure your solution scales. You should haven’t to provide any new CSS rules. Create menus of different lengths. - Add a media query for when the page goes below a certain width (say 40em).
- Hide the
navelement altogether in your media query. - Add to
headeran absolutely positioneddivcontaining just the text☰—which is the HTML entity for a menu-ish icon. We will show through this button a popup menu instead of a navigation bar on small screens. Pin thedivto the top, right, and bottom of its parentheader. - Give the
diva 1-pixel white border on its left. - Increase the font-size of the
div. - Give the
divthelabelclass. - Just as you did with the
navmenus, add to thediva menu containing an unordered list of anchor elements. Does your menu appear? It didn’t for me. The menu is absolutely positioned below its label thanks to thetopattribute. The menu icon is absolutely positioned too, and you probably set itsbottomattribute to 0. That gets inherited by the menu and makes it 0 pixels tall. Fix this by settingbottomtoautoin the menu. - Hide the icon
divby default, but make it visible when the media query takes effect. You should see only one of thenavand the icon at a time.