CS 318: Lab 2 – Core Elements, Relationships, and Validation
Dear students,
Today we meet the core elements of an HTML document. First, a little review of your reading:
- Question #1Provide an example of a TLD.
- Question #2What is the subdomain of the URL
https://to.madeup.xyz? - Question #3What is the protocol of the URL
https://to.madeup.xyz? - Question #4If computers on the internet are identified uniquely by their IP address, why don’t we see them more often?
- Question #5Who decides what HTML5 is?
The core elements that we meet today will stick with us the whole semester. They will help us give a coarse structure to our information. Before we meet them, I want to spend a moment helping us prepare for the oncoming complexity. Suppose you wrote this hierarchy of elements:
<a><b>1</b><c><d>2</d><e>3</e></c><f><g><h>4</h></g></f></a><i>5</i>
The web browser will be able to read this. But the poor humans that you work with will not. Let’s rewrite this so that every tag is on its own line. Every element nested inside another should be indented one level. I will several of you to come forward and add exactly one opening tag, closing tag, or chunk of content to the reformatted version.
With a cleanly visible hierarchy, let’s talk about some relationships that might exist between nodes:
- Relationship #1What element is a sibling to
c? - Relationship #2What element is a child of
g? - Relationship #3What element is a parent of
a? - Relationship #4What element is a predecessor to
d? - Relationship #5What element is a successor to
a?
When we don’t keep our HTML clean, it’s very easy to lose the structure. My challenge for you today is to keep the structure apparent as you write your HTML!
Let’s consider another hierarchy:
<a><b><c></b></c></a>
And another:
<a><b></b><c></d></a>
Neither of these is well-formed. What’s wrong with them?
For the rest of our time today, you will get to know a set of the core HTML elements and use them as you reverse engineer some documents.
Here’s your TODO list for next time:
- Read chapter 2 in your book.
- Read or watch some resource for learning HTML besides your book.
- On a quarter sheet to be turned at the beginning of the next lab, identify the resource you found and share three questions or observations inspired by the book, your resource, or the lab exercises.

Lab
We have a few goals for today’s lab:
- Meet the core team of HTML elements.
- Reverse engineer some renderings.
Like last time, please find a partner and work together on the steps below. Use only one machine and do a lot of talking to each other. Only one of you should be at the “helm,” running the keyboard and mouse. The other should be contributing with ideas, questions, and encouragement. Halfway the exercises, you will be asked to trade places.
Setup
Start by getting your tools up and running:
- Open your
cs318directory in Visual Studio Code. - Create a
lab02directory right next tolab01. - Create a file named
answers.html. You will add text to it in the following sections. - Run Live Server on
answers.html. Place your browser on one monitor and Visual Studio Code on the other. Every time you save (Control-SorCommand-S), the web browser will update.
Now let’s meet the major players of HTML5.
DOCTYPE
Every HTML document that we write should declare its doctype on its top line:
<!DOCTYPE html>
In answers.html, type in this line. Also type in answers to all the questions asked of you throughout the lab. For the time being, type anywhere; we will structure this document later.
Question 1: Search the web to learn the purpose of DOCTYPE. Explain its purpose in your own words.
Question 2: What happens when you omit the doctype? What is the name of the mode that the browser enters? (It starts with a Q.)
html
Every HTML document represents a hierarcy or tree of content. Unlike our family tree, which had two sets of grandparents at its top, HTML documents have only one root element. This root is the html element.
Use opening and closing tags to surround the rest of your content—which I represent with an ellipsis:
<!DOCTYPE html>
<html>
...
</html>
The html element will always be the outer layer of the onion that is an HTML document.
Question 3: What happens when you place two HTML elements as siblings? By siblings I mean the two elements sit at the same level of the hierarchy. One opens right after the other closes.
head
Question 4. What is currently displayed in your browser’s tab when viewing answers.html?
Not all content in our information hierarchy is meant for a human client to see. Such information is meta—it is information about the core information in our document. One piece of meta information is the title of our document.
Meta information goes inside an element named head. Open it right after you open html:
<!DOCTYPE html>
<html>
<head>

</head>
...
</html>
Several meta elements are legal inside head. For now, we just nest within it a title element for the title. Title the page Answers.
body
head is to meta information as body is to content consumable by humans.
Surround your answers to the questions with a body element. Make sure body is a sibling of head.
Now, to be mischievous, add a second body element, but nest it within head. Randomly generate some content inside of it. You might find the Dummy Text Generator useful.
Question 5: How does the browser handle the second body element?
h1
Think of a newspaper. What sets one article apart from another?
Talk it over before clicking.The same mechanism is used on the web. We can mark text as being a top-level headline with the h1 element.
Add an h1 element as the first child of the body tag. Give it the content Lab 2.
p
Large swaths of text should generally be placed in a paragraph or p element. Right after the h1 element, add a p element with some random text.
h2 through h6
We use h1 to demarcate the top-level header of our content. For subheaders, we can use h2, h3, h4, h5, and h6. Each of these corresponds to a different depth of our document’s content. Think of your document as if were structured in an outline:
1. Lab 2
  A. Partners
      i. Partner X
     ii. Partner Y
  B. Second section
      i. First subsection
     ii. Second subsection
    iii. Third subsection
     iv. Fourth subsection
  C. Answers
In a document showing only one article or section, there should only be one h1 element. If its content has sections, label them with h2 elements. If the h2 content has sections, label them with h3 elements. And so on.
Add an h2 element for the Partners section. Do not include the A.. The outline shown above is only a notion we hold about the structure of the document. We will see other HTML elements for formally outlining information. Add h3 elements for Partner X and Partner Y. Provide paragraphs containing your first names and last initials as the content after each of these two h3s.
Add h2 and h3 elements for the second section. Include a paragraph of random text after each h2 and h3.
Question 6: What does the browser do stylistically to make the hierarchy of headers clearly visible to the viewer?
Finally, add an h2 element for Answers. The content after it should be your list of answers to the questions asked in this lab.
ol
Sometimes our information is bundled together in a tight sequence. A recipe, for example, has an ordered list of steps. A manifesto may have a list of grievances (along with rambling language). A staff directory will have a list of employees.
You have an ordered list of answers. Let’s structure them using an ordered list or ol element. Surround the entire list with opening and closing ol tags.
Question 7: What does your list look like immediately after you embed it in an ol element?
In addition to the overarching ol, we need to embed each list item in an li tag. Add seven such elements around your seven answers. Clean up the spacing so that your structure is neatly organized. Your end result should look something like this:
<ol>
  <li>Item 1</li>
  <li>Item 2</li>
  <li>Item 3</li>
</ol>
ul
Sometimes the order of information doesn’t matter. We can use an unordered list in those situations. The HTML representation of unordered lists is nearly identical to ordered lists, except we use the ul tag instead of ol.
Switch the content after Partners to use an unordered list instead of two h3s. Make each partner a list item. Order doesn’t matter here, because neither of you is better than the other. Right?
Question 8: Name two lists of information whose orders don’t matter. For example: the ingredients list of a recipe.
Reverse Engineer
Switch places with your partner.
Now your task is to apply the elements that you’ve just met by reverse engineering some renderings into their original HTML structures. In all your solutions, take care to keep your HTML cleanly formatted. Elements at the same depth should appear at the same indentation.
Recipe
Your first task is to turn the text
Kringla
Ingredients
1 1/2 cups white sugar
1 egg
2 1/2 cups sour cream
4 cups all-purpose flour
2 teaspoons baking soda
1/4 teaspoon salt
Directions
Preheat oven to 350 degrees F (175 degrees C). Lightly grease or line baking sheets with parchment paper.
Combine the sugar, beaten egg and sour cream together. Mix in the flour, baking soda and salt. Blend thoroughly.
Divide dough in half and form each half into a long roll. (Note: If your kitchen is warm, keep the half of dough you're not working with in the refrigerator.)
Cut off a narrow slice of dough. Roll lightly with hands on lightly floured board into pencil-like strip about 7 inches long. Form into a figure "8", and pinch ends together. Place on cookie sheet. Repeat with remaining dough.
Bake at 350 degrees F (175 degrees C) for 12 to 15 minutes.
into a webpage that looks like this:

Write your HTML in a file named recipe.html. The recipe is delicious and comes from allrecipes.
Tips
Your second task is to turn the text
Travel can be stressful, for a lot of reasons. But some stress can be preempted. Whenever you leave the house for more than a few days, you should do these things:
Turn off the water to all toilets. You never know what they'll do while you're gone.
Keep your toothbrush and toothpaste in your carry-on. If your suitcase gets lost, your mouth feels it first.
Clean everything, so that no one can enjoy it while you're gone.
If you have any ideas you'd like to add to this list, share them in the comments section below!
into a webpage that looks like this:
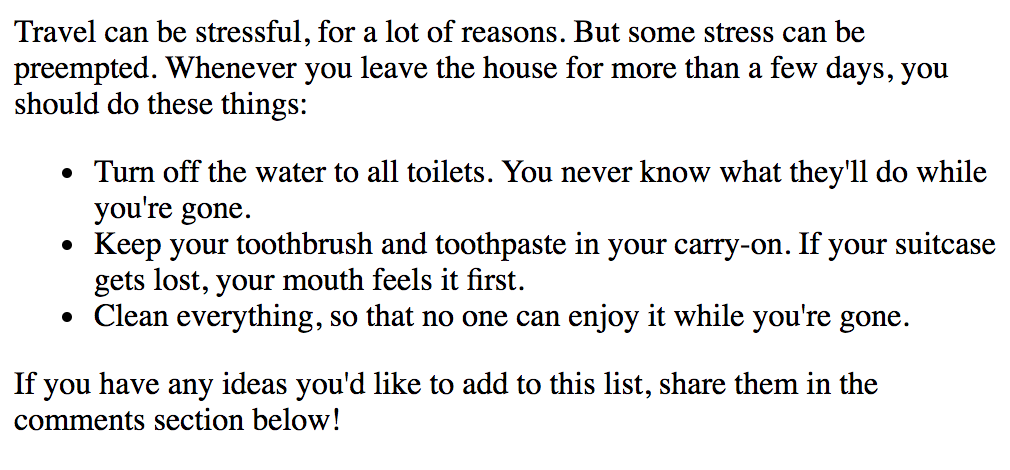
Write your HTML in a file named tips.html.
Directory
Your third task is to turn the text
My Home Directory
Desktop
virus.exe
verizon.pdf
appeal.docx
Photos
supermoon.png
rainbow.jpg
Downloads
cats.mp4
brackets.zip
into a webpage that looks like this:
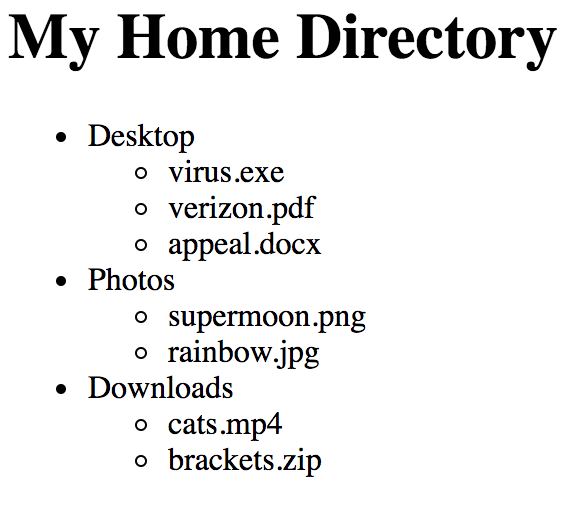
Write your HTML in a file named directory.html. Bear in mind that list elements can nest. That is, you can have an inner ol or ul inside the li of an outer list.
Publish
Now, commit and push all changes to your cs318 project.
Verify that they have been published by visiting your published pages in your browser. They are published under https://USERNAME.github.io/cs318/lab02.
Validate
Browsers tend to be very forgiving of poorly-formed HTML. This doesn’t justify writing sloppy markup. Poorly-formed HTML can hurt your search rankings, throw off screen readers for the vision-impaired, and appear differently on different browsers. You should validate your pages to ensure that they fit the HTML5 standard.
Visit the W3C Validator. Check and fix any issues found in your four HTML documents from this lab.
You do not need to have a lab finished by the end of the lab period. Rather, as described in the syllabus, all of your lab work must be completed by the end of the following Sunday. To receive that week’s labs’ Blugolds, your HTML must meet the expectations laid out in the lab writeups and it must be properly committed and pushed in order.