STEM in Education 2018 Workshop
Welcome to the notes for the Computational Making with Madeup workshop at STEM in Education 2018. It’s my hope that you read the abstract for this workshop, and you consent to our stated goals:
In this interactive hands-on workshop, participants will learn to build models using Madeup and gain skills and resources they can use to combine making with computer science and mathematics in their classrooms and makerspaces.
But what is this Madeup thing?
Madeup
Madeup is a programming language for building 3D models. We write code to trace a path between vertices. Vertices can be reached via turtle geometry, Cartesian coordinates, and polar coordinates. A path is turned into the full solid model through one of a handful of solidifiers. One can write code with text, or with blocks, or move back and forth between the two. The models can be exported in OBJ and STL formats and sent to 3D printers, 3D printing services, or game engines.
Madeup lives on the web at https://to.madeup.xyz.
A few years ago I had ideas about shapes that I just could not express. Most of the modeling tools I’d seen at the time expected the user to manipulate vertices with the mouse. But I wanted to shape models with algorithms. Thus, Madeup was born with this very specific mission. It’s not very good at making shapes that aren’t algorithmic in nature.
Let’s generate something!
Extrude
My children’s art teacher gives a talk that she calls the Funeral of Trite Ideas, in which she goes through a list of artistic devices that are overdone and must be put to rest—like stick figures and flat cars with two semicircular cutouts for wheels. In the world of Logo, the square is overdone, and that is exactly why we will use it for your first introduction to Madeup. What do you know about squares? Probably you will answer these things:
- They have four sides of equal length.
- They have four 90 degree angles.
You seem to know a lot about these squares, so I will ask you some more questions.
- How big is a square?
- What color is a square?
- Where is a square?
These questions are hard to answer, but we need their answers if we are going to generate a square. The good news is that there’s not just one answer to these questions. Let’s say the square is 5 units big, it’s cornflower blue, and its bottom-left corner sits at the origin.
The first step to make a model in Madeup is to trace out a path in 3D space that represents the shape. If we are using turtle geometry, we can trace out a square with three commands:
yaw degreesmove distancemoveto x, y, z
We start with moveto to anchor the square to its position, the origin. The z-coordinate defaults to 0.
moveto 0, 0
Then we move forward 5 units, turn, move forward, turn, move forward, turn, and so on.
moveto 0, 0

move 5
yaw 90

move 5
yaw 90

move 5
yaw 90

move 5
yaw 90
This code is repetitive, and as you might guess, we can use a loop to reduce our labor:
moveto 0, 0

repeat 4
  move 5
  yaw 90
end
The second step is to turn the path into a solid. There are a number of solidifiers. We’ll use one called extrude to extend the square along the z-axis. This command needs to know the axis and the distance along the axis to extend.
moveto 0, 0

repeat 4
  move 5
  yaw 90
end

extrude 0, 0, 1, 2
Extrude Challenge
Throughout the workshop, we will volley between demos and challenges. We have come to our first challenge, which is to trace out and extrude the following shape:
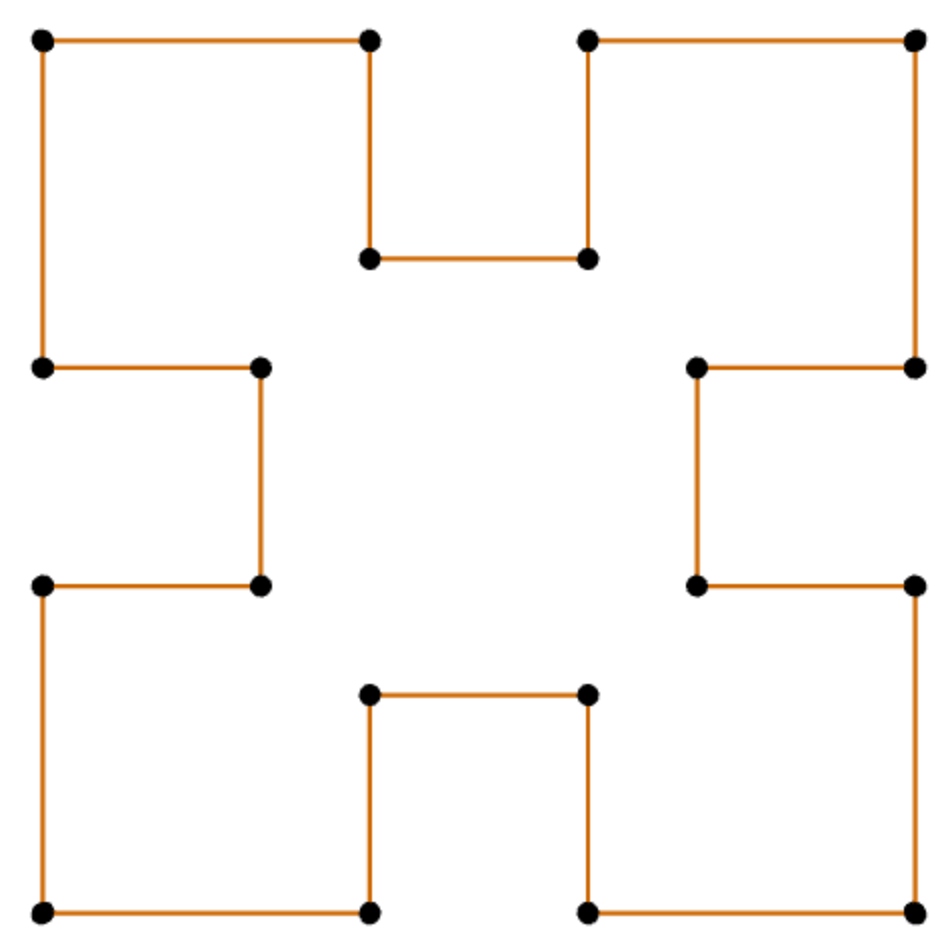
There are a few rules for these challenges:
- You must work with a partner
- You must work at one computer
- Start with a drawing
- Ask us questions
These challenges are opportunities to learn, not measures of your ability. We encourage you to fail and recover, and we are here to help.
Write down any challenges you encounter. We will reflect on them together.
Dowel
Let’s move on to a new solidifier: dowel. We will trace out a spring algorithmically, and then thicken the line into a solid with dowel.
We start by tracing out a circle, approximated first by a hexagon:
moveto 0, 0

repeat 6
  move 1
  yaw 60
end
What if we wanted an octagon instead? What would we need to change?
moveto 0, 0

repeat 8 -- the number of iterations
  move 1
  yaw 45 -- the angle of turning
end
What if we wanted a pentagon? Or a decagon? We might as well write the code for an arbitrary n-gon. We can use variables to express such parametric designs:
n = 10
angle = 360 / n
moveto 0, 0

repeat n
  move 1
  yaw angle
end
Can you see a spring here? Maybe a compressed one. Let’s decompress it a bit by turning not just right but also down. The pitch command works for this, but so does roll:
n = 36
angle = 360 / n
moveto 0, 0

repeat n
  move 0.4
  yaw angle
  roll 1
end
Now, what would we do to get multiple coils? We need to increase the number of circles, which we can do by multiplying the number of iterations:
n = 36
angle = 360 / n
moveto 0, 0

repeat n * 5
  move 0.4
  yaw angle
  roll 1
end
Finally, we thicken it with the dowel command:
n = 36
angle = 360 / n
moveto 0, 0

repeat n * 5
  move 0.4
  yaw angle
  roll 1
end

dowel
Dowel Challenge
Your challenge is to pick one of the following mathematical knots and thicken it into a dowel:
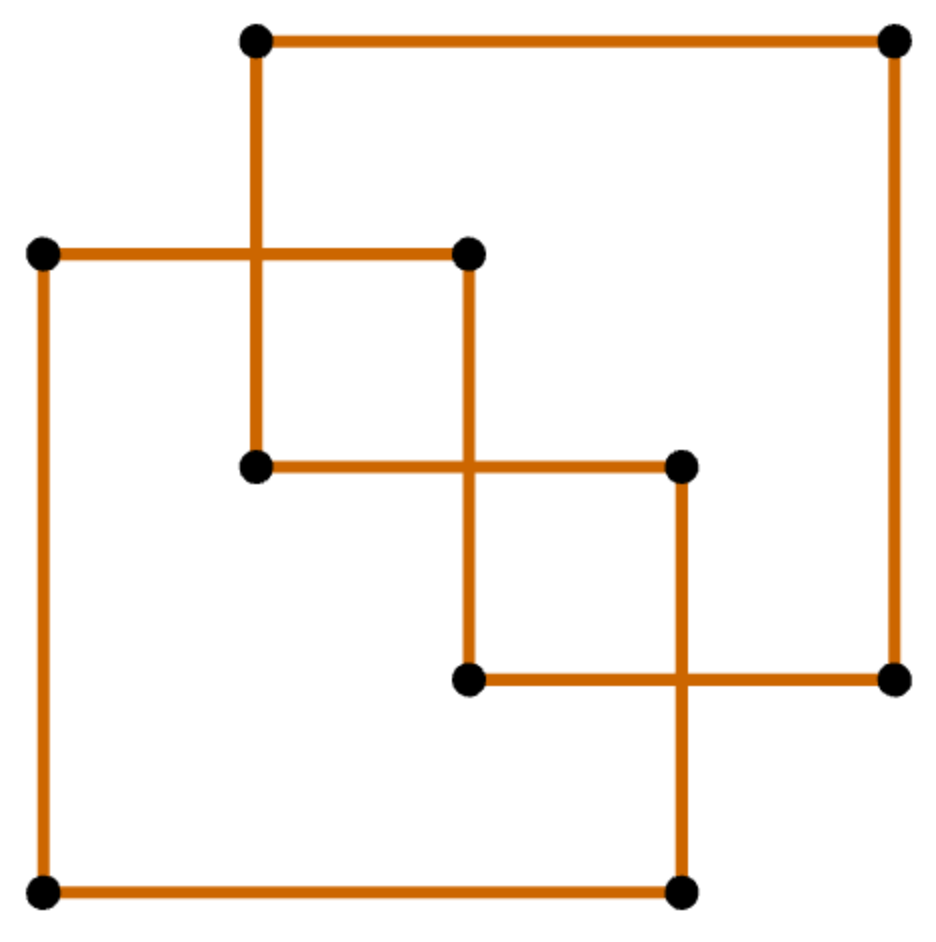
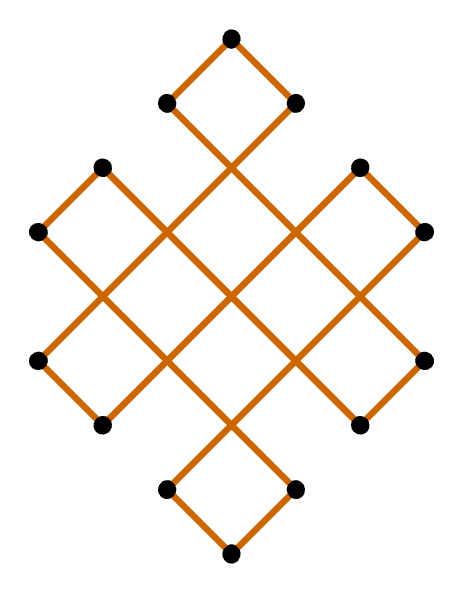
After you get this working, add a parameter to your dowel command to smooth out the corners:
dowel 5
This is the maxBend parameter. It forces the yaw to turn gradually, in 5-degree steps rather than all at once. By default, maxBend is set to 360, meaning that any possible bend between segments will be immediate and not distributed out in steps.
Write down any challenges you encounter. We will reflect on them together.
Revolve
Our third class of solids are surfaces of revolution, which are radially symmetric. We trace out a cross section of the solid, and then revolve it around some axis. Let’s see an example inspired by El Castillo, a Mayan temple in Mexico.

Let’s start our path at the top of the template and wind our way down to the base:
moveto 0, 0
yaw 90

repeat 10
  move 1
  yaw 90
end
This produces a stair-step pattern. If we revolve this around the y-axis, we see a crude approximation of the temple:
moveto 0, 0
yaw 90

repeat 10
  move 1
  yaw 90
end

revolve 0, 1, 0, 360
When we examine the bottom of the temple, we discover it has no bottom. To seal it up, we add a final line segment that returns to the y-axis:
moveto 0, 0
yaw 90

repeat 10
  move 1
  yaw 90
end

yaw 180
move 10

revolve 0, 1, 0, 360
We can increase the number of sides via the special variable nsides:
nsides = 6
This line needs to appear before the revolve to have any effect.
Revolve Challenge
Your challenge for revolve is to model a calamari ring.

Think about its cross section. What would it look if you cut through the ring? Draw it on paper first, and then code it.
Write down any challenges you encounter. We will reflect on them together.
Functions
A lot of introductory programming tools focus on a single computational idea: sequence. Our students are inundated with “Logo puzzlers,” which make them very good movers and turners. But they miss out on deeper computational ideas if that’s all they see. We “turn” now to one of those deeper ideas: procedural abstraction via functions.
Just as variables name data, functions name code. They hide away or abstract a complex sequence of instructions under a short and meaningful descriptor. Let’s see an occasion where the benefit of functions is clear: modeling a paperclip.

Imagine walking one of these with move and yaw. What would that look like? Let’s work through that traversal. Let’s start at the inner endpoint. We move straight, and then we do the yaw-move shuffle in a semicircle:
moveto 0, 0

move 10
repeat 18
  yaw 10
  move 0.5
end
What happens next? We move straight, and then we do a yaw-move shuffle, but this time with bigger steps:
moveto 0, 0

move 10
repeat 18
  yaw 10
  move 0.5
end

move 14
repeat 18
  yaw 10
  move 0.6
end
What happens next? We move straight, and then we do a yaw-move shuffle, but this time with bigger steps:
moveto 0, 0

move 10
repeat 18
  yaw 10
  move 0.5
end

move 14
repeat 18
  yaw 10
  move 0.6
end

move 19
repeat 18
  yaw 10
  move 0.7
end
What happens next? We move straight, but no yaw-move shuffle this time:
moveto 0, 0

move 10
repeat 18
  yaw 10
  move 0.5
end

move 14
repeat 18
  yaw 10
  move 0.6
end

move 19
repeat 18
  yaw 10
  move 0.7
end

move 14.5

dowel
This code is repetitive. Repetition often begs for a loop, but that won’t cut it here, as the lengths change. Enter functions, which make code reusable and also allow us to leave holes in the algorithm. First, let’s give this repeating pattern of code a name. Since the code draws a straight line and then a bend, I will name it crook:
to crook
  move 10
  repeat 18
    yaw 10
    move 0.5
  end
end
To allow the lengths to change, we replace the literal numbers with variables:
to crook
  move straightLength
  repeat 18
    yaw 10
    move bendLength
  end
end
And then we must also announce that these variables will be provided when the function is called:
to crook straightLength, bendLength
  move straightLength
  repeat 18
    yaw 10
    move bendLength
  end
end
In defining a function, we add a new recipe to recipe book. To turn a recipe into food, we must follow it, plugging in the ingredients that we provide. To turn a function into executed code, we must call it, plugging in the data that we provide. And we can execute it multiple times, providing different data each time:
to crook straightLength, bendLength
  move straightLength
  repeat 18
    yaw 10
    move bendLength
  end
end

moveto 0, 0
crook 10, 0.5
crook 14, 0.6
crook 19, 0.7
move 14.5

nsides = 40
dowel
Not only is the code much shorter, but we also got a more thrilling cognitive workout as we identified a pattern and abstracted it in a flexible, parametric way.
Functions Challenge
Pac-Man was a very popular arcade game designed by Toru Iwatani in Japan. There’s a maze with lots of little pellets in it. 240 to be exact. There’s also a little yellow circle with a mouth that goes around and eats all the pellets. That’s Pac-Man, and you get to control him. Eating pellets is pretty easy, so what makes the game challenging? Ghosts. If Pac-Man touches one of them, he loses a life.
To get good at Pac-Man, you must get good at moving around in space. And that’s our job in Madeup too. So, to celebrate the importance of space in both Pac-Man and Madeup, we will create a Pac-Man ghost in Madeup.
Observe Blinky
There are actually four ghosts in Pac-Man, and they each behave a little differently and are a different color. We will create Blinky, the red ghost. He’s the lead, and he’s the only ghost who was programmed to actively chase Pac-Man.

Eventually we are going to write code, but we should always place viscera before computer. We will first draw Blinky. Each of his pixels should be one cell on your graph paper. Ignore his eyes for today.
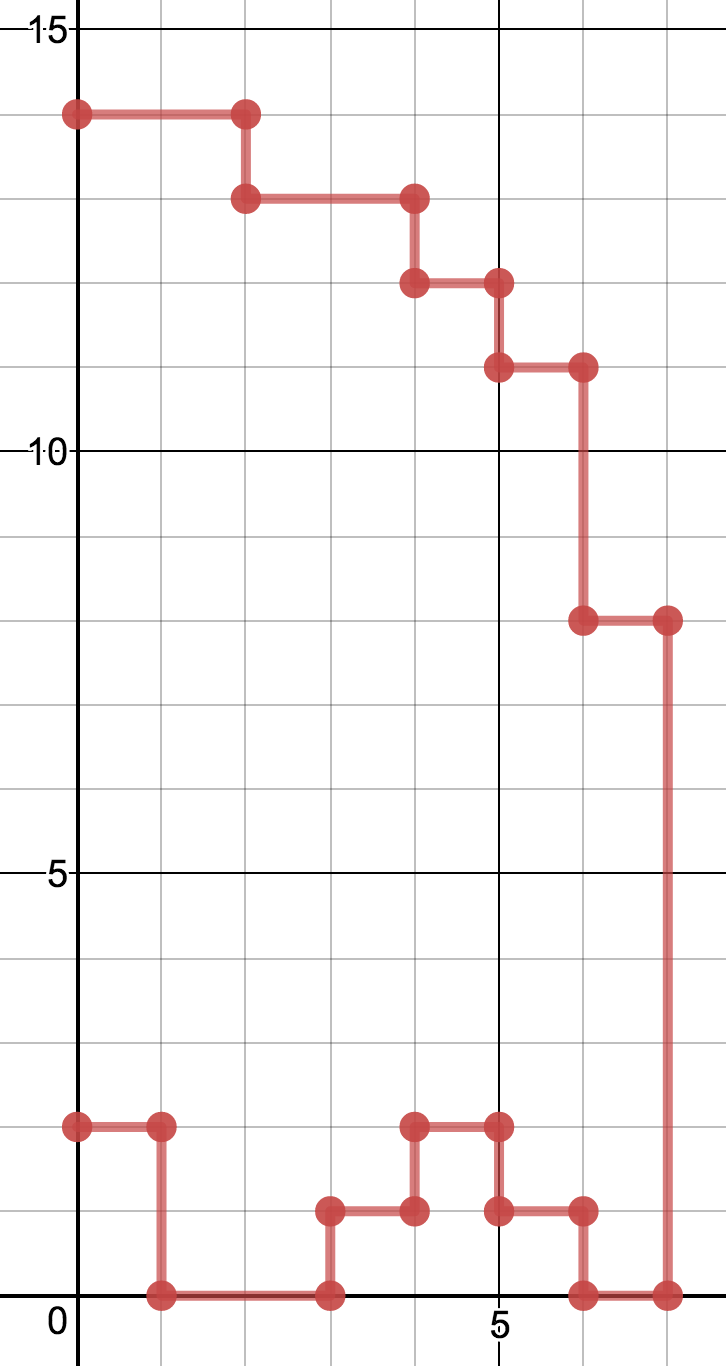
Since Blinky is symmetric, we only have to draw one half of his body. On the graph paper that we provide, draw only the right half of Blinky:
Measure Blinky
What are the coordinates of Blinky’s top-most vertex?
Compare your answer to mine.That’s the only vertex whose exact coordinates we’ll need when we start coding.
Now, consider the topmost line segment of Blinky’s body.
How long is it?Write the segment’s length down next to it. Then go on to the next line segment, measure it, and write down its length. Do this for all the lines of his perimeter. There are 21 segments in all.
Compare your list to mine.Program Blinky, First Draft
Now that we’ve got all of Blinky’s measurements taken, let’s use Madeup to trace out his outline. Start on the top with a moveto using the xy-coordinates you found earlier. After that, use only moves and yaws to wind around his perimeter, stopping at the bottom.
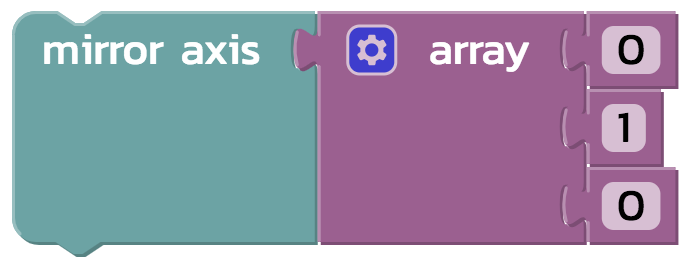
Once you’ve got his right half, add his left half automatically with this mirror command:
Finally, extrude Blinky to produce a solid model.
Program Blinky, Second Draft
If you look at your program, you’ll see that it is annoying long. We can simplify it with functions. What repeated unit or units of work do you see that would be good candidates for parametric abstraction?
Let’s compare answers.Maybe you saw something different than what I saw. Whatever you saw, your challenge is to write a function or two to simplify the code you wrote for your first draft.
Write down any challenges you encounter. We will reflect on them together.
Conclusion
If you finish the challenges early, I encourage you to take creative ownership. Design some interesting algorithmic shape. I want to see it!
That’s an introduction to Madeup in two hours. It’s my attempt to provide a spatial context for introducing computer science and mathematics, one that has a connection to the physical world. I have found it useful as a professor of computer science, a father of four, and a volunteer in schools. If you find it useful to support your mission, I encourage us to keep in touch through Twitter, email, or this blog.
Madeup is a labor of love. I am not in the educational technology market and never wish to be. Madeup is an open-source project and has a lot of bugs. If you find one, I’m probably aware of it and am just waiting for the term to finish, but feel free to let me know anyway.