The Midiometer
This post is part of a series of notes and exercises for a summer camp on making musical instruments with Arduino and Pure Data.
Waves vs. MIDI
When we generate sound by altering the frequencies of waves, we are operating at a pretty low level. Most musicians don’t think about physical laws like we have been doing. They think about notes and timing and volume. So that we can operate at a higher level, we will abandon the wave representation of sound. Instead, we will consider the MIDI representation.
MIDI was designed in the early 1980s by several companies that made electronic musical instruments. They wanted to agree on a standard for representing music. Before MIDI, each instrument had its own way of representing music that was incompatible with the other instruments. Trying to connect instruments into a single system was painful. Music’s supposed to bring people together, right? MIDI defined a universal language that all instruments could “speak,” making it much simpler for one device to communicate with another.
Each note in a MIDI representation is by two numbers. First is the note number. The note numbers for the musical notes across several octaves are shown in the following table:
| octave | C | C♯ | D | E♭ | E | F | F♯ | G | A♭ | A | B♭ | B |
|---|---|---|---|---|---|---|---|---|---|---|---|---|
| 0 | – | – | – | – | – | – | – | – | – | 21 | 22 | 23 |
| 1 | 24 | 25 | 26 | 27 | 28 | 29 | 30 | 31 | 32 | 33 | 34 | 35 |
| 2 | 36 | 37 | 38 | 39 | 40 | 41 | 42 | 43 | 44 | 45 | 46 | 47 |
| 3 | 48 | 49 | 50 | 51 | 52 | 53 | 54 | 55 | 56 | 57 | 58 | 59 |
| 4 | 60 | 61 | 62 | 63 | 64 | 65 | 66 | 67 | 68 | 69 | 70 | 71 |
| 5 | 72 | 73 | 74 | 75 | 76 | 77 | 78 | 79 | 80 | 81 | 82 | 83 |
| 6 | 84 | 85 | 86 | 87 | 88 | 89 | 90 | 91 | 92 | 93 | 94 | 95 |
| 7 | 96 | 97 | 98 | 99 | 100 | 101 | 102 | 103 | 104 | 105 | 106 | 107 |
Check that you can interpret this table with these questions:
- What is the note number for C in the 7th octave?It’s 96.
- What is the note number for D in the 4th octave?It’s 62.
- What is the note number for F♯ in the 5th octave?It’s 78.
The second number in the MIDI representation of a note is the velocity, which determines how loud the note is. If the MIDI instrument is a piano keyboard, velocity refers to the force applied to a key. 0 means silent, and 127 is as loud as can be.
That’s all the background we need to start generating MIDI notes. Now we’re going to rework our tiangle to use MIDI instead of physical waves.
Are you ready?Midiometer
To produce this new instrument, which we’ll call the midiometer, start by copying your Pure Data patch for the tiangle instrument into a new patch. Tweak it to look like this:
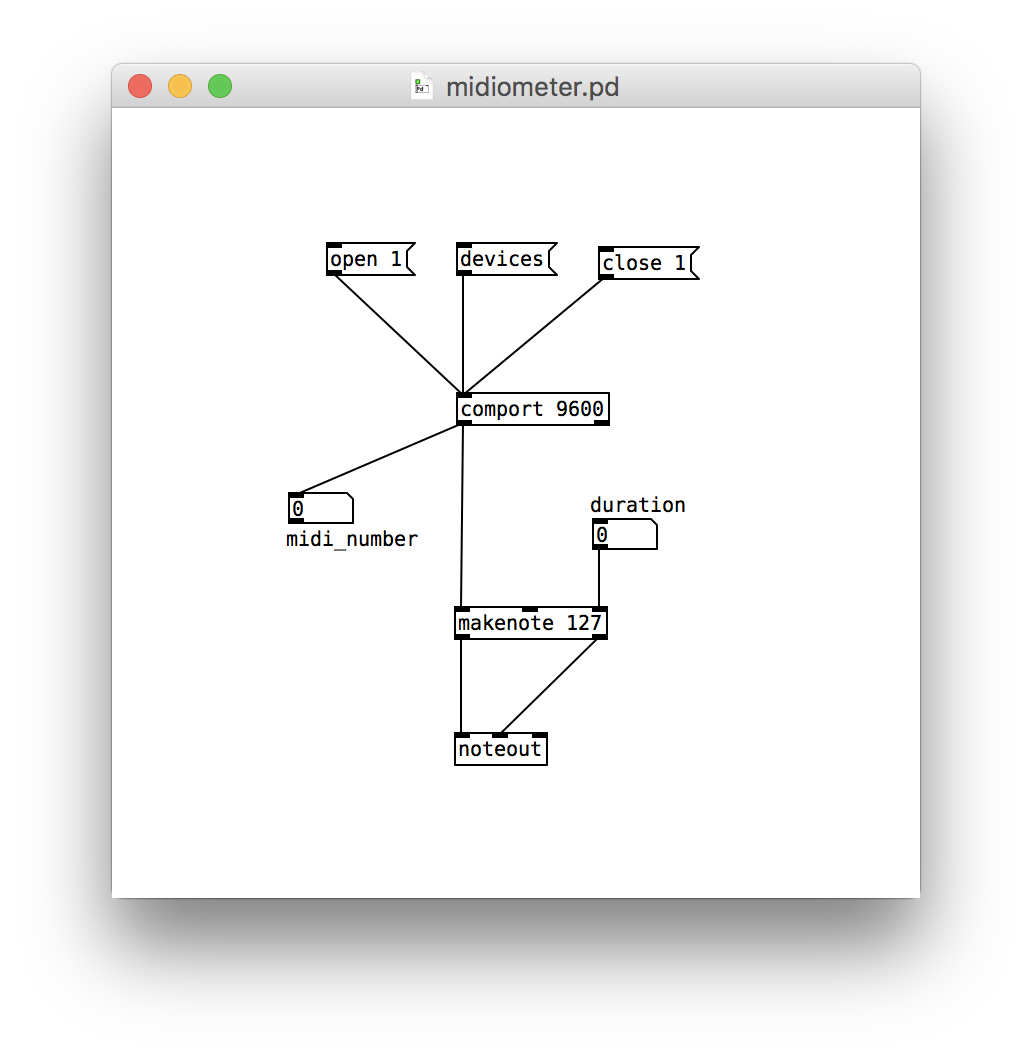
The makenote object wants three pieces of information:
- The note number, which comes from the Arduino.
- The velocity, which is fixed at 127.
- The length of each note in milliseconds.
It sends the note along to the noteout object, which sends a message to whatever MIDI instrument is listening. Pure Data itself doesn’t play MIDI sounds; we need a MIDI instrument. For that, we will use a program called Virtual MIDI Piano Keyboard (VMPK). Follow these steps to get the programs talking to each other:
- Hit
Command-Spaceand open Audio MIDI Setup. - Click Window / Show MIDI Studio.
- In the MIDI Studio window, double-click on IAC Driver.
- Check Device is online.
- Quit Audio MIDI Setup.
- Hit
Command-Spaceand open VMPK. - Click Edit / MIDI Connections.
- Check Show Advanced Connections.
- Set MIDI IN Driver to Core MIDI.
- Check Enable MIDI Thru on MIDI Output.
- Set Input MIDI Connection to IAC Driver Bus 1.
- Leave VMPK open.
- Back in Pure Data, click Media / MIDI Settings.
- Set the Output Device to IAC Driver Bus 1.
- Leave Edit Mode and crank the potentiometer.
Ideally, you’ll hear something that sounds like a piano. But something probably went wrong. Feel free to ask for help!
Recall that our Arduino spits out numbers in [0, 255]. But the MIDI note numbers are limited to [21, 107]. Let’s remap the potentiometer readings to the note number range. Hit close 1 in Pure Data. In your Arduino sketch, you probably have some code that looks like this:
int reading = analogRead(A0);
reading = reading / 4;
Map the potentiometer’s raw [0, 1023] range to [21, 107] with the map function:
int reading = analogRead(A0);
reading = map(reading, 0, 1023, 21, 107);
Verify and upload your sketch. Test your changes. Every note should be audible.
Challenges
After you get your midiometer working, answer the following questions on a piece of scratch paper.
- In VMPK, click View / Note Names. Play a note with your midiometer. Based on the MIDI note table above, does the note number you see in Pure Data correspond to the note name shown on the piano keyboard?
- How can you change in VMPK what instrument generates the MIDI notes?
- Add a number box and connect it to the middle inlet of
makenote. Leave Edit Mode, drag on it, and play more notes on the midiometer. What does it do? After you’ve determined your answer, two-finger or right-finger click onmakenoteand check your answer against the documentation under Help.