The Monodrone, Part I
This post is part of a series of notes and exercises for a summer camp on making musical instruments with Arduino and Pure Data.
First order of business: switch partners. Choose a partner that you haven’t worked with yet.
Today we’ll build an instrument that behaves like a piano but with fewer keys. In fact, this first incarnation of that instrument will have just a single key. Let’s call it the monodrone. It has a single push button that always plays the same note when it’s pressed.
We cover the hardware in this exercise, and the software in the next.
Hardware
Start by building this circuit:
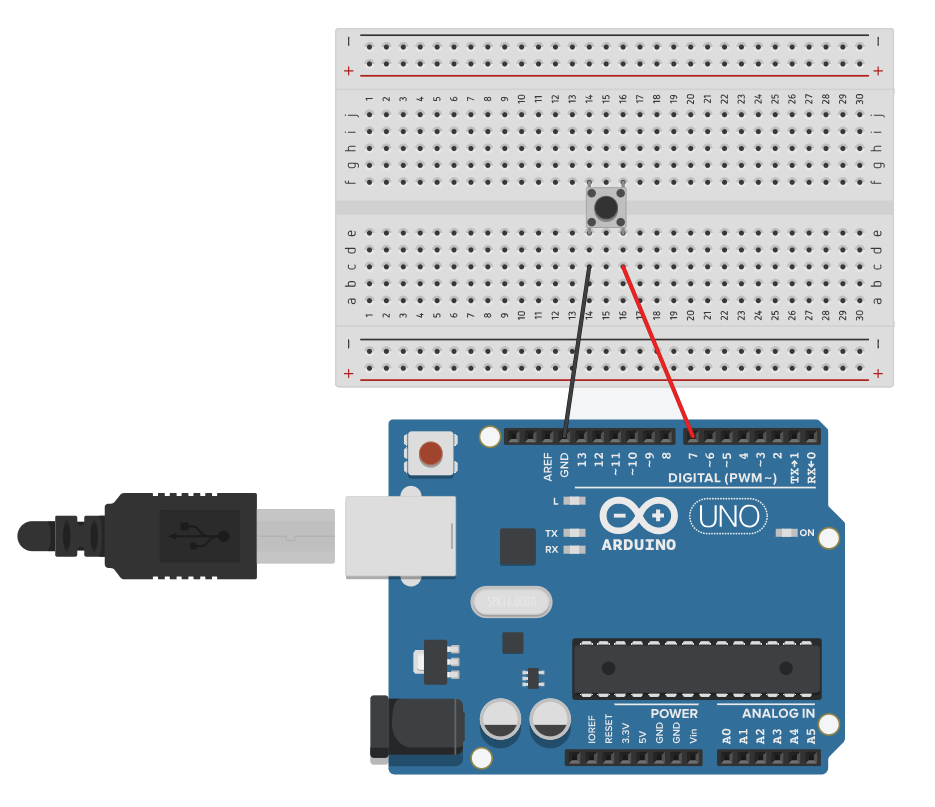
See those four pins on the button? We will only use two of them, but four anchor the button to the breadboard better than two. When the button is not pressed, no electrons flow from ground to pin 7. When it is pressed, electrons flow from the bottom left pin to the bottom right.
Firmware
We want to program the Arduino to send a number across the serial port that describes the state of the button. Our setup function will open the serial port and allow pin 7 to be read from:
void setup() {
  Serial.begin(9600);
  pinMode(7, INPUT_PULLUP);
}
Note the _PULLUP in the pin mode. To prevent short circuits, we use something inside the Arduino called a pullup resistor. This mode, unlike the regular INPUT, activates an internal electrical component called a resistor, which keeps too many electrons from zooming through and starting a fire.
In loop, we continuously read the state of pin 7 and send it across the serial port:
void loop() {
  int button = digitalRead(7);
  Serial.println(button);
}
Upload this code to your Arduino. Open the serial monitor and examine the output.
Challenges
After you get your circuit assembled and programmed, answer the following questions on a piece of scratch paper.
- What output do you see when the button is pressed? When not pressed? How is the output here different from what we saw with the potentiometer?
- Add the line
button = !button;right before printing to the serial port. Upload and test your circuit. What does the!operator do?
Before leaving this exercise, do two things. First, ensure that your Arduino issues a 1 when the button is pressed, and a 0 when it’s not pressed. Second, to prepare for working with Pure Data, switch your Arduino to use binary output. Replace Serial.println with Serial.write and upload. Close the serial monitor.