Homework 4 – Wireframe – due November 12
Your objective in this homework is to acquaint yourself with conditional statements and loops, which enable you to write code that diverges and repeats. You will do this in the context of writing an application that produces a GIF of animated wireframe objects.
This assignment is more involved and less easy to test in small chunks than your previous assignments. Plan accordingly.
Wireframes
The essential task in this homework is to read or parse an animation described in a text file, draw each frame of the animation into an image, and collect up the images into an animated GIF. Let’s work through an example Wireframes file and see what animation it produces before we get into the details of the specification.
Here’s a modest Wireframes file that demonstrates all the functionality that your final program will support:
resolution 120 100
delay 1000
loop true

frame
background 230 230 230

object
color 0 128 255
dilation 2
vertex 20 10
vertex 20 90
vertex 100 90
vertex 100 10
endobject

object
color 255 0 255
dilation 5
vertex 40 25
vertex 40 45
vertex 50 45
vertex 50 25
endobject

object
color 255 0 255
dilation 5
vertex 70 25
vertex 70 45
vertex 80 45
vertex 80 25
endobject

object
color 255 128 0
dilation 2
vertex 50 70
vertex 70 70
endobject

endframe

frame
background 230 230 230

object
color 0 128 255
dilation 2
vertex 20 10
vertex 20 90
vertex 100 90
vertex 100 10
endobject

object
color 255 0 255
dilation 5
vertex 40 25
vertex 40 45
vertex 50 45
vertex 50 25
endobject

object
color 128 0 255
dilation 5
vertex 70 35
vertex 80 35
endobject

object
color 255 128 0
dilation 2
vertex 50 70
vertex 73 65
endobject

endframe
Let’s break this down. Consider the first few lines:
resolution 120 100
delay 1000
loop true
From these lines we gather that the animation will be rendered into a GIF that is 120 pixels wide and 100 pixels tall, there will be a delay of 1000 milliseconds between frames, and the animation will loop.
Next in the file is the first frame sandwiched between frame and endframe:
frame
background 230 230 230

object ...

endframe
This first frame has a light gray background. Within the frame are plotted four objects. Let’s examine only the first:
object
color 0 128 255
dilation 2
vertex 20 10
vertex 20 90
vertex 100 90
vertex 100 10
endobject
This object is described with four vertices, which happen to form a square. It is plotted in bluish lines that have been thickened or dilated twice. Though its impossible to determine its semantic meaning through the text alone, this object is a head. In general, objects have one or more vertices and can take on any shape. But only its perimeter, or wireframe, is plotted. The second and third objects are eyes, and the fourth a mouth. Altogether the frame looks like this:

To produce a coherent animation, the second frame retains all of the objects but changes some of them. The head and one of the eyes stay the same, but the other eye winks as the mouth is drawn upward. The two-frame sequence produces this animated GIF:

Helper Classes
There are several classes that will aid you on your journey. Ideally, you should skim their documentation and investigate their usage in books and tutorials. Here we provide just a brief overview of some of their relevant methods.
BufferedImage
The BufferedImage class manages pixel-based images. You can make a new image with this construction:
BufferedImage image = new BufferedImage(480, 320, BufferedImage.TYPE_INT_RGB);
This image has a resolution of 480×320. Each pixel will hold an RGB color. To copy the pixel at column c, row r to its right neighbor, we’d write:
int rgb = image.getRGB(c, r);
image.setRGB(c + 1, r, rgb);
This code will throw an exception if you reach beyond the dimensions of the image.
Color
The Color class is a handy bridge between an int representation of a color and its four channels: red, green, blue, and opacity or alpha. If you have the intensities of the four channels as ints, you can construct a new Color using one of its several constructors:
Color color = new Color(red, green, blue, alpha);
We can turn a Color instance into an int use the getRGB method:
int packedColor = color.getRGB();
Suppose you instead have an int representation of the color already, but you need its four channels separated. You can decompose the int by way of the Color class:
Color color = new Color(packedColor);
int red = color.getRed();
int green = color.getGreen();
int blue = color.getBlue();
int alpha = color.getAlpha(); // always returns 255
But be careful here. The Color constructor invoked here ignores the alpha stored in the int representation for an unknown reason. If you want the alpha channel to get unpacked, you need a two-parameter version of the Color constructor:
Color color = new Color(packedColor, true);
int alpha = color.getAlpha(); // that's better!
The BufferedImage class only works with the packed int form of colors. We often convert its ints to the friendlier Color class because of its useful methods.
ImageIO
To test your code in small chunks, it will be helpful to read and write BufferedImages to disk, as we do here:
try {
  BufferedImage image = ImageIO.read(new File("/Users/foobag/Desktop/image.png"));
  ImageIO.write(image, "png", new File("/Users/foobag/Desktop/image.png"));
} catch (Exception e) {
  throw RuntimeException(e);
}
You’ll need to edit the paths to point to your actual destination directory.
When we deal with files, we are likely to encounter FileNotFoundException or IOException. Java forces us to acknowledge these exceptions, and we deal with them here by turning them into a RuntimeException, which lets them bubble up and halt our program.
GifSequenceWriter
Java by itself can’t produce animated GIFs, but a GifSequenceWriter class that can do so has been bundled into the hw4.specchecker package. You can create one like so:
GifSequenceWriter gif = new GifSequenceWriter(new File("/Users/foobag/Desktop/movie.gif"));
gif.setDelay(100);
gif.setLooping(true);
gif.appendFrame(image0);
gif.appendFrame(image1);
gif.appendFrame(image2);
gif.close();
When you reference GifSequenceWriter for the first time in your code, IntelliJ will show it in red because it’s not a class it knows about yet. Click on the red lightbulb icon that shows up and select Add library hw4.jar to classpath.
Okay, now we’re ready for the detailed specification!
Requirements
Complete the classes described below. Place all classes in package hw4. Make all methods static.
Main
Write class Main with a main method, which you are encouraged to use to test your code. Nothing in particular is required of it, but it must exist.
DrawingUtilities
Write class DrawingUtilities with the following methods:
- Method
lerpthat linearly interpolates between two values by some proportion. It accepts three parameters in the following order:It returns the interpolated value as a- a from value of type
double - a to value of type
double - a proportion value of type
double
double. Calculate the interpolated value based on the pattern you see in these examples:lerp(0, 100, 0.8)→ 80 because the total jump between from and to is 100 and we want to move 80% of that jump away from fromlerp(80, 90, 0.4)→ 84 because the total jump between from and to is 10 and we want to apply 40% of that jump away from from
- a from value of type
- Method
lerpthat linearly interpolates between two 2D points by some proportion. It accepts three parameters in the following order:It returns the interpolated- a from value of type
Point - a to value of type
Point - a proportion value of type
double
Point, whose coordinates are calculated by interpolating the x- and y-coordinates of the two points separately and rounding to the nearestint. - a from value of type
- Method
chessboardDistancethat calculates the number of steps it takes a king to move from one point to another according to the rules of chess. It accepts two parameters in the following order:Consider this movement of a king:- a from position of type
Point - a to position of type
Point
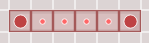 Here the king requires 5 moves to get between the squares. Because kings can move diagonally, a non-straight path with the same horizontal span can be traveled in just as many steps:
 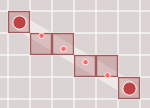 But look what happens when the path gets taller than it is wide:
 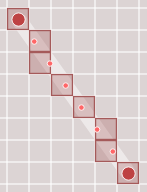 This taller-than-wide path requires 7 steps, which is just as many steps as are required this vertical straight path:
To calculate the chessboard distance, then, we consider just the lengths of the two possible straightened versions of the path between the given pixels. The length of the vertical version is the absolute difference between the y-coordinates. The length of the horizontal version is the absolute difference between the x-coordinates. Whichever is longer is the chessboard distance.
- a from position of type
- Method
linethat plots a colored line between two points on an image. It accepts four parameters in the following order:There are many published algorithms for drawing lines. Do not use them, nor any builtin line-drawing methods from the Java library. Instead, implement this pseudocode:- an image of type
BufferedImage - a color of type
int - a starting pixel of type
Point - an ending pixel of type
Point
nsteps = calculate chessboard distance between points
for each chessboard step
  calculate proportion of steps taken
  lerp between points
  fill lerped pixel with color
For the loop, consider step 0 (proportion 0) to be at the starting pixel and step n (proportion 1) to be at the ending pixel. Inclusively visit these pixels. - an image of type
ImageUtilities
Write class ImageUtilities with the following methods:
- Method
clonethat creates an independent clone of an image. It accepts aBufferedImageas a parameter, creates a new image of the same size and type, copies over the pixel data, and returns the new image. - Method
createTransparentLayerthat creates a completely transparent image. It accepts as its sole parameter a source image of typeBufferedImage. It returns a newBufferedImageof the same resolution as the source image, but its type isTYPE_INT_ARGB. A is short for alpha, which is synonomous to opacity in the computer graphics world. Opacity determines how much of the color behind the pixel can be seen. A pixel with opacity 0 is completely transparent. One with opacity 1 blocks all light coming from behind. This method sets all pixels to color 0—no red, no green, no blue, and no opacity. - Method
combinethat places a transparent overlay on top of a base image. It accepts two parameters in the following order:The images are assumed to be of the same resolution. Each non-transparent pixel of the layer replaces the corresponding pixel in the base image. Thus the base image is changed by this method, but not the layer image. See the word of caution in the Color section about about alpha and- A base image of type
BufferedImage - A layer of type
BufferedImage
Color. - A base image of type
- Method
hasNeighborthat determines if a pixel has a neighbor of a certain color. It accepts four parameters in the following order:It returns true if any of the eight pixels surrounding the pixel specified by the row and column are of the specified color. This can be implemented with a compound logical expression. Note that pixels on the edge won’t have all eight neighbors; be sure to guard against invalid coordinates with short-circuiting.- an image of type
BufferedImage - a column index of type
int - a row index of type
int - a color of type
int
- an image of type
- Method
dilatethat adds a border around pixels of a certain color. It accepts two parameters in the following order:It first creates a clone of the image. Then it visits each pixel in the clone. If any of a pixel’s eight neighbors is the specified color, set the corresponding pixel in the base image (not the clone) to that color. This effectively thickens the colored region.- a base image of type
BufferedImage - a color of type
int
- a base image of type
Wireframes
Write class Wireframes that handles the parsing of an animation file. Its methods are listed below from independent to dependent order. The last method in the list is what depends on all those above it. You may want to read the list from bottom to top, but we recommend you implement them from top to bottom, testing each one independently to minimize pain and suffering.
- Method
parseColorthat reads in the red, green, and blue intensities of an RGB color. It accepts aScannerparameter, whose next readable chunks of text—or tokens—are the three intensities, each in [0, 255]. The three numbers are returned together as anintwith the following byte layout:
Packing these three numbers together is a common practice to save on storage. Thebyte 3 byte 2 byte 1 byte 0 opacity red green blue Colorclass provides a pathway for assembling these numbers together and converting them to anint. - Method
parseBackgroundthat reads in an RGB color and fills an image with that color. It accepts two parameters in the following order:It sets every single pixel of the image to the parsed color.- a
Scannerwhose next tokens are the three RGB intensities - an image of type
BufferedImage
- a
- Method
parseVertexthat reads in a two-dimensional coordinate. It accepts aScannerparameter, whose next tokens are the x- and y-coordinates. It returns the coordinates as aPoint. - Method
parseObjectthat reads in a single object definition and draws the object. It accepts two parameters in the following order:It reads and responds to one or more commands, stopping when it sees the command- a
Scannerwhose next tokens define the object - a
BufferedImagein which to draw the object
endobject. The commandcolorsets the object’s color. The commanddilationsets the objects thickness. The commandvertexdraws a line of the object’s outline from the previous vertex to this new vertex—unless this is the first vertex. The segment is colored according to thecolorcommand. You may assume that the vertex coordinates are legal pixel coordinates within the image’s resolution. After all commands have been read, the object is closed by connecting a line from the final vertex back to the first. The object’s outline is then dilated the number of times defined by the frame’sdilationcommand. For example, suppose theScanneris set to read the following object:color 255 0 0 dilation 1 vertex 10 10 vertex 10 90 vertex 90 50 endobject
When plotted on a transparent layer, the resulting image looks like this, with the transparent pixels shown in the checkerboard pattern: You may assume that the
 colorcommand appears before anyvertexcommand and that thevertexcommands appear in relative order, but otherwise the order is not specified. Effectively, this meansdilatemay appear anywhere, even betweenvertexcommands, which further means that you should not try to process allvertexcommands with a nested loop. You are encouraged to use the following loop structure:read command while not finished if command is option 1 process option 1 else if command is option 2 process option 2 and so on read next command - a
- Method
parseFramethat reads in a single frame definition. It accepts two parameters in the following order:It reads and responds to one or more commands, stopping when it sees the command- a
Scanner, whose next tokens define the frame - a base image of type
BufferedImageon which the object layers are combined
endframe. The commandbackgroundfills the image with the specified background color. The commandobjectplots an object to a transparent layer that has the same resolution as the base image. Each object’s layer is combined with the base image. Because each object is drawn onto a transparent image, combining will not erase any previously plotted objects. Follow a loop structure similar to that recommended forparseObject. For example, suppose theScanneris set to read the following frame:background 0 255 255 object color 255 128 0 dilation 2 vertex 0 0 vertex 10 10 vertex 0 10 endobject object color 0 128 255 dilation 2 vertex 0 0 vertex 10 10 vertex 0 10 endobject endframe
- a
- Method
parseWirethat reads in an entire animation file and renders it into an animated GIF. It accepts two parameters in the following order:It parses the text of the file—using a- an animation file of type
File - a collector of animation frames of type
GifSequenceWriter
Scannerso it can hand off work to the helper methods described above. It reads and responds to one or more commands, stopping when there are no more tokens. The commandresolutionsets the animation’s width and height. The commanddelaysets the interframe delay of the animation. Its unit is milliseconds. The commandloopsets whether or not the animation repeats. The commandframedefines a single frame of the animation. Before parsing the frame, it creates a newBufferedImageof the resolution specified by a previousresolutioncommand and with pixel formatTYPE_INT_RGB. This is the image into which the frame is rendered. After the frame is complete, it appends the image to theGifSequenceWriter. Follow a loop structure similar to that recommended forparseObject, but since there’s no explicit end command, the continuation logic can be simplified to this:while there is a command to be read read the command if the command is ... ... ... - an animation file of type
- Method
wireToGifthat converts a wireframe animation file into an animated GIF. It accepts two parameters in the following order:It creates an- a source animation file of type
File - a destination GIF file of type
File
GifSequenceWriterfor the destination file and parses the source file. To commit the GIF to disk, you must close theGifSequenceWriter. - a source animation file of type
Extra
For an extra credit participation point, compose your own animation and share it on Piazza under folder ec4 by the due date. To be eligible, your animation shouldn’t look like it was scrapped together in as little time and with creative effort as possible. The submission garnering the most votes will be honored in some way.
Here’s your instructor’s submission:

And here’s the Wireframes file that produced this:
resolution 181 100
delay 250

frame
background 100 100 255
object
dilation 1
color 255 255 255
vertex 10 50
vertex 30 30
vertex 50 20
vertex 60 20
vertex 80 40
vertex 90 30
vertex 100 40
vertex 120 20
vertex 130 20
vertex 150 30
vertex 170 50
vertex 130 30
vertex 120 30
vertex 100 50
vertex 80 50
vertex 60 30
vertex 50 30
endobject
endframe

frame
background 100 100 255
object
dilation 1
color 255 255 255
vertex 20 30
vertex 50 20
vertex 80 50
vertex 90 40
vertex 100 50
vertex 130 20
vertex 160 30
vertex 130 30
vertex 100 60
vertex 80 60
vertex 50 30
endobject
endframe

frame
background 100 100 255
object
dilation 1
color 255 255 255
vertex 10 50
vertex 30 30
vertex 50 20
vertex 60 20
vertex 80 40
vertex 90 30
vertex 100 40
vertex 120 20
vertex 130 20
vertex 150 30
vertex 170 50
vertex 130 30
vertex 120 30
vertex 100 50
vertex 80 50
vertex 60 30
vertex 50 30
endobject
endframe

frame
background 100 100 255
object
dilation 1
color 255 255 255
vertex 60 90
vertex 50 70
vertex 60 40
vertex 80 30
vertex 90 20
vertex 100 30
vertex 120 40
vertex 130 70
vertex 120 90
vertex 120 60
vertex 100 40
vertex 80 40
vertex 60 60
endobject
endframe
Submission
To check your work and submit it for grading:
- Run the SpecChecker by selecting
hw4 SpecCheckerfrom the run configurations dropdown in IntelliJ IDEA and clicking the run button. - Fix problems until all tests pass.
- Commit and push your work to your repository.
- Verify on Gitlab that your submission uploaded successfully by adding the comment
test hw4to any commit. You will receive an email of the SpecChecker results.
A passing SpecChecker does not guarantee you credit. Your grade is conditioned on a few things:
- You must meet the requirements described above. The SpecChecker checks some of them, but not all.
- You must not plagiarize. Write your own code. Talk about code with your classmates. Ask questions of your instructor or TA. Do not look at others’ code. Do not ask questions specific to your homework anywhere online but Piazza. Your instructor employs a vast repertoire of tools to sniff out academic dishonesty, including: drones, CS 1 moles, and a piece of software called MOSS that rigorously compares your code to every other submission. You don’t want to live in a world serviced by those who achieved their credentials by questionable means. For your future self, career, and family, do your own work.
- Your code must be submitted correctly and on time. Machine and project issues are common—anticipate them. Commit early and often to Git. Extensions will not be granted. If you need more time to make things work, start earlier.