Fabrication Summer Camp: Day 1
Welcome to summer camp! My name is Chris. Scattered throughout the room are some of my friends that you will meet soon. For the next week, all of us will be making things with technology. The tools we’ll be using to make things include computers, a vinyl cutter, a laser cutter, and a pen plotter. We provide these tools for you to use, but there are some tools that we expect you to supply. Each day we need you to bring your brains, of course, but also your eyes and hands. Don’t try to borrow anybody else’s. They won’t fit you. We’ve tried to design this camp so that it’s more about you doing things with your brain and body than about listening to us talk.
Frankenshape
Speaking of body parts, let’s get right to our first making exercise. We will make a Frankenshape, a shape that is made out of other shapes. Our exercise will have three stages: drawing a prototype shape, measuring the physical shape’s properties, and programming a digital version of the shape that we can fabricate on one of our tools.
Drawing
Here are the supplies we need:
- pencil
- graph paper
- scissors
- ruler (optional)
- compass (optional)
Notice there’s no computer on the list. In most of our activities, we will start with drawing. Our brain works better if our body is involved. So, here’s the challenge for you and your body:
- Draw an interesting creature or object on your graph paper using only circles and rectangles. Center each circle and rectangle on a grid point. Ensure that the circles and rectangles overlap and that there is only one “island” of shapes. Here’s my design, which may be a bat:
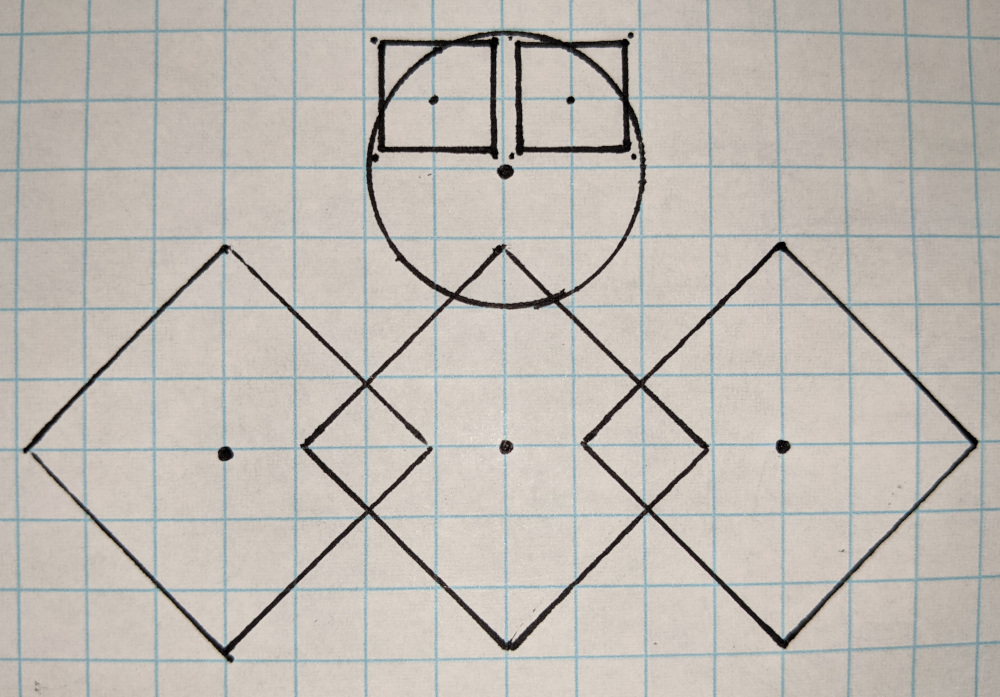
- Count how many circles and rectangles you have. My bat has five squares and one circle.
- Cut out your shape along only the outer edge.
Once that is done, we’ll get to know each other and our designs with this challenge:
- Flip over your shape so that it lies flat on the table and no pencil marks are visible. Only the design’s silhouette is visible.
- Find someone else in the room, learn their name, and invite them to your table.
- Ask them what they think your object is.
- Ask them how many circles and rectangles they see.
- Do this again with someone different.
Measuring
In a moment you will turn your design into a computer program. The program will produce a file that we can feed into the pen plotter or the vinyl cutter. Before that can happen, we need to figure out some numbers. In particular, we need this information:
- The XY-coordinates of each shape’s center.
- The radius of each circle.
- The width and height of each rectangle.
- The rotation of each rectangle.
To determine the xy-coordinates of each shape, first designate some point on the grid to be the origin, the location (0, 0). I choose my bat’s “belly button” to be the origin. The coordinates of each shape’s centers are then measurements of how far away they are from the origin:
Here’s my bat with its coordinates and sizes marked:
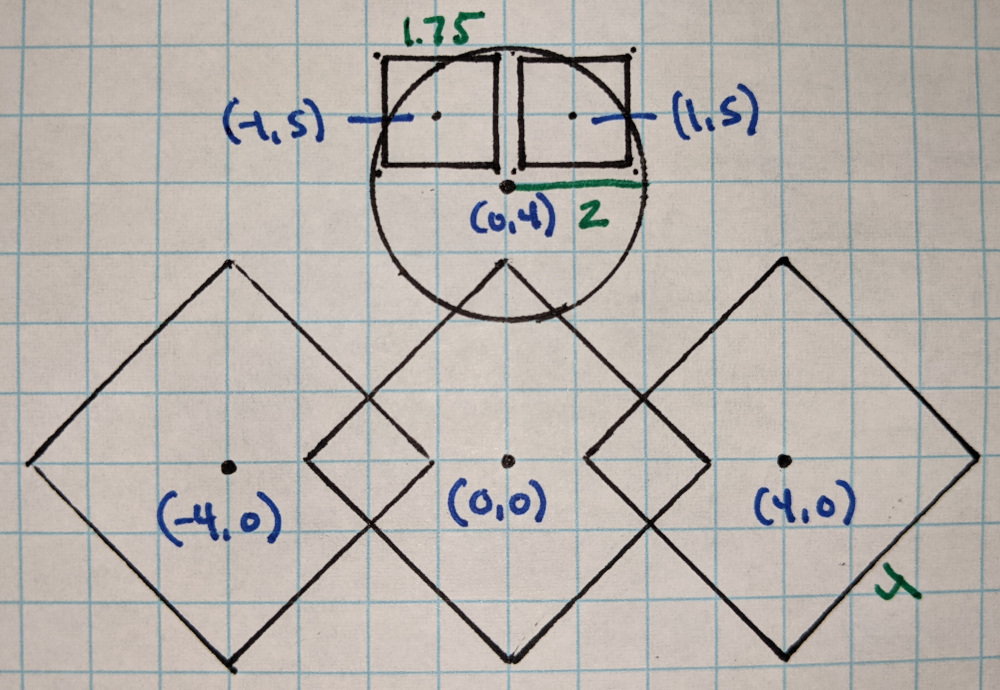
The rotations are not marked. The three squares are each rotated 45 degrees.
Programming
With your measurements identified, you are now ready to use the computer. Open a web browser and direct yourself to Twoville. In the editor, place one of your black circles by writing code like this:
Don’t use my numbers. Use your numbers. Notice the indentation. Notice the punctuation. These typographical details matter. We call the symbols [ and ] square brackets.
To plot a second circle, we use a second circle block:
Plot a rectangle with code like this:
Notice that rectangles have a size property similar to the circle’s radius property. Unlike radius, the size property must be set to a list of two numbers. If your rectangle is rotated, add a rotate block:
Putting all these ideas together, here is my bat:
When I run this, the bat shows up very small in the bottom-left corner. That’s because Twoville looks at the scene through a window whose bottom-left corner is at (0, 0) and whose dimensions are (100, 100). This window is only the default. We can alter it by setting properties of the view object:
We can even turn on a grid to help us identify locations:
After you get your shape made, we will fabricate it. You’ll submit your shape to me, I will load it into a vinyl cutter, and out will come a vinyl sticker.
Camera
Circles and rectangles are indispensible tools to have around, but they aren’t enough to make all the interesting designs out there. Let’s explore another design that requires a new kind of shape. Check out this movie camera:

Draw your own version of this camera on your graph paper. Put the corners and centers at intersections as much as possible.
What shapes did you use to make this design? I used two circles, one rectangle, and one trapezoid. I could have used a triangle instead of trapezoid. The general name for a shape with corners or vertices is a polygon. Rectangles are polygons, as are triangles, trapezoids, stars, and lightning bolts.
Measure the camera, identifying the sizes and the xy-coordinates of the vertices.
Program the camera in Twoville. For your new shape, use the polygon command, as demonstrated in this program that plots an elbow:
Barbell
Making is an iterative process. We try something and then we adjust it until it feels right. It’s not that we are wrong in our first attempts, it’s that we are uninformed. With each iteration, we get more information that inspires us to make further changes or perhaps return to an earlier iteration.
Coding is making and is also an iterative process. We write some code, inspect the output, and adjust the code. Sometimes adjusting the code can become tedious. For example, suppose you want to make this shape:
Later you decide the circles need to be bigger. You change one, but you mustn’t forget to change the other:
Then you decide the structure needs to be a little wider, so you change the x-coordinates of the circles:
Oh, you forgot that you also need to adjust the rectangle:
Right now the numbers are separate. They should be linked so that if we change the size of one circle, the other changes automatically. If we change the location of the right circle, the width of the rectangle changes automatically. We do this by naming the numbers using variables:
To make the height of the bar adjustable, we add another variable:
What happens if tweak the height of the bar?
It’s no longer centered. We need to adjust our corner so that half of the bar is below the x-axis. Instead of using plain numbers and variables, we perform a little math right in the code:
When we think about shapes in terms of a small set of variables, we are doing parametric design. The variables are the parameters that control the shape.
Shape Jam
There are these events where people gather together and spend 48 hours making a game. The participants get little sleep, eat a lot of pizza, and enjoy the community of others. At the end, the participants have a small game to show their friends and family. These events are called game jams.
We are going to have a shape jam. There will be no pizza, it won’t be nearly so long, and you can enjoy the community of others by working with a partner, if you so choose. Your challenge in this shape jam is to use circles, rectangles, polygons, variables, and mathematical expressions to make a parametric design. We will turn fabricate it into a vinyl sticker.
Game jams usually have themes. I don’t want to impose a theme on you. However, I do ask you that you incorporate all the ideas we’ve discussed up till now.
Follow these steps in making your shape:
- Start by drawing on graph paper.
- Get your design inspected by a teacher to make sure it’s something we can fabricate.
- Mark the vertex positions and sizes on the graph paper.
- Code up your shape in Twoville.
You will have about 30 minutes to make your design. Use that time to make something interesting that exercises your creativity and your brain.