Fabrication Summer Camp: Day 2
Welcome to the second day of our summer camp! Today we will explore two big ideas: loops and turtle geometry. Like yesterday, we will be drawing, coding, and making.
Caterpillar
Code is like a caterpillar. It is on its way to being something beautiful that will bring people delight. But it’s trapped in a body that doesn’t seem beautiful. Speaking of caterpillars, let’s design one using the ideas we discussed yesterday. Some caterpillars are sort of bulbous, so let’s string together a sequence of overlapping circles:
Writing this code wears me out. Even worse, if I later decide to change the radius or the color, I’ll have to change many lines. I’m likely to miss one. The cost of making changes discourages experimentation.
A better solution is to use a loop. Programming languages often support several kinds of loops. We’re going to talk about one: the for loop. A for loop walks through a sequence of numbers. For each value in the sequence, it runs its block of code. The value of the sequence is available in a variable. To walk through the numbers from 0 to 10, we write this loop:
This loop allows us to reduce our circle drawing code to something much shorter and less repetitive:
Now it’s much easier to change the color or radius.
If you want to apply a little curvature to the caterpillar and feel comfortable with trigonometric functions, you can alter the y-coordinate of the body segments using the sine function:
The for-to loop that we just saw always starts at 0 and stops when it reaches the upper bound. There’s also the for-in loop which allows you start at a different number. It looks like this:
Notice how 10 is printed. Unlike the for-to, the upper bound is included in the range of numbers that the loop walks through.
Tower
Now it’s your turn to make something. First draw this stack of rectangles on your graph paper:

Label the centers and the sizes of the rectangles.
Then write a Twoville program with a loop that plots them.
Turtle Geometry
So far, we’ve been thinking of space as a grid that we are flying over. We look down and see imaginary streets that intersect. To identify a location, we name its vertical street and its horizontal street.
This isn’t how you think about space when you are physically in the space instead of flying overhead. When you are on a bike or in a car, you think about moving forward and turning. This first-person perspective is sometimes called turtle geometry. Let’s try making a shape with turtle geometry instead of “bird geometry.”
In a moment, you are going to trace out the letter of someone’s name. To prepare you for that task, let’s pretend this shape is a letter:

In fact, this shape is a letter in Russian. It makes a P sound.
We’ll plot this letter with turtle geometry using a polyline, which is like a polygon but is not filled in. It starts off like this, with an additional weight property to control the line thickness:
With bird geometry, we used vertex.position to add each corner. With turtle geometry, we start by initially positioning the turtle. It has both a position and a direction or heading. The heading is an angle. A heading of 0 starts the turtle facing to the right. A heading of 90 starts the turtle facing up. Let’s start it facing up and sitting in the bottom-right corner:
We move the turtle forward with the walk command, which expects a distance property:
We turn the turtle with the turn command, which expects a degrees property. To turn left at a right angle, we turn 90 degrees:
Fast-forwarding a bit, we arrive at the inner perimeter:
Our distances change and we must also make turns to the right, which use a negative number of degrees:
The last leg is not closed. We could walk to close it off, or we could just switch to a polygon:
Letter
Now it’s time for you to make something of your own. Think of someone you care about. That could be a family member, a friend, or yourself. What is the first letter of that person’s name? If that person’s letter has holes in it, as we see in A, B, D, O, P, Q, and R, think of someone else, or think of a different name to represent that person. Later we’ll see how to add holes to shapes, but not yet.
Once you have a letter, follow these steps:
- Draw it on your graph paper in a block style. The letters must have thickness; they can’t just be lines.
- Identity the corner at which you want the turtle to start. Label its position and heading.
- For each edge, label its length.
- For each corner, measure how much the turtle turns from its current direction to align with the new edge.
- Turn your drawing into a Twoville program.
Ask lots of questions. When you’ve finished, we’ll fabricate your letter into a vinyl sticker that you can give to the person you have in mind.
Starfish
We’ve examined loops. We’ve examined turtle geometry. If we put these two ideas together, we can make some interesting and beautiful shapes, like a starfish maybe. As a first step, let’s model a pentagon. From the turtle’s perspective it moves forward, turns some degrees, moves forward, turns some degrees, and so on. It does this five times total. How many degrees does it turn at each bend? In total, it turns a complete circuit of 360 degrees. It has five steps to do it in, so each step is 360 / 5 = 72 degrees.
That leads to this program:
How would the program change in order to make a hexagon? We’d have six steps of 60 degrees each. A triangle? Three steps of 120 degrees each. A polygon with $n$ vertices? We’d have $n$ steps of $\frac{360}{n}$ degrees. Consider this parametric version of the same program:
Starfish generally have five arms, but some have 40 or 50. Probably we don’t need to think parametrically right now. Five is good. Here’s my preliminary sketch of the turtle walking along the edge of the starfish:
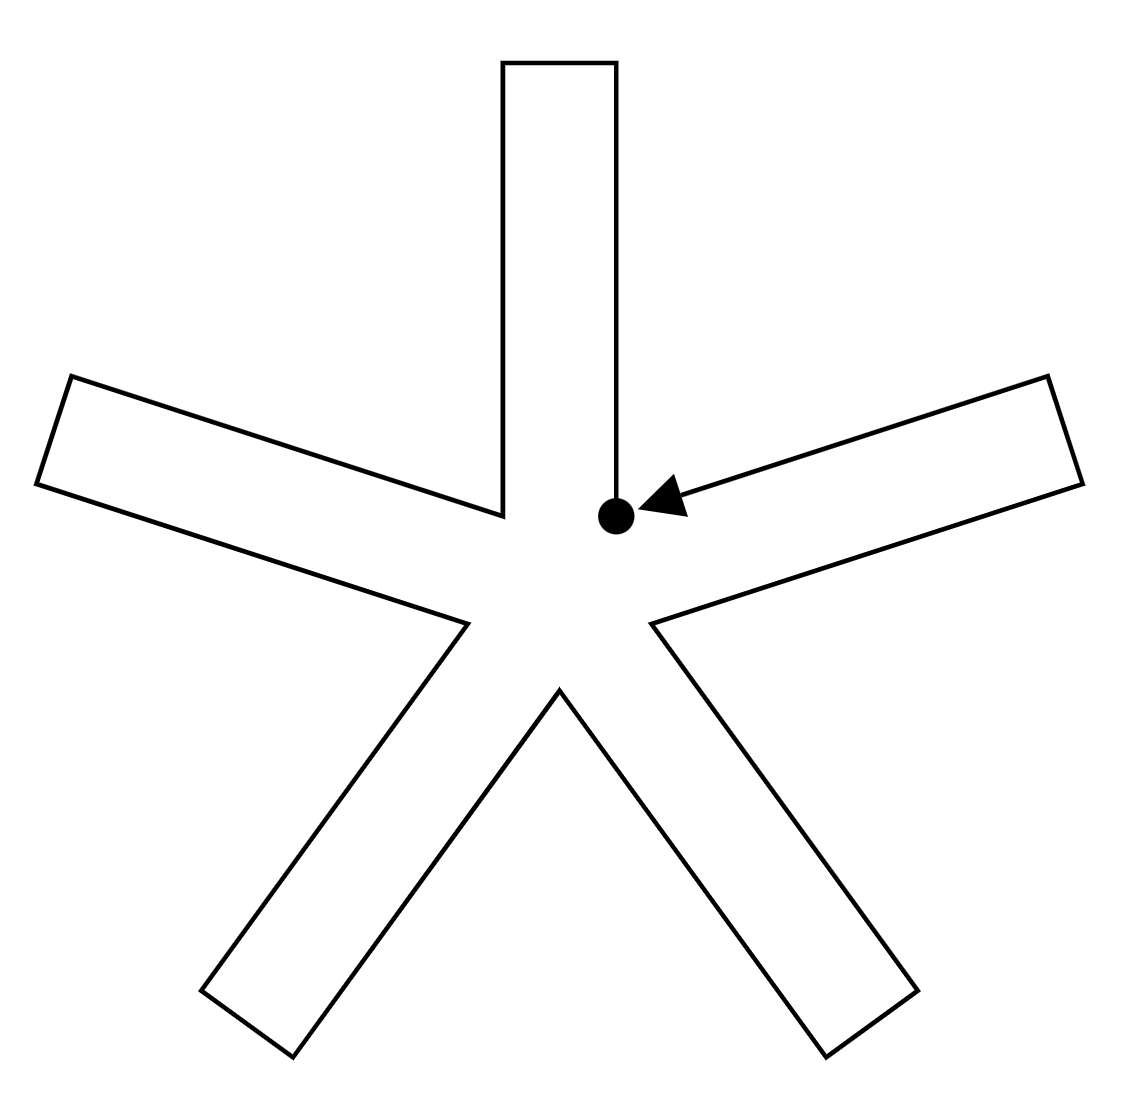
In my program, I’m going to start the turtle off at the bottom-right of the top arm, pointing upward:
Then I trace out the arm, which is currently very boxy:
To get five of these arms, I put this code in a for-to loop. But first I need to turn at the armpit. This is a right turn, so the number of degrees will be negative. The angle is bigger than a right angle, so the number will be greater than 90. Through either experimentation or math, we’ll find that number that we need is -108. Here’s our completed, repeated path:
The final step is to fill the starfish in. We could switch polyline to polygon, but the arms would be blocky. If we switch to an ungon, then we’ll get rounded corners on the arms:
Shape Jam
Just like yesterday, we are going to have a shape jam. Your “theme” for today is to use turtle geometry and loops. Follow these steps in making your shape:
- Start by drawing on graph paper.
- Get your design inspected by a teacher to make sure it’s something we can fabricate.
- Mark the turtle’s starting position and heading, the distances of each walk, and the degrees of each turn.
- Code up your shape in Twoville.
You will have about 30 minutes to make your design. Use that time to make something interesting that exercises your creativity and your brain. We’ll turn your creation into a vinyl sticker.