Cylinder
This post is part of a course on geometric modeling at the Summer Liberal Arts Institute for Computer Science held at Carleton College in 2021.
You are on a roll. Literally. Your next shape is a cylinder, and the word cylinder comes from the Greek noun kulindros, which means roller. A cylinder is a bit like a cone in that it’s round. However, it has two caps, and it doesn’t taper. Interestingly, the code to produce a cylinder will have a very similar structure to the code that you wrote to produce a grid.
Draw
Before you go anywhere near code, first draw on paper a cylinder made of triangles. What decisions do you find yourself having to make as you draw? Those decisions are likely to suggest the parameters your function will need.
Function
Write a function named generateCylinder. Have it accept these parameters:
- An integer
nlongitudesthat specifies the number of lines of longitude that the cylinder has. The higher the number, the more circular it will be. - The
radiusof the cylinder. - The
heightof the cylinder. We’ll assume that the cylinder is standing up along the y-axis.
Create an empty positions and triangle arrays and return them in an object.
Seed Positions
Unlike the other shapes you have, the cylinder has rotational symmetry. We will exploit this fact. Instead of trying to walk across the surface with for loops, we will traverse just a cross section of the cylinder. The vertices on this cross section are what we’ll call the seed positions. They are called seeds because later on we will use them to grow the complete vertex positions array.
Follow these steps to generate your seed positions:
- Create an empty array named
seeds. - If you were to cut the cylinder along its rotational axis, you would see this cross section:
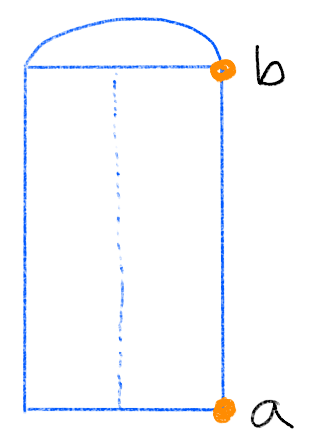 Only the marked points are the ones that need to be rotated to produce the cylinder. These are the seed positions. What are their coordinates in terms of the parameters passed to the function?
 - Add these two seed points to your array. With the
positionsarray, all the coordinates have been expressed in a flat list. For the seeds, we are going to rotate the points, which will be easier if you bundle each coordinate triplet up in aVector3object. Make your seeds array look something like this:const seeds = [ new THREE.Vector3(ax, ay, az), new THREE.Vector3(bx, by, bz), ];
Test that your seed points appear along this outer right wall by rendering as points and changing your return statement to this:
return {positions: seeds.flatMap(seed => seed.toArray()), triangles};
If that worked, great! If not, let’s talk.
Vertex Positions
The next task is to rotate the seed points all around the cylinder to form the lines of longitude. Follow these steps to produce the full array of vertex positions:
- Add a loop that visits each longitude index.
- Inside the loop, calculate the longitude’s angle around the cylinder in radians by range-mapping the longitude index to $[0, 2\pi]$.
- Create a matrix that rotates a position around the y-axis by the longitude’s angle with code like this:
const matrix = new THREE.Matrix4().makeRotationY(radians);
- Clone and multiply the seed with code like this: Adapt the names of variables accordingly. The call to
const rotatedPosition = seed.clone().applyMatrix4(matrix);
clonemakes an independent copy of the seed position. If you don’t make an independent copy, you will rotate the original seed point, which would interfere with subsequent lines of longitude. TheapplyMatrix4method performs a matrix-vector multiplication. Most movement in computer graphics is accomplished by multiplying matrices and vectors. - Push the rotated position into your positions array with code like this:
positions.push(rotatedPosition.x, rotatedPosition.y, rotatedPosition.z);
- After the loops are all finished, push the coordinates of the south and north poles of the cylinder into the array. What will their indices be?
- Restore the return statement to
return {positions, triangles}.
When you render as points, you should see the entire cylinder wall covered in dots.
Side Triangles
Good news. The triangles on the sides of the cylinder and are connected together in the same way as the grid. Start by copying the code for generating the grid’s triangles into this function.
The grid code depends on a variable named nlatitudes. This was passed as a parameter to generateGrid. With a cylinder, this value shouldn’t come in as a parameter, as there are exactly two lines of latitude, always. To make the grid code work in generateCylinder, add a const variable named nlatitudes.
Render the cylinder as a solid mesh. What do you notice?
You should find one wedge of the cylinder missing. This is where the cylinder’s topology is different than the grid’s. We want the final line of longitude to connect back up with the first line of longitude. To make this happen, extend your longitude loop to visit each possible longitude index. When calculating the next line of longitude inside the loop, use wrapped addition.
Cap Triangles
Add triangles to seal off the caps. The triangle-generating code from generateCircle or generateCone can be reused here, but the indices are a little different there are two vertices at each stop along the circular perimeter.
Consider this cylinder with 10 lines of longitude:
The vertices on the bottom cap have indices that are even. We can visit them by visiting each longitude and doubling the index. The vertices on the edge connect up with the bottom cap’s center, whose index is 2 * nlongitudes. These triangles are formed with pseudocode like this:
for each longitude index ilongitude
  iNextLongitude = wrapped increment of i
  add triangle with indices 2 * ilongitude, 2 * iNextLongitude, 2 * nlongitudes
The vertices on the top cap have indices that are odd. They connect up with the top cap’s center, whose index is 2 * nlongitudes + 1. These triangles are formed with pseudocode like this:
for each longitude index ilongitude
  iNextLongitude = wrapped increment of i
  add triangles with indices 2 * ilongitude + 1, 2 * nlongitudes + 1, 2 * iNextLongitude + 1