CS 318 Lab 4 – Structure, Anchors, and Validation
Dear students,
Let’s start with a game we’ll call either Like I’m 5 or 85. You’ll randomly draw an HTML element and explain it’s purpose to us as if we were 5 or 85 years old. You pick the age.
Another thing that we will do from time to time is share your work up front. Usually it will be because there’s something funny going on in your solution. I thank you for providing these talking points. You are not a failure; you are helping us learn. Here’s what I saw in your work from last week:
We will inspect these with our eyes, but we’ll also use the W3C Validator to formally check that we’re conforming to the HTML5 syntax.
Today we will branch out from our 1-page sites. To connect our pages to other pages, we will make extensive use of the anchor element, whose tag is a. Its href attribute contains a URL to another page, much like img‘s src attribute contains a URL to an image. Consider this example:
There's no place like <a href="http://www.nullisland.com">Null Island</a>.
Many types of content can be links. Like images:
<a href="http://www.nullisland.com/">
<img src="http://www.nullisland.com/Images/Flag.png">
</a>
These examples use absolute URLs. These URLs point to very specific websites. They fully specify the domain. When we want to link to files and images that are in the same folder as our page, we don’t need to be so specific. We can use a relative URL:
<a href="otherpage.html"><img src="arrow.png"></a>
The advantage of using relative URLs for our local files is that our webpage can be moved around to different domains without having to update the paths.
Let’s get started making a multi-page site!
Here’s your TODO list for next time:
- Read chapter 3.
- Read the semester project guidelines.
- On a quarter sheet, share any questions or observations you have about the reading or project. Also share some ideas of potential clients.

Lab
We have a few goals for today’s lab:
- Create a multi-page web site with image.
- Use anchor elements to navigate between pages.
- Use the structuring elements
header,nav,main, andfooter.
Your task is to create a website for a fictitious band, of which you and your partner are the founding members.
Partners
Create a lab04 directory in your project. In file partners.html, provide your names in a format of your choosing.
Index
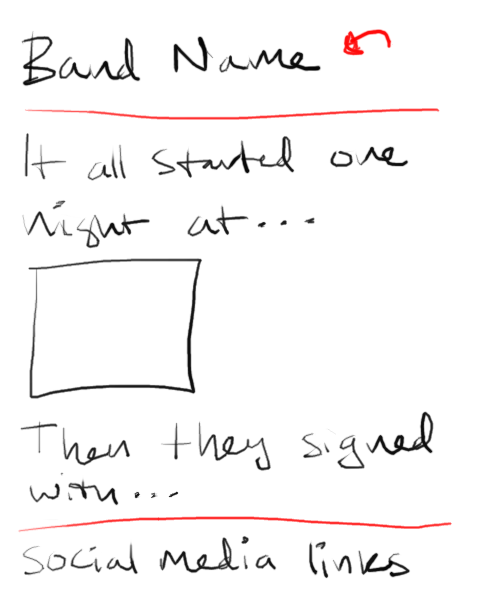
Start with the index (or front) page of your band’s site in file index.html. Follow this mockup:

Do not reproduce the red annotations. They are used to mark off sections and show text that is to link elsewhere.
Organize your page using header, nav, main, and footer elements. These won’t alter your view of the web page, but they are clues to screen readers and other tools that try to understand your page. These tools are concerned less about visual presentation and more with the semantic meaning of your content.
Create an image with a wide aspect ratio using an image editor of your choice. We want the experience of owning our content; do not use an existing image.
Make bio, tour, and music links using the a tag. Have them link to files bio.html, tour.html, and music.html, respectively. These files will be placed in the same directory as index.html in the succeeding steps.
In the footer, add links to at least two accounts/pages on different social networks. Use images rather than text. Images can usually be acquired directly from the network (like Twitter or Facebook), but they may require some editing. Save copies of these images in your lab04 directory and reference them using short relative URLs.
Bio
Now create the biography page in bio.html according to this mockup:
Create another image to break up some paragraphs of text. Random text is sufficient.
Have the overall heading link back to index.html.
Tour
List upcoming tour dates in tour.html according to this mockup:
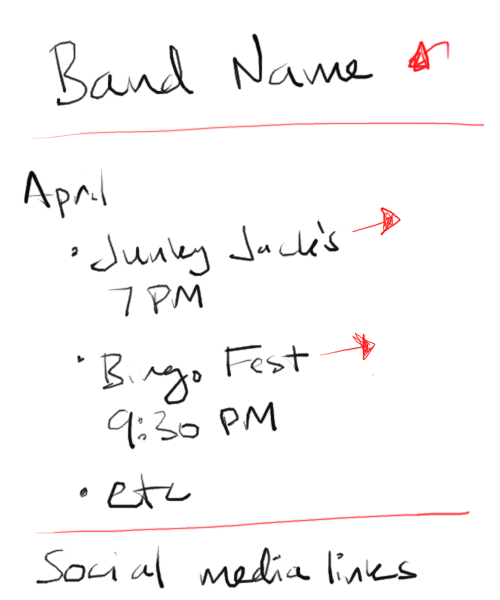
Include the important details about the shows, including at least the venue and time. Do not use p tags. Link the venue name to some real venue’s page, but force the page open in a new tab or window using an attribute of a. Consult MDN to figure out how to do that.
Include at least three months of shows.
Have the overall heading link back to index.html.
Music
List your bands albums according to this mockup:
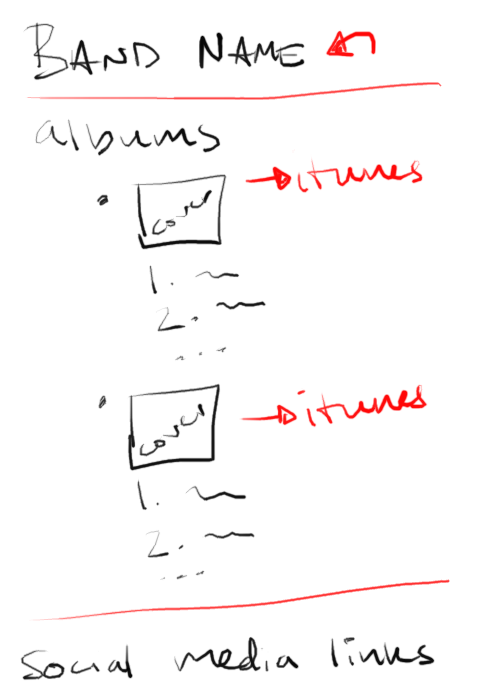
Create cover art for each album, and list the tracks. Make sure each album’s content is entirely contained in an li element of the outer list.
Have the overall heading link back to index.html.
Publish
Now, open GitHub Desktop and select your cs318 project. You should see a list of changes. Commit them and synchronize. Verify that all pages have been uploaded by visiting https://USERNAME.github.io/cs318/lab04 in your browser. Note that when you request a directory (lab04 in this case) and not an HTML page directly, the webserver will automatically assume you wanted the index.html within that directory and retrieve it.
Validate
Now, visit the W3C Validator. Paste in the URLs to your pages, one at a time, and address all concerns raised by the validator. Fix your changes on the local machine, commit, and sync, until the validator reports no issues.