CS 318 Lab 17 Cont’d – Dropdowns and Tabviews
Dear students,
Last time we started implementing dropdown menus. We decided to continue that effort today, though I do want to add one extra and related exercised: a tabbed viewer.
Here’s your TODO list:
- Read chapter 10 in your book.
- Complete the Codecademy exercise on forms. It is woefully incomplete and it uses single quotes around attributes, but it’s something.
- On a quarter sheet, design a form to gather input for some interesting purpose (like for vetting would-be employees, suitors, or babysitters). Make the widget types clear (text, radio, checkbox, slider, etc.).
See you next time!
Sincerely,

Lab
Continue on in your lab17 directory.
Spenditures
Create in spenditures.html (sic) a table displaying a breakdown of the federal budget of the United States. It looks like this:
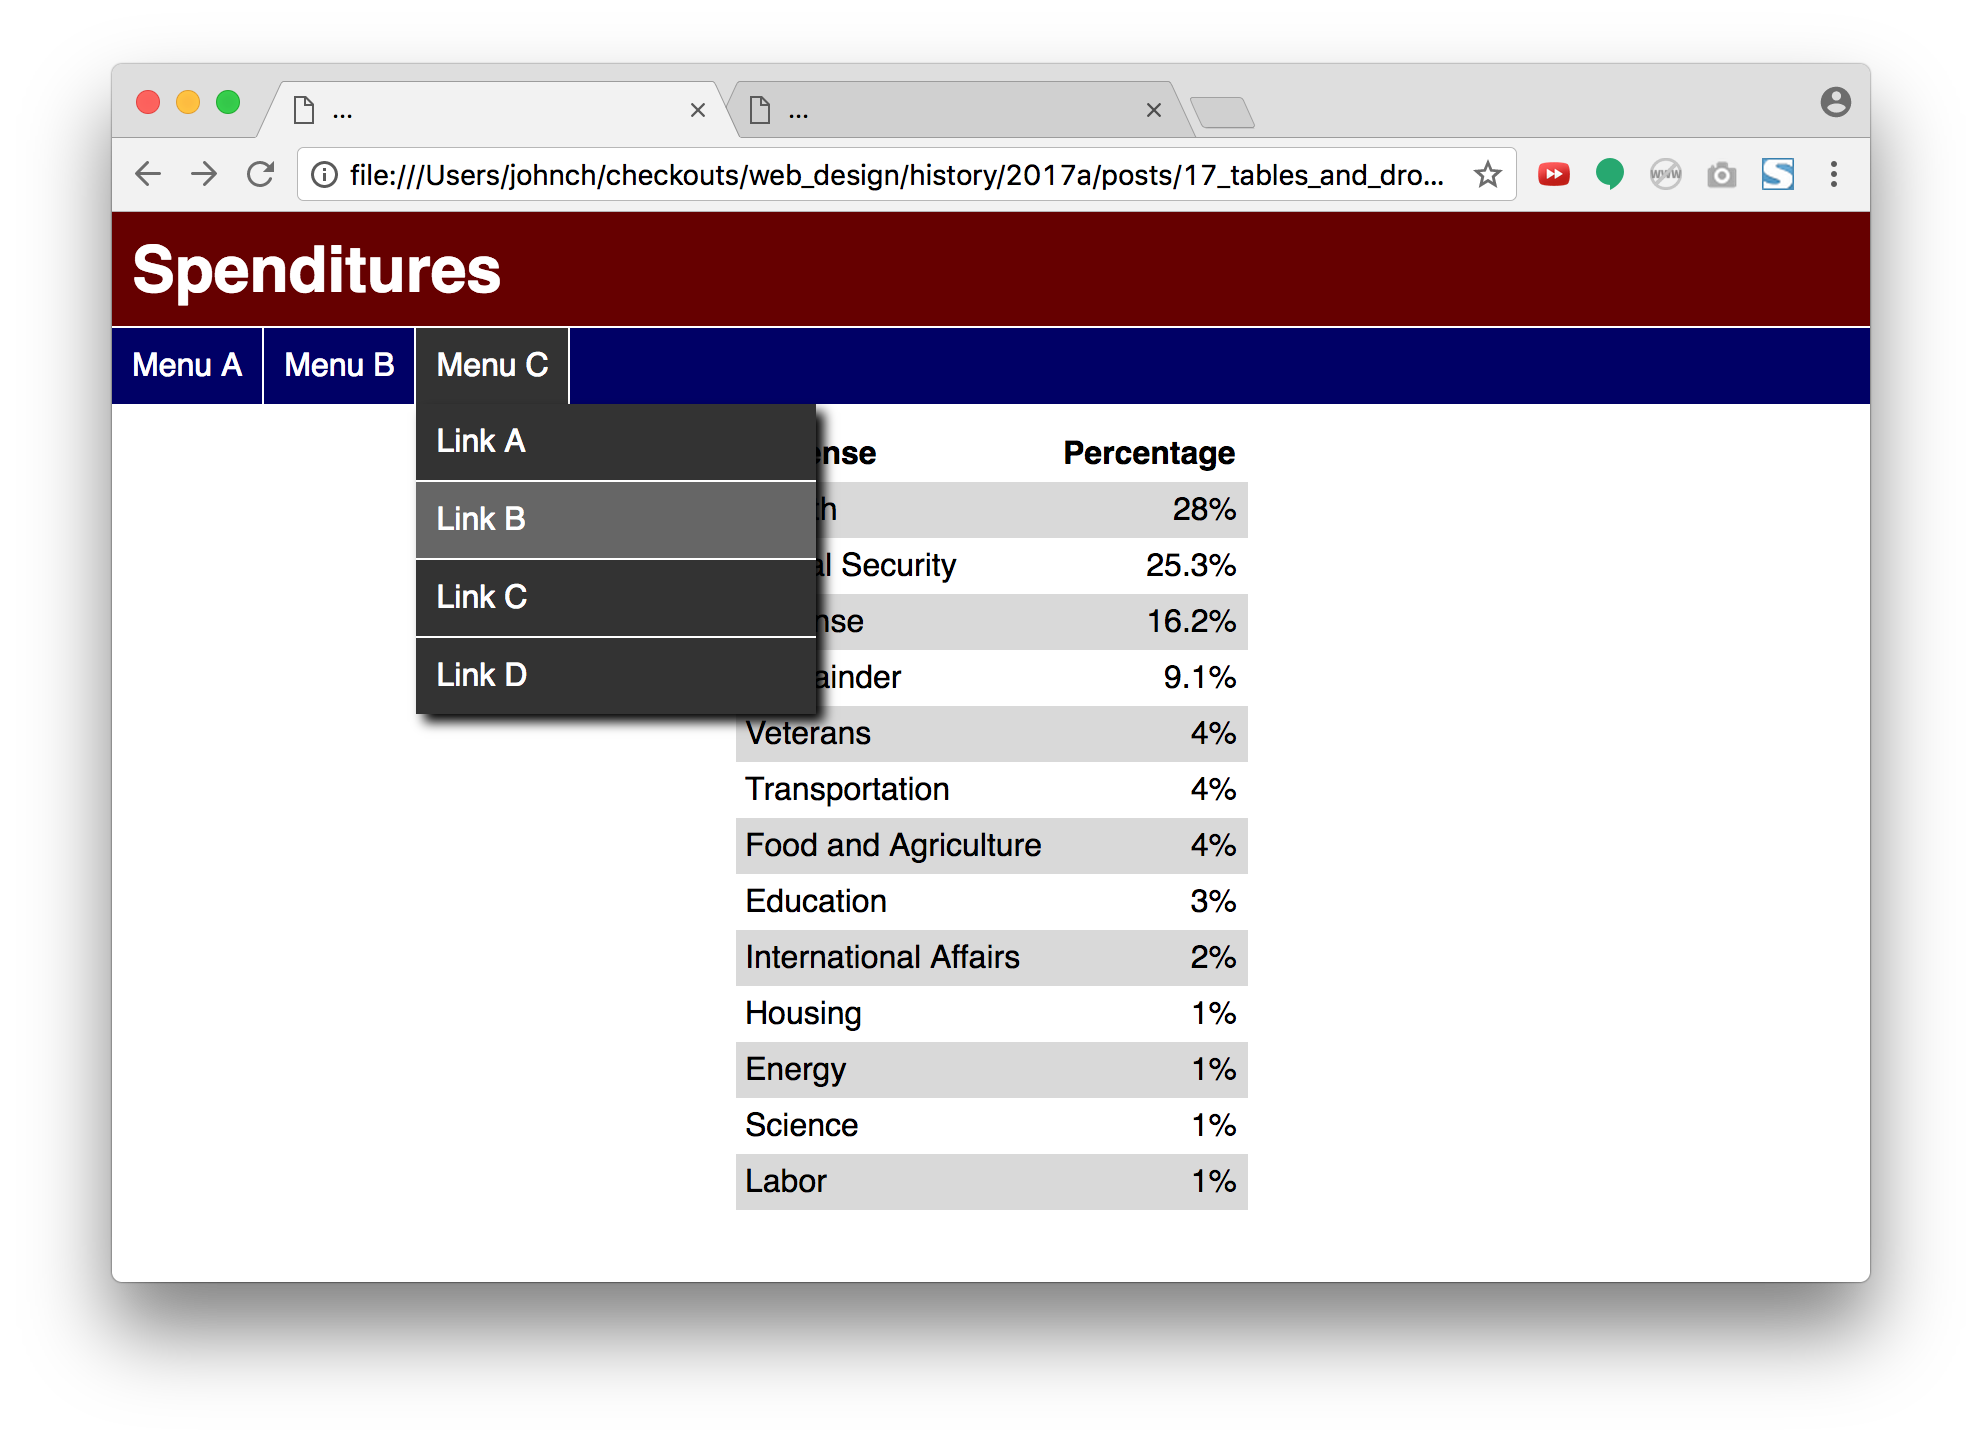
And it interacts with the viewer like this:
- Create a table showing the expenditure breakdown. Here’s the raw data taken from Politifact:
Health 28%
Social Security 25.3%
Defense 16.2%
Remainder 9.1%
Veterans 4%
Transportation 4%
Food and Agriculture 4%
Education 3%
International Affairs 2%
Housing 1%
Energy 1%
Science 1%
Labor 1%
- Style the table as shown in terms of spacing, coloring, and alignment. You should not need to add any classes or IDs to your HTML. Use pseudoclass selectors.
- Apply a sans-serif font to the entire page.
- In
header, place the page’s heading. Match the reference exactly, tweaking margins and padding as necessary. - In
nav, add an unordered list of the top-level menu labels. Put each in thelabelclass. Match the reference exactly. Include a 1-pixel right border above thenavand to the right of each list item. I recommend starting with just one item in the list but growing it after the first item behaves as you intend. - When the viewer hovers over a menu label in
nav, color it gray and change the cursor to a pointer with this CSS property:This will make the menu feel clickable, even though it isn’t a link.cursor: pointer;
- Add a
divto each menu item to hold the actual menu content: an unordered list of anchor elements. - Position each menu below its label with absolute positioning. (Recall that for this to work, the parent list item must be non-statically positioned. Relative positioning is a good alternative.) The menu and its parent should be aligned on their left edges, but for the menu to appear below the label, what must
topbe? You probably don’t know the exact height, but you can always use a percentage… - Color the menu the same gray as the hovered menu label.
- Provide a
box-shadowto the menu to increase the layering effect. Include enough vertical offset that the shadow can’t be seen at the top. We want the label and the menu to feel “attached,” and a visible shadow between them breaks that illusion. - Make the links white and not underlined. Have them link to a site of your choosing. Display them as
blocks so that the whole rectangular “button” is clickable—not just the text. - Place a 1-pixel white border below each link, save for the last. Again, don’t use a special class or ID for this. Use a pseudoclass selector.
- When an menu item is hovered, highlight it in a lighter gray.
- Have the menus not display initially. Use the
displayproperty. - When the menu item is hovered over, display its corresponding menu as a
block. This is most easily done by using a descendant selector:This rule applies to menus whose parent label is hovered over..label:hover .menu { ... }
- Add a few more menus to
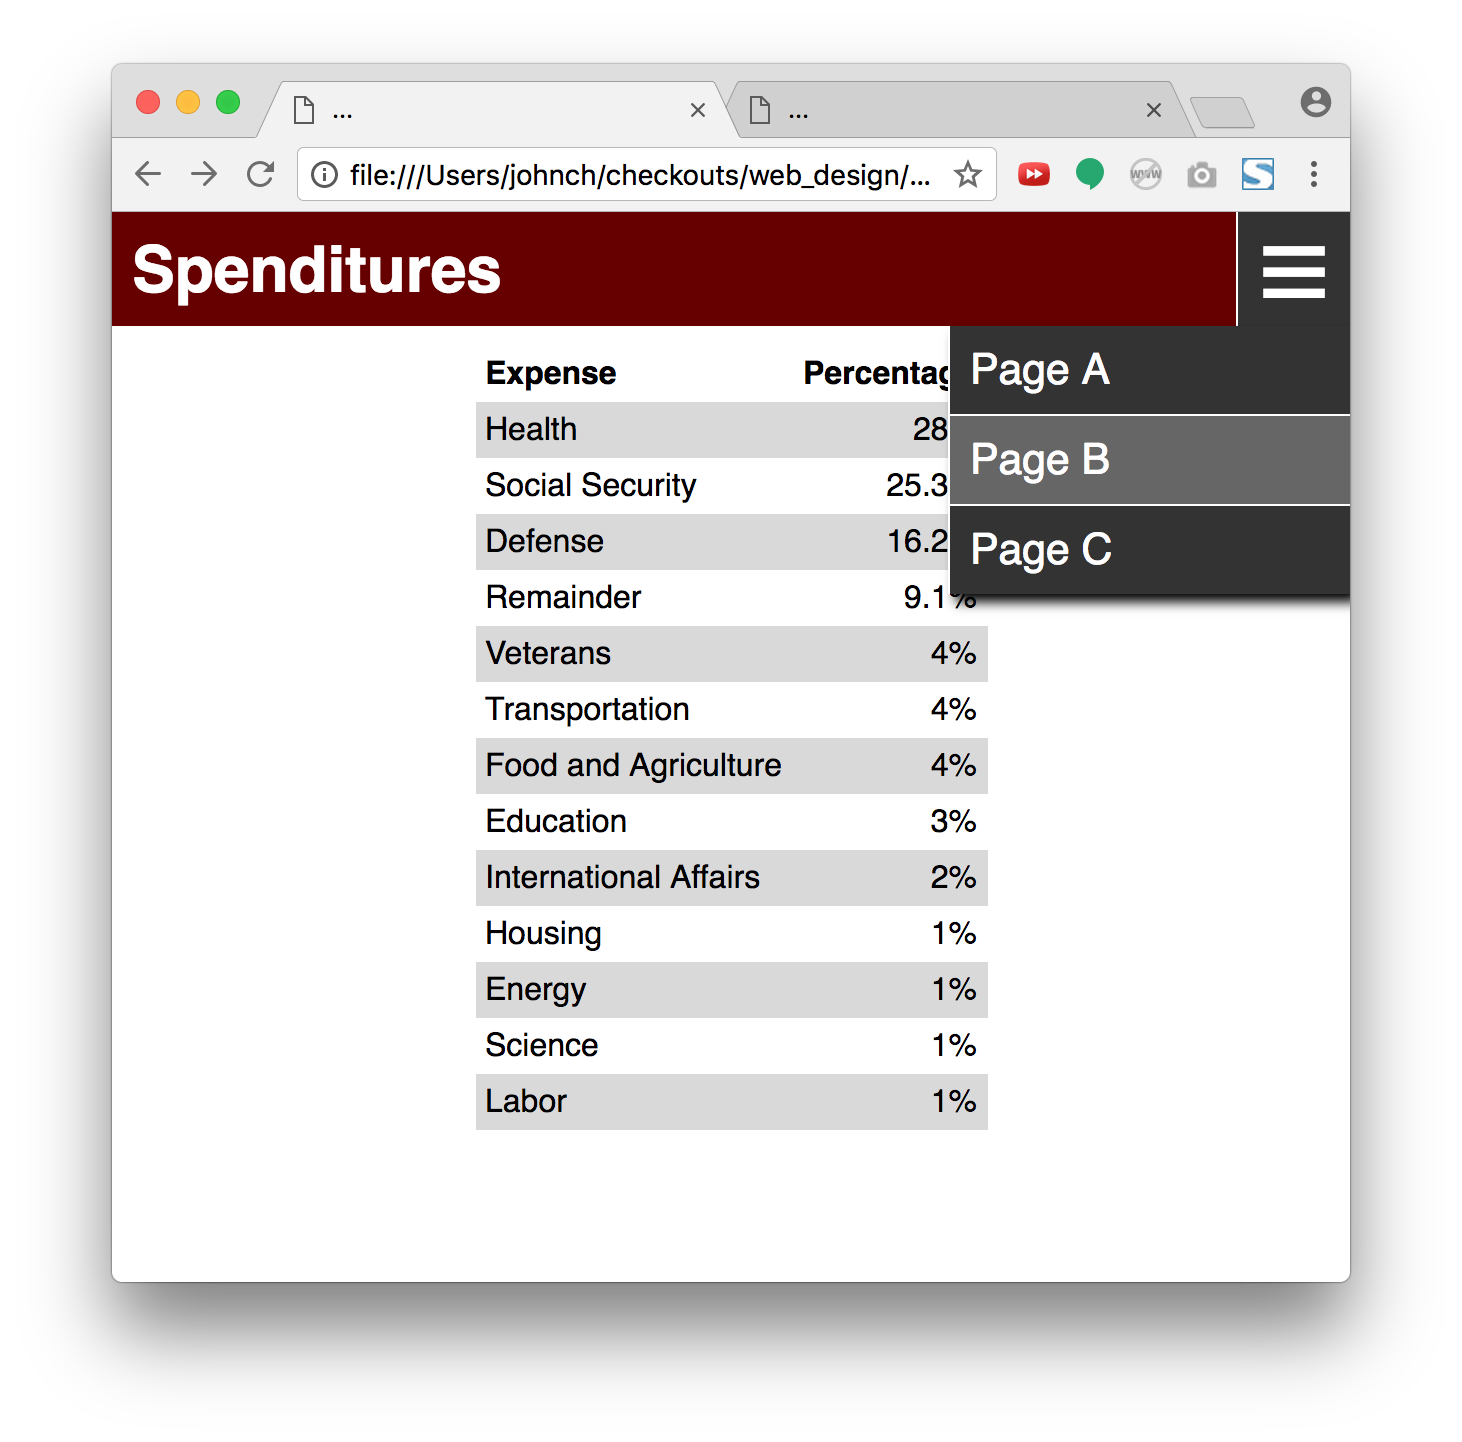
navand make sure your solution scales. You should haven’t to provide any new CSS rules. Create menus of different lengths. - Add a media query for when the page goes below a certain width (say 40em).
- Hide the
navelement altogether in your media query. - Add to
headeran absolutely positioneddivcontaining just the text☰—which is the HTML entity for a menu-ish icon. We will show through this button a popup menu instead of a navigation bar on small screens. Pin thedivto the top, right, and bottom of its parentheader. - Give the
diva 1-pixel white border on its left. - Increase the font-size of the
div. - Give the
divthelabelclass. - Just as you did with the
navmenus, add to thediva menu containing an unordered list of anchor elements. Does your menu appear? It didn’t for me. The menu is absolutely positioned below its label thanks to thetopattribute. The menu icon is absolutely positioned too, and you probably set itsbottomattribute to 0. That gets inherited by the menu and makes it 0 pixels tall. Fix this by settingbottomtoautoin the menu. - Hide the icon
divby default, but make it visible when the media query takes effect. You should see only one of thenavand the icon at a time.
Tabbed Viewer
Create a second page named tabs.html and an accompanying stylesheet named tabs.css. Your goal is to create a page that allows the viewer to switch between views within a single web page. Something like this:
I suggest tackling this exercise in this order:
- Create a
divwith an ID oftabparent. - Create within
tabparentthreedivs of classtabbutton. Give each a unique ID. Give as content the labels of the buttons. - Style the tab buttons as inline blocks (so they line up horizontally) and with a light background color, a fixed width and height, and rounded top corners. You know, like tabs.
- Switch the tab buttons’ cursor to
pointer. - Add a
focusrule for these buttons so that their background color becomes darker. Thefocuspseudo-selector is much likehover, but focus can “stick.” It is activated when the viewer clicks on an item. This is important for us, because we want a tab to be selectable and to stay selected even after the mouse moves on. - You’ll find that your
focusrule doesn’t have any effect. That’s becausedivs aren’t naturally focusable. In the HTML, add atabindexattribute of 0 to each of your tab buttons.tabindexrefers to the actual Tab key on your keyboard, not the tabbed view that we are trying to create. Pressing the Tab key cycles through the focusable elements in the page, and by giving yourdivs atabindex, they become focusable. After this, you should be able to see your focused tab button show prominently against its neighbors. - Disable the outline that appears around your tab button by setting a tab button’s
outlineproperty tonone. - Add another
divtotabparentfor the default view. Give it the IDtabview0and classtabview. Givetabview0the muted background color that you used for non-focused tab buttons. Give it no content. - Add three more
divs totabparentfor the views that will correspond to your three tab buttons. Give them unique IDs but put them all in the classtabview. Give them some identifiable content so that you can test your work. - Style
tabviews to appear below the tab buttons. This is most easily done with absolute positioning. First, givetabparentrelative positioning so it can serve as the anchor point. Then give eachtabviewabsolute positioning. Anchor each tab view’s left edge against its anchor’s left edge. Offset them from the top of their anchor by the height of the tab buttons. You should see them all stack on top of each other below the buttons. - Color all
tabviews by the darker selected color. (tabview0overrides this to the lighter color.) - Probably your tab views are filling the whole page. Make
tabparentdisplay as aninline-blockso it automatically sizes itself around its children and doesn’t greedily eat up the browser window. Alternatively, one could leave it asblockand just explicitly set the width. - Hide all the
tabviews. - Override
tabview0so that it always displays as ablockelement. - Override each of your other tab views so that they display as a
blockelement only when their corresponding button is focused. We can use the sibling selector to achieve this:When the button’s not focused, the general#tabbutton3:focus ~ #tabview3 { ... }
tabviewrule takes effect and hide that tab’s content. Unfortunately, no comprehensive rule can be written to apply to all three views at once. You will need three separate rules. - Give yourself a high five.